433 On A Stick

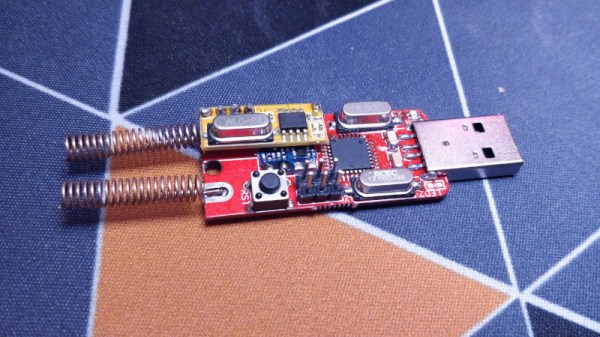
Cheap 433 MHz wireless switches are a tempting way to enter the world of home automation, but without dedicated hardware, they can be less easy to control from a PC. That’s the position [TheStaticTurtle] was in, so the solution was obvious. Build a USB 433 MHz transceiver.

At the computer end is a CH340 USB-to-serial chip and the familiar ATmega328 making this a compact copy of the Arduino. At the RF end are a pair of modules for transmit and receive, unexpectedly with separate antennas. This device is a second revision, after initial experiments with a single antenna connector and an RF switch proved not to work. On the software side the Arduino uses the rc-switch library, while on the PC side there’s a Python library to make sense of it all. The code and hardware files are all on GitHub, should you wish to experiment.

The problem of making a single antenna transceiver is not for the faint-hearted RF engineer, as while diode switches seem on paper to deliver the goods, they can be extremely difficult to get right and preserve linearity. We’re curious that a transceiver module wasn’t used instead, but we’re guessing that cost played a significant part in the equation.

Over the years we’ve featured quite a few fascinating 433 MHz projects, like this TP-Link router conversion.

DIY ESP32 Alarm System Leverages 433 MHz Sensors

There’s a huge market for 433 MHz alarm system hardware out there, from PIR motion detectors to door and window sensors. If you want to put them to work, all you need is a receiver, a network-enabled microcontroller, and some code. In his latest video, [Aaron Christophel] shows how easy it can be.

In essence, you connect a common 433 MHz receiver module to an ESP32 or ESP8266 microcontroller, and have it wait until a specific device squawks out. From there, the code on the ESP can fire off using whatever API works for your purposes. In this case [Aaron] is using the Telegram API to send out messages that will pop up with a notification on his phone when a door or window is opened. But you could just as easily use something like MQTT, or if you want to go old-school, have it toggle a relay hooked up to a loud siren.

Even if you aren’t looking to make your own makeshift alarm system, the code and video after the break are a great example to follow if you want to get started with 433 MHz hardware. Specifically, [Aaron] walks the viewer through the process of scanning for new 433 MHz devices and adding their unique IDs to the list the code will listen out for. If you ever wondered how quickly you could get up and running with this stuff, now you’ve got your answer.

In the past we’ve seen the Raspberry Pi fill in as an RF to WiFi gateway for these type of sensors, as well as projects that pulled them all together into a complete home automation system on the cheap.

Continue reading “DIY ESP32 Alarm System Leverages 433 MHz Sensors”

HoloLens Brings Video Game Kart Racing To Life

There aren’t a lot of video game experiences we can easily recreate in the physical realm. You’ll quickly find that jumping on mushrooms in the real world doesn’t have nearly the same appeal as it does in Super Mario, and we won’t even get into the dangers of trying to recreate Frogger on your local multi-lane. But video game style go-kart racing? We have all the technology to pull that off, somebody just has to put all the pieces together.

Which is precisely what [Ian Charnas] is trying to do with his latest project. Using Microsoft’s HoloLens augmented reality headset, electric go-karts, 433 MHz wireless transceivers, and some Arduinos sprinkled in, he’s created the closest thing to Mario Kart that us flesh and blood mortals are likely to experience anytime soon.

The HoloLens headset worn by each driver overlays the necessary graphical elements like pickups and weapon effects, as well as puts over-the-top cartoon heads on the other racers. But of course, that’s only half of the story. Seeing the pickups and gadgets doesn’t do you any good if they don’t have any effect on the actual race.

To that end, [Ian] has come up with a way to control the performance of the go-karts using an electronic “backpack” that mounts to each kart. So speed boosting pickups actually make the kart go faster, and if a driver gets hit with a weapon fired at them, they get slowed down.

That’s the high-level version, anyway. There’s obviously a lot going on behind the scenes, some of which are detailed on the Hackaday.io page. One of the interesting notes is that the HoloLens needs visual markers to orient itself, which in the video after the break can be seen as black and white posters dotting the walls alongside the track. As the project progresses, [Ian] is hoping that these can be camouflaged in creative ways (such as being made to look like audience members or checkered flags) to make the overall experience more immersive.

According to [Ian], the next step is to find partners who want to help elevate this from a one-off project to something that you might actually see at an amusement park. We wish him luck, if for no other reason than we really want to play the thing ourselves. In the meantime, we’ll have to settle for racing hacked Power Wheels.

Continue reading “HoloLens Brings Video Game Kart Racing To Life”

Alarm System Defeated By $2 Wireless Dongle, Nobody Surprised

It seems a bit unfair to pile on a product that has already been roundly criticized for its security vulnerabilities. But when that product is a device that is ostensibly deployed to keep one’s family and belongings safe, it’s plenty fair. And when that device is an alarm system that can be defeated by a two-dollar wireless remote, it’s practically a responsibility.

The item in question is the SimpliSafe alarm system, a fully wireless, install-it-yourself system available online and from various big-box retailers. We’ve covered the system’s deeply flawed security model before, whereby SDRs can be used to execute a low-effort replay attack. As simple as that exploit is, it looks positively elegant next to [LockPickingLawyer]’s brute-force attack, which uses a $2 RF remote as a jammer for the 433-MHz wireless signal between sensors and the base unit.

With the remote in close proximity to the system, he demonstrates how easy it would be to open a door or window and enter a property guarded by SimpliSafe without leaving a trace. Yes, a little remote probably won’t jam the system from a distance, but a cheap programmable dual-band transceiver like those offered by Baofeng would certainly do the trick. Not being a licensed amateur operator, [LockPickingLawyer] didn’t test this, but we doubt thieves would have the respect for the law that an officer of the court does.

The bottom line with alarm systems is that you get what you pay for, or sadly, significantly less. Hats off to [LockPickingLawyer] for demonstrating this vulnerability, and for his many other lockpicking videos, which are well worth watching.

Continue reading “Alarm System Defeated By $2 Wireless Dongle, Nobody Surprised”

Hackaday Podcast 003: Igloos, Lidar, And The Blinking LED Of RF Hacking

It’s cold outside! So grab a copy of the Hackaday Podcast, and catch up on what you missed this week.

Highlights include a dip into audio processing with sox and FFMPEG, scripting for Gmail, weaving your own carbon fiber tubes, staring into the sharpest color CRT ever, and unlocking the secrets of cheap 433 MHz devices. Plus Elliot talks about his follies in building an igloo while Mike marvels at what’s coming out of passive RFID sensor research.

And what’s that strange noise at the end of the podcast?

Take a look at the links below if you want to follow along, and as always, tell us what you think about this episode in the comments!

Direct download (60 MB or so.)

Continue reading “Hackaday Podcast 003: Igloos, Lidar, And The Blinking LED Of RF Hacking”

Raspberry Pi As 433 MHz To MQTT Gateway

Many low-cost wireless temperature and humidity sensors use a 433 MHz transmitter to send data back to their base stations. This is a great choice for the manufacturer of said devices because it’s simple and the radios are cheap, but it does limit what we as the consumer can do with it a bit. Generally speaking, you won’t be reading data from these sensors on your computer unless you’ve got an SDR device and some experience with GNU Radio and reading the Nexus protocol.

But [Aquaticus] has developed a very comprehensive piece of software that should make integrating these type of sensors into your home automation system much easier, as long as you’ve got a spare Raspberry Pi lying around. Called nexus433, it uses a cheap 433 MHz receiver connected to the Pi’s GPIO pins to receive data from environmental sensors using the popular Nexus communication protocol. A few known compatible sensors are listed in the project documentation, one of which can be had for as little as $5 USD shipped.

In addition to publishing the temperature, humidity, and battery level values from the sensors to MQTT, it even tracks connection quality for each individual sensor and when they go on and offline. To be sure, this is no simple hack. In nexus433, [Aquaticus] has created a mature Linux service with enough flexibility that you shouldn’t have any problems working it into your automation setup, whether it’s Home Assistant or something you’ve put together yourself.

We’ve seen a number of home automation hacks using these ubiquitous 433 MHz radios,  from controlling them with an ESP8266 to hacking a popular TP-LINK router into a low-cost home automation hub.

Speaking The Same Language As A Wireless Thermometer

Temperature is a delicate thing. Our bodies have acclimated to a tight comfort band, so it is no wonder that we want to measure and control it accurately. Plus, heating and cooling are expensive. Measuring a single point in a dwelling may not be enough, especially if there are multiple controlled environments like a terrarium, pet enclosure, food storage, or just the garage in case the car needs to warm up. [Tim Leland] wanted to monitor commercially available sensors in several rooms of his house to track and send alerts.

The sensors of choice in this project are weather resistant and linked in his project page. Instead of connecting them to a black box, they are linked to a Raspberry Pi so your elaborate home automation schemes can commence. [Tim] learned how to speak the thermometer’s language from [Ray] who posted about it a few years ago.

The system worked well, but range from the receiver was only 10 feet. Thanks to some suggestions from his comments section, [Tim] switched the original 433MHz receiver for a superheterodyne version. Now the sensors can be a hundred feet from the hub. The upgraded receiver is also linked on his page.

We’ve delved into thermocouple reading recently, and we’ve featured [Tim Leland] and his 433MHz radios before.