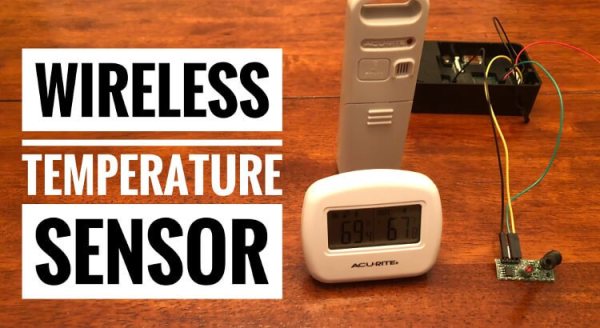
Attack Some Wireless Devices With A Raspberry Pi And An RTL-SDR

If you own one of the ubiquitous RTL-SDR software defined radio receivers derived from a USB digital TV receiver, one of the first things you may have done with it was to snoop on wide frequency bands using the waterfall view present in most SDR software. Since the VHF and UHF bands the RTL covers are sometimes a little devoid of signals, chances are you homed in upon one of the ISM bands as used by plenty of inexpensive wireless devices for all sorts of mundane control tasks. Unless you reside in the depths of the wilderness, ISM band sniffing will show a continuous procession of chirps; short bursts of digital data. It is surprising, the number of radio-controlled devices you weren’t aware were in your surroundings.

Some of these devices, such as car security keys, are protected by rolling encryption schemes to deter would-be attackers. But many of the more harmless devices simply send a command in the open without the barest of encryption. The folks at RTL-SDR.com put up a guide to recording these open data bursts on a Raspberry Pi and playing them back by transmitting them from the Pi itself.

It’s not the most refined of attack because all it does is take the recorded file and retransmit it with the [F5OEO] RPiTX software. But they do demonstrate it in action with a wireless lightbulb, a door bell, a wireless relay, and a remote-controlled switched socket. Since the data in question is transmitted as OOK, or on-off keying, the RPiTX AM mode stands in for the transmitter.

You can see it in action in the video below the break. Now, have you investigated the ISM band chirps in your locality?

Continue reading “Attack Some Wireless Devices With A Raspberry Pi And An RTL-SDR”

Long Range Wireless Internet

While most of you reading this have broadband in your home, there are still vast areas with little access to the Internet. Ham radio operator [emmynet] found himself in just such a situation recently, and needed to get a wireless connection over 1 km from his home. WiFi wouldn’t get the job done, so he turned to a 433 MHz serial link instead. (Alternate link)

[emmynet] used an inexpensive telemetry kit that operates in a frequency that travels long distances much more easily than WiFi can travel. The key here isn’t in the hardware, however, but in the software. He went old-school, implemending peer-to-peer TCP/IP connection using SLIP — serial line Internet protocol. All of the commands to set up the link are available on his project page. With higher gain antennas than came with the telemetry kit, a range much greater than 1 km could be achieved as well.

[Editor’s note: This is how we all got Internet, over phone lines, back in the early Nineties. Also, you kids get off my lawn! But also, seriously, SLIP is a good tool to have in your toolbox, especially for low-power devices where WiFi would burn up your batteries.]

While it didn’t suit [emmynet]’s needs, it is possible to achieve extremely long range with WiFi itself. However this generally requires directional antennas with very high gain and might not be as reliable as a lower-frequency connection. On the other hand, a WiFi link will (in theory) get a greater throughput, so it all depends on what your needs are. Also, be aware that using these frequencies outside of their intended use might require an amateur radio license.

Continue reading “Long Range Wireless Internet”

Radio Decoding Swiss Army Knife In A NES Controller

If you wanted to name a few things that hackers love, you couldn’t go wrong by listing off vintage console controllers, the ESP system-on-chip platform, and pocket tools for signal capture and analysis. Combine all of these, and you get the ESP32Thang.

At its heart, the ESP32Thang is based around a simple concept – take an ESP32, wire up a bunch of interesting sensors and modules, add an LCD, and cram it all in a NES controller which helpfully provides some buttons for input. [Mighty Breadboard] shows off the device’s basic functionality by using an RFM69HW module to allow the recording and replay of simple OOK signals on the 433 MHz band. This is a band typically used by all sorts of unlicenced radio gear – think home IoT devices, wireless doorbells and the like. If you want to debug these systems when you’re out and about, this is the tool for you.

This is a fairly straightforward build at the lower end of complexity, but it gets the job done with style. The next natural step up is a Raspberry Pi with a full software defined radio attached, built into a Nintendo DS. If you build one, be sure to let us know. This project might serve as some inspiration.

With the wide availability of SPI and I2C modules these days, combined with the ease of programming provided by the Arduino environment, this is a project that just about any hacker could tackle after passing the blinking LED stage. The fact that integrating such hardware is so simple these days is truly a testament to the fact that we are standing on the shoulders of giants.

Dumbing Down A Smart Switch

Internet of Everything is the way to go for home automation these days. ITEAD makes an ESP-8266 switch that IoT-ifies your appliances. If you still have an ancient, 433 MHz style radio switch system, they even make one that does WiFi and 433 MHz. But if you’re too cheap to shell out for the dual-mode version, you can always add a $1 433 MHz radio yourself. Or at least, that’s what [Tinkerman] did.

IMG_20160522_163814x_thumbnailAside from the teardown and reverse-engineering of the WiFi-enabled switch, [Tinkerman] also flashed custom firmware into the switch’s ESP-8266, and worked it all into his existing home Node-RED framework. Now he’s got more possible ways to turn on his living-room lights than any person could possibly hope for!

If you want to get into this whole WiFi-based home automation game, you could do worse than to have a look at the series we ran on MQTT just a little while ago. Seeing [Tinkerman]’s Node-RED demo makes us think that we’ll have to give that a look for our home system as well.

Easy DIY Telemetry Goes The Distance

[Paweł Spychalski] wrote in to tell us about some experiments he’s been doing, using cheap 433 MHz HC-12 radio units as a telemetry radio for his quadcopter.

In this blog post, he goes over the simple AT command set, and some of the limitations of the HC-12 part. Then he takes it out for a spin on his quadcopter, and finds out that his setup is good for 450 meters in an open field. Finally, he ties the radio into his quad’s telemetry system and tethers the other end to his cellphone through a Bluetooth unit for a sweet end-to-end system that only set him back around $20 and works as far out as 700 meters.

The secrets to [Paweł]’s success seem to be some hand-made antennas and keeping the baud rate down to a reasonable 9600 baud. We wonder if there’s room (or reason?) for improvement using a directional antenna on the ground. What say you, Hackaday Antenna Jockeys?

Also check out this very similar build where an ESP8266 replaces the Bluetooth module. And stashes it all inside a nice wooden box! Nice work all around.

Minimal 433 MHz Web Home Automation

How minimal can a decent home automation setup be? If you need an HTML frontend, you’re going to need a webserver. An ESP8266 will do the trick. And then you need to be able to control your electronics. The cheapest and easiest way to do that is with the ubiquitous 433 MHz remote-controlled outlets and a $1 radio unit from an online auction site. Add in a cheap ESP8266 module, and your total outlay is going to be under $20.

That’s exactly what [Nikos Kantarakias] did. He combined a bunch of available ESP8266 Arduino libraries — one for driving the 433 MHz radio modules, [Paul Stoffregen]’s libraries for keeping time and for setting alarms, and another for keeping track of time zones — with some of his own code for setting up WiFi access, and it’s done.

It’s all available on GitHub for your perusal. The code does some strange things — like requiring a complete reboot every time you set an alarm — but it does let you set recurring and one-off activations of the attached devices with a web interface that’s served off the ESP8266 itself. If you want your coffee machine to turn itself on in the mornings, and want a system that’s easy for the other inhabitants of your house to configure, something like this might be just the ticket.

But if you’re looking for a project on the other end of the ESP-tech spectrum, [CNLohr] wrote a standalone Ethernet controller for the thing. Woah.

Reverse Engineering Wireless Temperature Probes

[bhunting] lives right up against the Rockies, and for a while he’s wanted to measure the temperature variations against the inside of his house against the temperature swings outside. The sensible way to do this would be to put a few wireless temperature-logging probes around the house, and log all that data with a computer. A temperature sensor, microcontroller, wireless module, battery, case, and miscellaneous parts meant each node in the sensor grid would cost about $10. The other day, [bhunting] came across the exact same thing in the clearance bin of Walmart – $10 for a wireless temperature sensor, and the only thing he would have to do is reverse engineer the protocol.

These wireless temperature sensors are exactly what you would expect for a cheap piece of Chinese electronics found in the clearance bin at Walmart. There’s a small radio operating at 433MHz, a temperature sensor, and a microcontroller under a blob of epoxy. The microcontroller and transmitter board in the temperature sensor were only attached by a ribbon cable, and each of the lines were labeled. After finding power and ground, [bhunting] took a scope to the wires that provided the data to the radio and took a look at it with a logic analyzer.

After a bit of work, [bhunting] was able to figure out how the temperature sensor sent data back to the base station, and with a bit of surgery to one of these base stations, he had a way to read the temperature data with an Arduino. From there, it’s just a data logging problem that’s easily solved with Excel, and [bhunting] has exactly what he originally wanted, thanks to a find in the Walmart clearance bin.