3D Printing Concept Car (Parts)

When you want to fabricate something you either start with something and take away what you don’t want — subtractive manufacturing — or you start with nothing and add material, which is additive manufacturing that we usually call 3D printing. Popular Science recently took a look inside Vital Auto, the British lab that uses 3D printing for high-end concept cars from companies like Rolls-Royce, McLauren, Jaguar, and others. In the video below, [Anthony Barnicott], an engineer for Vital, says that the two technologies — additive and subtractive — work best when used together.

As you might expect, they are not using a $200 FDM printer. They have three Formlabs 3Ls that print with resin and five Formlab Fuse 1 selective laser sintering printers. While metal printers are still uncommon in hacker’s workshops, resin printers are now very affordable although your garage printer is probably a good bit smaller than the 3L’s 335x200x300 mm volume. For comparison, an LCD-based AnyCubic Photon X provides just 165x132x80 mm. Of course, you’re looking at about $11,000 for the dual-laser 3L versus about $240 for the Photon.

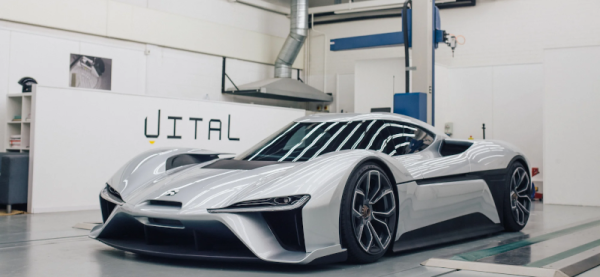
Vital started building the EP9 electric car concept for NIO, an electric car maker in China. You can imagine that modern manufacturing machines make it possible to create more sophisticated concept cars faster. How many times do you want to tweak a part that takes a machinist eight hours to produce? But if you can just let a machine run overnight and get the result in the morning, you are more likely to change and refine the part.

Vital Auto is an interesting look at how professional fabrication shops are using the same technologies we do, at least at the core. We’ve noted before how these same technologies are making homebrew projects look better than some commercial products not long ago. You can print big things if you break them up, of course. Or, break the bank and buy a really big printer.

Continue reading “3D Printing Concept Car (Parts)”

Kia Recalls Cars Over Airbag Controller Assembly Issue

Last month Kia Motors announced a large recall due to possibly defective airbag controller units (ACU). The recall spans many models and model years — in the United States alone it covers over 400K cars, and over half a million cars worldwide. From the NHTSA report we learn that the problem happened at assembly when the cover of some ACUs interfered with the pins of an EEPROM chip. This can cause some of the pins to open-circuit. If your car had this problem, a warning light would come on, but more seriously, the airbags would not deploy in an accident. Kia estimates that less than 1% of the cars using this ACU have this issue. Cars which have this fault will get a new ACU, and other cars will get a firmware upgrade to keep this from happening should the EEPROM pins break loose in the future.

We think this EEPROM is used for logging errors and crash events, and is therefore not in the critical path for airbag deployment. The original firmware apparently prevented deployment if the EEPROM had a fault. Presumably, after this patch, if pins break in the future, the fault indicator still lights up but you’ll have functioning airbags.

It’s not clear if these broken EEPROM pin solder joints were present from the start and the factory test procedures didn’t catch the problem. Or did the pins left the factory intact and were subsequently broke due to bumps and vibrations. Hardware issues aside, having safety critical firmware perform its primary function even when faults exist in non-essential parts of the circuit seems like a requirement that should have been applied to the ACU from the beginning.

This is a reminder of the importance of enclosure design and making sure your PCB layouts take into account all clearances necessary for the entire assembly. How many times have you got your PCB back and realized you forgot to even put mounting holes?

We covered a similar issue a couple of years ago regarding the Takata airbag fiasco. If you have a Kia, this form on their website tells you whether your vehicle is subject to the recall or not.

Arduino Activated Automotive Aerodynamic Apparatus Is… (Spoiler Alert!)

Sometimes a great hack is great for no other reason than that it’s fun, and [Michael Rechtin]’s DIY Active Aero Spoiler and Air Brake certainly qualifies as a fun hack. This is a mod designed to live in a world where looks are everything, stickers add horsepower, and a good sound system is more important than good wheel alignment. Why is that? Because like the switch that exists only to activate the mechanism that turns it off, the DIY Active Aero Spoiler and Air Brake seen below is almost completely useless. So to understand its allure, we must understand its inspiration.

For a few decades now, luxury sports car manufacturers have been adding active aerodynamic components to their vehicles. For example, several Porsche models feature adaptive spoilers that adjust to driving conditions. Super cars such as the Bugatti Veyron have spoilers that flip up at high angles during braking to increase drag and reduce braking distance. All of these features are sadly missing from the average two or four door family-car-turned-wannabe-track-fiend. Until now!

[Michael] has created a new active spoiler for every mall-bound muffler-challenged hand me down. The build starts with a CNC cut foam wing which is covered with fiberglass, Bondo (an automotive necessity) and some faux carbon fiber for that go-fast feel. An Arduino, IMU, two servos, and a battery pack detect deceleration and automatically increase the spoiler angle just like the big boys, but without needing any integration into the vehicles systems. Or bolts, for that matter.

It’s unlikely that the braking force is enough to slow down the vehicle though, given that it’s not enough to pop the suction cups holding it to the trunk lid. But does it have the “wow” factor that it was designed to induce? Spoiler Alert: It does!

As it turns out, this isn’t the first adjustable spoiler featured here at Hackaday, and this adjustable spoiler on a car that’s made for actual racing is quite interesting.

Continue reading “Arduino Activated Automotive Aerodynamic Apparatus Is… (Spoiler Alert!)”

Exploring Tesla Model S High Voltage Cabling

When he’s not busy with his day job as professor of computer and automotive engineering at Weber State University, [John Kelly] is a prolific producer of educational videos. We found his video tracing out the 22+ meters of high voltage cabling in a Tesla Model S (below the break) quite interesting. [John] does warn that his videos are highly detailed and may not be for everyone:

This is not the Disney Channel. If you are looking to be entertained, this is not the channel for you.

We ignored the warning and jumped right in. The “high” voltages in the case of an electric vehicle (EV) like the Model S is approximately 400 volts. Briefly, external input via the charge connector can be single or three phase, 120 or 250 VAC, depending on your region and charging station. This get boosted to a nominal 400 VDC bus that is distributed around the various vehicle systems, including the motors and the battery pack.

Rear Modules

    • Charge receptacle
    • On-board charger module
    • Rapid splitter
    • Rear motor inverter

Front Modules

    • High voltage junction block
    • Cabin air heater
    • DC to DC converter
    • Battery coolant heater
    • Air conditioning compressor
    • Front motor inverter

He goes through each module, showing in detail the power routing and functionality, eventually assembling the whole system spanning two work benches. We liked his dive into the computer-controlled fuse that recently replaced the standard style one, and were impressed with his thorough use of labels.

If you’ve ever been curious about the high voltage distribution of a EV, grab some popcorn and check out this video. Glancing through his dozens of playlists, [John]’s channel would be a good place to visit if you’re interested any topic related to hybrids and electric vehicles, drive trains, and/or transmissions. We’ve written about some Tesla teardowns before, the Model 3 and the Model S battery packs. Have you worked on / hacked the high voltage system in your EV? Let us know in the comments below.

Continue reading “Exploring Tesla Model S High Voltage Cabling”

Exploring An Aftermarket LED Headlight Retrofit Kit

There’s plenty of debate about drop-in LED headlight bulbs, especially when they’re used with older reflector housings that were designed for halogen bulbs. Whether or not you personally feel the ultra-bright lights are a nuisance, or even dangerous, one thing we can all agree on is that they’re clearly the result of some impressive engineering.

Which is why we were fascinated to see the teardown [TechChick] did on a “Ultra 2 LED” retrofit from GTR Lighting. Apparently one of the diodes was failing, and as part of the warranty replacement process, she was informed she had to make it completely inoperable. Sounds like a teardown dream come true. If a manufacturer ever told us we needed to take something apart with extreme prejudice and provide photographic evidence that the deed was done, we’d be all too happy to oblige.

The driver itself ended up being completely filled with potting compound, so she doesn’t spend much time there. Some will no doubt be annoyed that [TechChick] didn’t break out the small pointy implements and dig all that compound out, but we all pretty much know what to expect when it comes to driving LEDs. The real interesting bit is the bulb itself.

As is common with these high-output automotive LEDs, the Ultra 2 is actively cooled with a small fan that’s actually enclosed within the heatsink. With the fan and the two-piece heatsink removed, she’s able to access the LED module itself. Here, two PCBs are sandwiched back to back with a hollow copper chamber that leads out of the rear of the module. When [TechChick] cut into the copper she said she heard a hiss, and assumed it was some kind of liquid cooling device. Specifically we think it’s a vapor chamber that’s being used to pull heat away from the diodes and into the heatsink at the rear of the module, which speaks to the advanced technology that makes these bulbs possible.

While laser headlights are arguably the future of automotive lighting, it’s going to be quite some time before they trickle down to those of us that don’t own supercars. Until then, when used responsibly, these LED retrofits can inject a bit of cutting-edge tech into your old beater without breaking the bank.

Continue reading “Exploring An Aftermarket LED Headlight Retrofit Kit”

Repair Hack Saves Tesla Owner From Massive Bill

As expensive as a new car is, it almost seems like a loss leader now to get you locked into exorbitantly expensive repairs at the dealership’s service department. That’s the reason a lot of us still try to do as much of the maintenance and repairs on our cars as possible — it’s just too darn expensive to pay someone else to do it.

Case in point: this story about a hapless Tesla owner who faced a massive repair bill on his brand new car. [Donald]’s tale of woe began when he hit some road debris with his two-wheel-drive Model 3. The object hit penetrated the plastic shield over the front of the battery pack, striking a fitting in the low-pressure battery cooling plumbing. The plastic fitting cracked, causing a leak that obviously needed repair. The authorized Tesla service center gave him the bad news: that he needed a new battery pack, at a cost of $16,000. Through a series of oversights, [Donald]’s comprehensive insurance on the car had lapsed, so he was looking at funding the repair, approximately half the cost of a new Model 3, out of pocket.

Luckily, he got in touch with [Rich Benoit] of The Electrified Garage, one of the few independent garages doing Tesla repairs and customizations. The video below is queued up to the part where they actually do the repair, which is ridiculously simple. After cutting off the remains of the broken fitting with a utility knife, [Rich]’s tech was able to cut a thread in both the fitting and the battery pack, and attach them together with a brass nipple from the plumbing section of the local home store. The total bill for the repair was $700, which still seems steep to us, but a far cry from what it could have been.

Hats off to [Rich] and his crew for finding a cost-effective workaround for this issue. And if you think you’ve seen his EV repairs before, you’re right. Of course, some repairs are more successful than others.

Continue reading “Repair Hack Saves Tesla Owner From Massive Bill”

CAN Bus Wireless Hacking / Dev Board

[Voltlog] has been hacking away at the CAN bus console of his VW Golf for quite some time now. Presumably, for his projects, the available CAN bus interface boards are lacking in some ways, either technically and/or price. So [Voltlog] designed his own wireless CAN bus hacking and development module called the ESP32 CanLite (see the video below the break). The board was tailored to meet the needs of his project and he claims it is not a universal tool. Nevertheless we think many folks will find the features he selected for this module will be a good fit for their projects as well.

In his introduction of the design, he walks through the various design decisions he faced. As the project name suggests, he’s using the ESP32 as the main controller due to it’s wireless radios and built-in CAN controller. The board is powered from the car’s +12V power, so it uses a wide input range ( 4 to 40 V ) switching regulator. One feature he added was the ability to switch automotive accessories using the ST VN750PC, a nifty high-side driver in an SO-8 package with integrated safety provisions.

The project is published as open source and the files can be pulled from his GitHub repository. We noticed the debug connector labeled VOLTLINK on the schematic, and found his description of this custom interface interesting. Basically, he was not satisfied with the quality and performance of the various USB-to-serial adapters on the market and decided to make his own. Could this be a common theme among [Voltlog]’s projects?

A word of warning if you want to build the ESP32 CanLite yourself. While [Voltlog] had intentionally selected parts that were common and easy to purchase when the project began, several key chips have since become nearly impossible to obtain these days due to the global parts shortage issue (it’s even out of stock on his Tindie page).

If you want to dig deeper into CAN bus hacking, check out this talk that we wrote about back in 2016. Do you have any favorite CAN bus development boards and/or tools? Let us know in the comments below.

Continue reading “CAN Bus Wireless Hacking / Dev Board”