Light Painting With An 19th Century Inspired Plotter

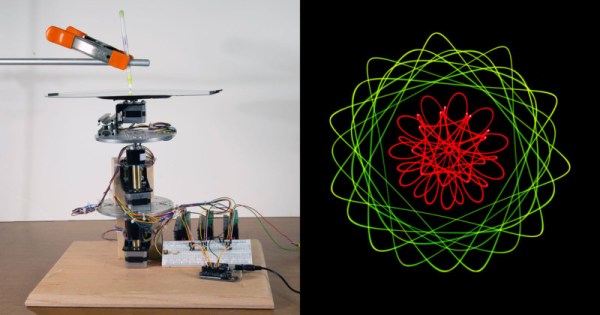
The geometric chuck was a device that stacked up multiple rotating wheels that could vary their speed and their offset to a central shaft, in order to machine ornate designs using a lathe. It’s this piece of machining obscura from the 19th century that inspired this light painting build from [Ted Kinsman].

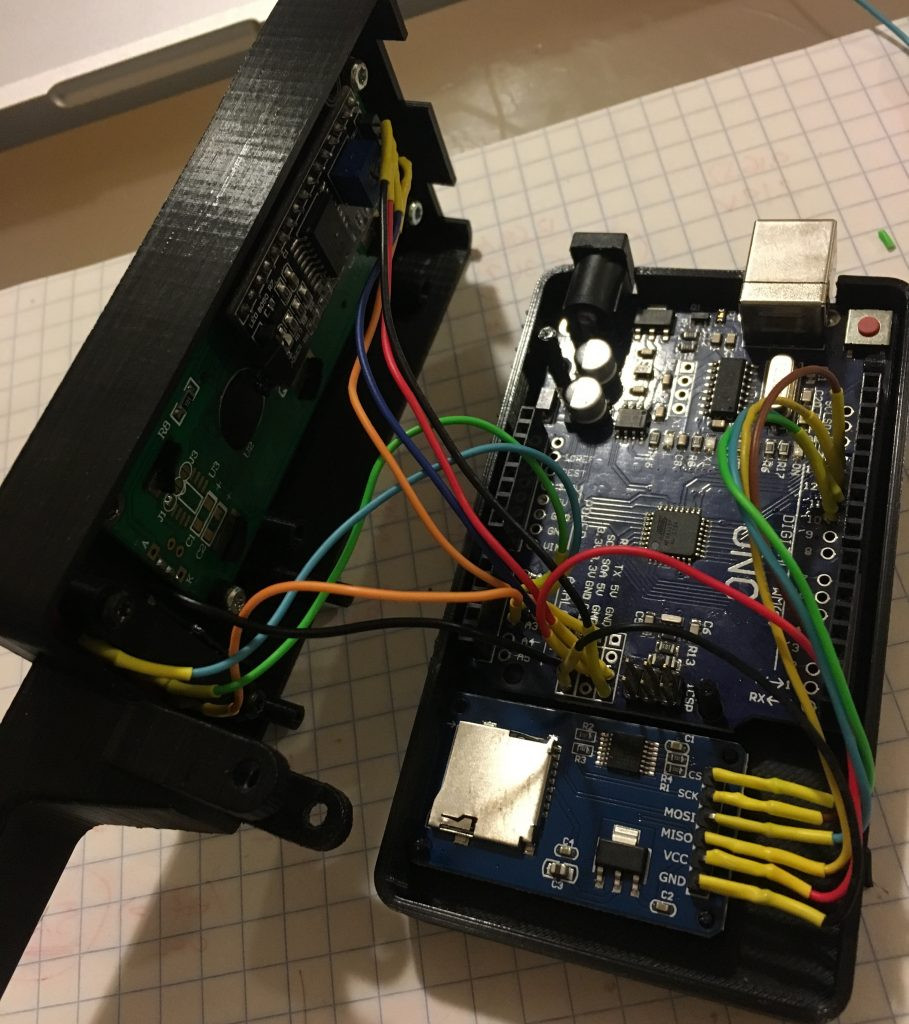
Rather than the complicated gears and wheels used in the distant past, [Ted] instead elected to use stepper motors. Three stepper motors are stacked on top of each other, each one able to rotate at an independent rate. The design only implements three steppers as the slip rings needed to send power and control signals to each stepper are prohibitively expensive.

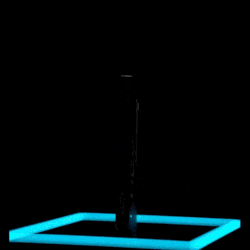
An Arduino is programmed to run the show, changing the speed of each motor and thus the patterns the system generates. Put LEDs on the spinning plates, or install a pen to mark a piece of paper, and it’s possible to generate all manner of beautiful spirograph-like patterns. Vary the motor speeds or the positioning of the lights, and the patterns vary in turn.

It’s a fun build for light painting, with some great visuals produced. We also appreciate the use of the Arduino which makes varying the parameters far easier than having to change out gearsets in classical designs.

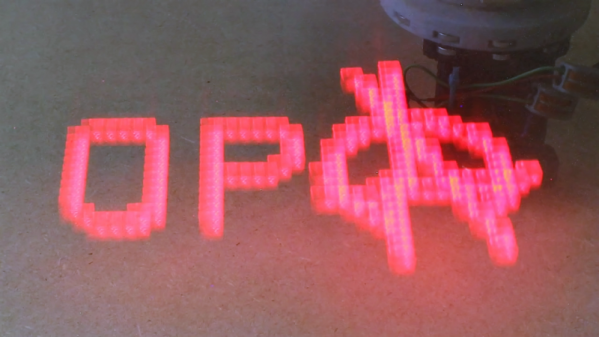
If you miss the old school spirograph, you can always build one out of Lego. Else, consider experimenting with other light painting techniques. If you’ve built a fancy rig of your own, be sure to let us know!

[Thanks to zit for the tip!]

Painting With Light: The Homemade Pixelstick

Light painting has long graced the portfolios of long-exposure photographers, but high resolution isn’t usually possible when you’re light painting with human subjects.

This weekend project from [Timmo] uses an ESP8266-based microcontroller and an addressable WS2812-based LED strip to paint words or custom images in thin air. It’s actually based on the Pixelstick, a tool used by professional photographers for setting up animations and photorealism shots. The equipment needed for setting up the light painting sticks runs in the order of hundreds, not to mention the professional camera and lenses needed. Nevertheless, it’s a huge step up from waving around a flashlight with your friends.

The LED Lightpainter takes the Pixelstick a few notches lower for amateur photographers and hobbyists. It directly supports 24-bit BMP, with no conversion needed. Images are stored internally in Flash memory and are uploaded through a web interface. The settings for the number of LEDs, time for the image row, and STA/AP-mode for wireless connections are also set by the web interface. The project uses the Adafruit NeoPixel, ArduinoJson, and Bodmer’s TFT_HX8357 libraries for implementing the BMP drawing code, which also allows for an image preview prior to uploading the code to the microcontroller. Images are drawn from the bottom row to the top, so images have to be transformed before updating to the LED painter.

Some future improvements planned for the project include TFT/OLED support, rainbow or color gradient patterns in the LEDs, and accelerometer or gyroscope support for supporting animation.

There aren’t currently too many galleries of DIY LED-enabled light paintings, but we’d love to see some custom modded light painting approaches in the future.

This isn’t the first LED light stick we’ve seen, if you’re interested in such things.

Utterly Precise Light Painting, Thanks To CNC And Stop Motion

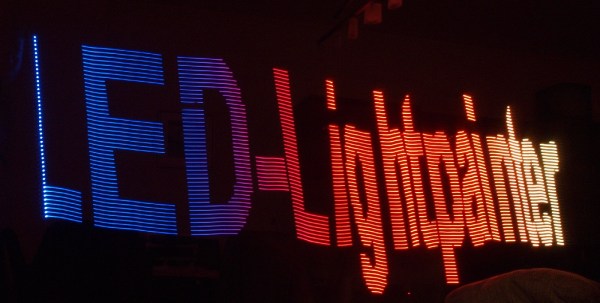
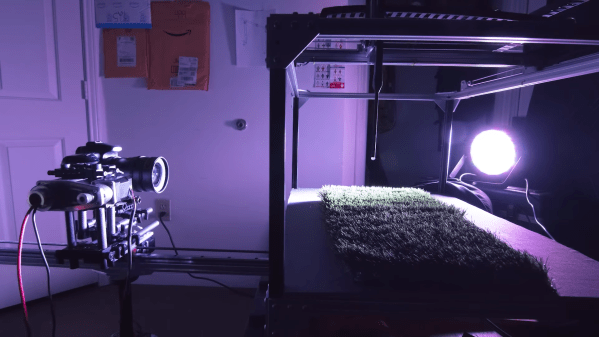
Light painting is the process of moving a light while taking a long-exposure photograph, which creates a sort of drawing from the path of the light source. It’s been done in one way or another since at least the early-to-mid 1900s, but modern hardware and methods have allowed for all kinds of new spins on this old idea. [Josh Sheldon] demonstrates just how true this is with the light painting he did for a gum ad, showing what’s possible with a single multicolor LED under CNC control combined with stop-motion animation techniques. The rest of the magic comes from the software. [Josh] designs the animations in Blender, and the paths are then exported and used as the instructions for his self-made Light Painting Machine. The machine therefore recreates the original animation with lights and camera and not a single computer-generated graphic.

[Josh] is no stranger to light painting in this way. We’ve seen his fantastic machine at work before and we’re glad he shared the details behind his latest work. Embedded below is a concise video that shows the whole process, but if you’re in a hurry and just want to see the end product, here’s a shortcut to the results.

For those of you who would like to know more, there are plenty of details on [Josh]’s Light Painting Machine on GitHub along with a more in-depth description of the workflow and software, so check it out.

Continue reading “Utterly Precise Light Painting, Thanks To CNC And Stop Motion”

Painting With Light And A Little G-Code

Most photographs are made in the fraction of a second that the camera’s shutter is gathering reflected light from the scene. But there’s fun to be had by leaving the shutter open and directing light into the camera. Called light painting, it can be as simple as a camera on a tripod in a dark room and a penlight spelling out dirty words – not like we’d know – or as complicated as this CNC dot-matrix light printer.

The first idea that [Jeremy S. Cook] had for this build didn’t go so well. He fitted an LED to the gantry of his 3D-printer, intending to send it G-code representing bitmaps. The idea would be to set it up in a dark place, open the shutter, and let the machine build up the image by rastering through the X- and Y- axes while blinking the LED on and off at the right time. But since the gantry only moves in one axis, he abandoned the printer in favor of his CNC router. He printed a collar to fit the dust collector shroud we previously featured, added a battery-powered LED, and affixed a pushbutton switch to the let the Z-axis turn on the light. It took some tweaking such as adding a translucent PLA diffuser, to get decent images, but in the end it worked. We like the soft look of the floating voxels, which were really helped by the later addition of a Nano and a Neopixel. Check out the build in the video below.

One thing we’d suggest is better reflection control. [Jeremy] used a black platen as a background, but it wasn’t quite enough. We suggest going none more black next time.

Continue reading “Painting With Light And A Little G-Code”

Light Painting Animations Directly From Blender

Light painting: there’s something that never gets old about waving lights around in a long exposure photo. Whilst most light paintings are single shots, some artists painstakingly create frame-by-frame animations. This is pretty hard to do when moving a light around by hand: it’s mostly guesswork, as it’s difficult to see the results of your efforts until after the photo has been taken. But what if you could make the patterns really precise? What if you could model them in 3D?

[Josh Sheldon] has done just that, by creating a process which allows animations formed in Blender to be traced out in 3D as light paintings. An animation is created in Blender then each frame is automatically exported and traced out by an RGB LED on a 3D gantry. This project is the culmination of a lot of software, electronic and mechanical work, all coming together under tight tolerances, and [Josh]’s skill really shines.

The first step was to export the animations out of Blender. Thanks to its open source nature, Python Blender add-ons were written to create light paths and convert them into an efficient sequence that could be executed by the hardware. To accommodate smooth sliding camera movements during the animation, a motion controller add-on was also written.

The gantry which carried the main LED was hand-made. We’d have been tempted to buy a 3D printer and hack it for this purpose, but [Josh] did a fantastic job on the mechanical build, gaining a solidly constructed gantry with a large range. The driver electronics were also slickly executed, with custom rack-mount units created to integrate with the DragonFrame controller used for the animation.

The video ends on a call to action: due to moving out, [Josh] was unable to continue the project but has done much of the necessary legwork. We’d love to see this project continued, and it has been documented for anyone who wishes to do so. If you want to check out more of [Josh]’s work, we’ve previously written about that time he made an automatic hole puncher for music box spools.

Thanks for the tip, [Nick].

Continue reading “Light Painting Animations Directly From Blender”

Handheld Arduino Light Painter

Light painting is a technique which allows you to “draw” on a photograph by moving a light past the camera during a long exposure shot. While it can be difficult to master, light painting allows for some incredible effects such as text and images that appear to be hovering in mid-air. Think of it like a very slow but much cooler version of an augmented reality app.

[Reven] recently wrote in to tell us about the Arduino light painter he put together, and while DIY (and even commercial) light painting gear isn’t exactly new at this point, we think he’s raised the bar a bit with his design. With the addition of a slick 3D printed enclosure and on-board display and menu system, his light painter looks exceptionally professional for being built out of hardware he had on hand.

On his blog, [Reven] has done a phenomenal job of documenting the build from start to finish. Not only does he include a detailed Bill of Materials and the STL files so you can build your own version of his light painter, he walks the reader though his design process and explains why he did the things he did. Even if you aren’t interested in building a light painter, there’s almost certainly something of interest for anyone who’s ever looked at a pile of parts on their workbench and wondered how they were going to turn it into a functioning device.

Powered by an Arduino Uno, the light painter provides a user interface on a 16×2 LCD which allows control over not only the brightness of the WS2812 LED strips but selecting and loading different images from the micro SD card. The case was designed in FreeCAD, and while [Reven] mentions there are a number of issues which could be improved, satisfies all his design goals.

We covered the original Adafruit project that [Reven] based his code all the way back in 2013, though there’s certainly been more modern interpretations of the idea since then.

Light-Painting Robot Turns Any Floor Into Art

Is [SpongeBob SquarePants] art? Opinions will differ, but there’s little doubt about how cool it is to render a pixel-mapped time-lapse portrait of Bikini Bottom’s most famous native son with a roving light painting robot.

Inspired by the recent trend of long exposure pictures of light-adorned Roombas in darkened rooms, [Hacker House] decided to go one step beyond and make a lighted robot with less random navigational tendencies. A 3D-printed frame and wheels carries a pair of steppers and a Raspberry Pi. An 8×8 Neopixel matrix on top provides the light. The software is capable of rendering both simple vector images and rastering across a large surface to produce full-color images. You’ll notice the careful coordination between movement and light in the video below, as well as the impressive turn-on-a-dime performance of the rover, both of which make the images produced so precise.

We’ve covered a lot of light-painting videos before, including jiggering a 3D-printer and using a hanging plotter to paint. But we haven’t seen a light-painter with an essentially unlimited canvas before. We’d also love to see what two or more of these little fellows could accomplish working together.

Continue reading “Light-Painting Robot Turns Any Floor Into Art”