Fire Extinguisher Ball Mill Destined To Grind Kitty Litter

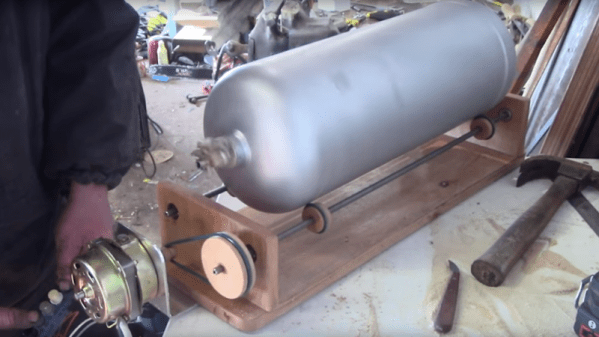
Nothing says hack like a tool quickly assembled from a few scrap-heap parts. For [Turbo Conquering Mega Eagle], his junkyard finds were a fire extinguisher, an old office fan, and a few scraps of plywood; the result was a quick and easy ball mill.

There’s very little mention of what said ball mill will be for — [TCME] said something about milling bentonite clay, AKA kitty litter — but that’s hardly the point. Having previously fabricated a much smaller version of this ball mill that could chuck up in his lathe, he scaled this one up considerably. The spent fire extinguisher was relieved of the valve and some external bits to create the mill’s drum. Plywood was used for a quick frame to support rollers and to turn a couple of pulleys for the running gear. The fan motor proved barely capable of performing, though, even with the mechanical advantage of the pulleys and an improvised drive belt. The motor just didn’t have the oomph to turn the drum when loaded with ceramic balls, but a quick adjustment to the drive train did the trick. The video below shows the whole build process, which couldn’t have taken much more than a couple of hours.

It looks like a sand casting project may be on deck for [TCME]’s milled bentonite, so we’ll look forward to that. Perhaps his other recent fire extinguisher build will make an appearance in that video too.

Continue reading “Fire Extinguisher Ball Mill Destined To Grind Kitty Litter”

PCB Production On The Sienci Mill One

A complete start to finish electronics prototyping workshop is nirvana for many of us: being able to go from design on the computer to real hardware without having to get up from your rolling chair. The falling prices of 3D printers have helped make at least part of this a reality: $200 USD is enough to get you a printer that can churn out decent looking enclosures. But there’s more to producing your own hardware than creating slick looking project boxes; at some point you’ll need to put some electronics in there.

For [Chuck Hellebuyck] at least, the last piece of the puzzle has just fallen into place. He’s recently put up a YouTube video describing how he converted his $399 Sienci Mill One into a capable PCB mill. With a 3D printer and this new PCB mill, he’s happy to say he can now go from concept to production all on the same workbench.

The Sienci Mill One is a solid enough mill in its own right but did need some modification to attain the accuracy necessary for cutting at a depth of only .9 mm. First, a block of wood was cut to the same size as the original plastic bed of the Sienci, and then the mill itself was used to drill holes through the wood block and plastic bed. The wood was attached to the bed using a nut and bolt in each corner, being sure to torque it down enough that the head of the bolt is pulled down flush with the surface of the wood.

Pulling the head of the bolts flush wasn’t just to keep the surface free of any snags, [Chuck] uses them in conjunction with a probe in the mill’s chuck as a simple way of adjusting the Z height. With a continuity meter attached between the two, he could lower the probe down until they were touching just enough to make a circuit.

Click through the break for the rest of the story!

Continue reading “PCB Production On The Sienci Mill One”

Guide: Why Etch A PCB When You Can Mill?

I recall the point I started taking electronics seriously, although excited, a sense of dread followed upon the thought of facing the two main obstacles faced by hobbyists and even professionals: Fabricating you own PCB’s and fiddling with the ever decreasing surface mount footprints. Any resistance to the latter proves futile, expensive, and frankly a bit silly in retrospect. Cheap SMD tools have made it extremely easy to store, place, and solder all things SMD.

Once you’ve restricted all your hobbyist designs/experiments to SMD, how do you go about producing the PCBs needed for prototyping? Personally, I dread the thought of etching my own boards. The process is laborious and involves messy chemicals and specially sensitized PCB’s — none of which interest me. I’ve only ever done it a few times, and have promised myself never to do it again. Professional but cheap PCB manufacturing is more like it board pooling services such as OSH park have made this both easy and affordable — if you can wait for the turnaround.

So what are the alternatives? If you are really serious about swift prototyping from your own Lab, I put forth the case of milling your own PCB’s. Read on as I take you through the typical workflow from design to prototype and convince you to put up with the relatively high start up cost of purchasing a PCB mill.

Continue reading “Guide: Why Etch A PCB When You Can Mill?”

CNC Milling Is More Manual Than You Think

I was in Pasadena CA for the Hackaday Superconference, and got to spend some quality time at the Supplyframe Design Lab. Resident Engineer Dan Hienzsch said I could have a few hours, and asked me what I wanted to make. The constraints were that it had to be small enough to fit into checked luggage, but had to be cool enough to warrant taking up Dan’s time, with bonus points for me learning some new skills. I have a decent wood shop at home, and while my 3D printer farm isn’t as pro as the Design Lab’s, I know the ropes. This left one obvious choice: something Jolly Wrencher on the industrial Tormach three-axis CNC metal mill.

A CNC mill is an awesome tool, but it’s not an omniscient metal-eating robot that you can just hand a design file to. If you thought that having a CNC mill would turn you into a no-experience-needed metal-cutting monster, you’d be sorely mistaken.

Of course the machine is able to cut arbitrary shapes with a precision that would be extremely demanding if done by hand, but the craft of the operator is no less a factor than with a manual mill in making sure that things don’t go sideways. Dan’s good judgment, experience, and input was needed every step of the way. Honestly, I was surprised by how similar the whole procedure was to manual milling. So if you want to know what it’s like to sit on the shoulder of a serious CNC mill operator, read on!

Continue reading “CNC Milling Is More Manual Than You Think”

Home Built PCB Mill Reportedly Doesn’t Suck

It’s 2017, and getting a PCB professionally made is cheaper and easier than ever. However, unless you’re lucky enough to be in Shenzhen, you might find it difficult to get them quickly, due to the vagaries of international shipping. Whether you want to iterate quickly on designs, or just have the convenience of speed, it can be useful to be able to make your own PCBs at home. [Timo Birnschein] had just such a desire and set about building a PCB mill that doesn’t suck.

It might sound obvious, but it bears thinking about — if you know you’re incapable of building a good PCB mill in a reasonable period of time, you might save yourself a lot of pain and lost weekends by just ordering PCBs elsewhere. [Timo] was fairly confident however that the build would be able to churn out some usable boards, however, and got to work.

The build is meant to be accessible to the average hacker who wants one. The laser cut & 3D printed parts are readily available these days thanks to online services that can manufacture for those who don’t have the machines at home. [Timo] uses a rotary multitool for a spindle, a common choice for a budget CNC build.

With the hardware complete, [Timo] has spent time working on optimising the software side of things. Through careful optimisation of the G-Code, [Timo] has been able to improve performance and reduce stress on the tooling. It’s not enough to just build a good mill — you’ve got to have your G-Code squared away as well.

Overall, the results speak for themselves. The boards don’t suck; the mill can do traces down to 8 mil, and even drill the holes. We’d love to have one on the workbench when busting out some quick prototypes. For another take on the home-built PCB mill, why not check out this snap-together version?

Restoring A Strange Milling Machine From Craigslist

[diyVT] found a real white elephant in this milling machine from Craigslist. It cost him only $200, cheap for a small mill, so it was worth the gamble. We’re not sure what to call this — it’s not exactly a gantry mill, not a horizontal mill, and definitely not a knee mill. The tag says V-Mill, made by either Pierce West or Tree Tool and Die Works, depending on which ID plate you read. The Tree has a three-phase motor, but it came with a phase converter, so it should be good to run on single phase 220 volt household power.

The machine was in good physical shape, at least until the previous owner attempted to move it out of the garage. During the move one of the cast iron chain drive handwheel brackets broke into three pieces. Cast iron is no fun to weld. It has to be pre-heated, welded with nickel rod, and slowly cooled. Some hackers would have given up or built a new part, but [diyVT] accepted the challenge. He put the puzzle pieces back together, grooved them out with an angle grinder, and welded everything. The result wasn’t pretty, but it only has to take the force of the handwheel and the 200 lb gorilla spinning it.

After a bit of work on the motor and head, including a new belt, this tree was ready to cut. [diyVT] snuck out of a family bar-b-que to cut his first chips on the new (to him) machine.

Continue reading “Restoring A Strange Milling Machine From Craigslist”

Making An Inexpensive DRO

[Andrew] wanted a digital readout (DRO) for his mini lathe and mini mill, but found that buying even one DRO cost as much as either of his machines. The solution? You guessed it, he built his own for cheap, using inexpensive digital calipers purchased off eBay.

The DRO he created features a touch screen with a menu system running on an LPCXpresso, while smaller OLED screens serve as labels for the 7-segment displays to the right. The DRO switches back and forth between the lathe and mill, and while the software isn’t done, [Andrew] hopes to be able to transfer measurements from one machine to the other.

In a very sweet touch, [Andrew] hacked cheap digital calipers to provide measurements for each axis, where they provide a resolution of 0.01mm. There are six daughter boards, one for each caliper, and each has a PIC that converts from serial to I2C, freeing the main firmware from dealing with six separate data streams.

The DRO doesn’t have a case, [Andrew] has it positioned out of chip-range from either machine.

A previous DRO we featured in 2012 used an Android tablet as its display.