Miniature Concrete Hoover Dam Is Tiny Engineering Done Right

Growing up, we got to play with all kinds of things in miniature. Cars, horses, little LEGO houses, the lot. What we didn’t get is a serious education with miniature-sized dams. This recreation of the glorious Hoover Dam from the [Creative Construction Channel] could change all that for the next generation.

The build starts with the excavation of a two-foot long curve in a replica riverbed. A cardboard base is installed in the ditch, and used as a base for vertical steel wires. Next, the arch of the dam is roughed out with more steel wires installed horizontally to create a basic structure. The cardboard is then be removed from the riverbed, with the steel structure remaining. It’s finally time to pour real concrete, with a foundation followed by the main pour into foam formwork. The dam is also given 3D printed outlets that can be opened to allow water to pass through — complete with small gear motors to control them. The structure even gets a little roadway on top for good measure.

The finished product is quite impressive, and even more so when the outlets open up to spill water through. Such a project would be great fun for high school science students, or even engineering undergrads. Who doesn’t want to play with a miniature scale dam, after all? Bonus points if you build an entire LEGO city downstream, only to see it destroyed in a flood.

Continue reading “Miniature Concrete Hoover Dam Is Tiny Engineering Done Right”

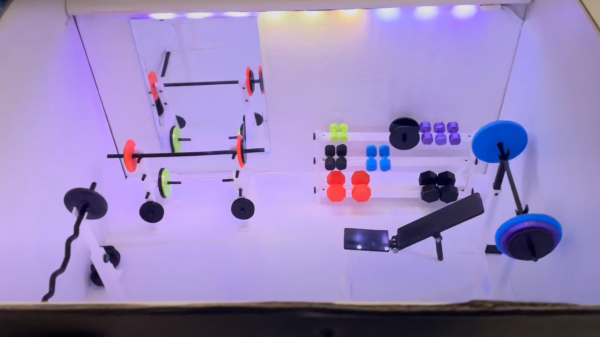
3d printed tiny gym in a box with mirror and led strip lighting

Get Pumped For This Miniature Gym

[Duncan McIntyre] lives in the UK but participated in a secret Santa gift exchange for his Dutch friends’ Sinterklaas celebration. In traditional maker fashion, [Duncan] went overboard and created a miniature gym gift box, complete with flashing lights, music and a motorized lid.

[Duncan] used [TanyaAkinora]’s 3D printed tiny gym to outfit the box with tiny equipment, with a tiny mirror added to round out the tiny room. An ATmega328P was used as the main microcontroller to drive the MP3 player module and A4988 stepper motor controller. The stepper motor was attached to a drawer slide via a GT2 timing belt and pulley to actuate the lid. Power is provided through an 18V, 2A power supply with an LM7805 providing power to the ATmega328P and supporting logical elements. As an extra flourish, [Duncan] added some hardware audio signal peak detection, fed from the speaker output, which was then sampled by the ATmega328P to be able to flash the lights in time with the playing music. A micro switch detects when the front miniature door is opened to begin the sequence of lights, song and lid opening.

[Duncan] provides source on GitHub for those curious about the Arduino code and schematics. We’re fans of miniature pieces of ephemera and we’ve featured projects ranging from tiny 3D printed tiny escalators to tiny arcade cabinets.

Video after the break!

Continue reading “Get Pumped For This Miniature Gym”

Here’s The World’s Smallest Wood Plane…Probably

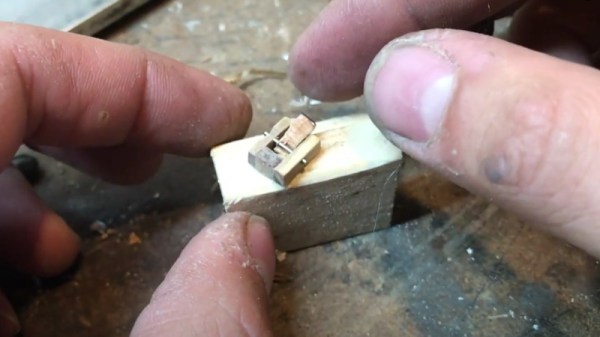
Admittedly, we aren’t really in a position to confirm whether or not the miniature wood plane put together by [Daniel d’Entremont] is actually the smallest in the world, but we’re willing to take his word for it. At the very least, we certainly haven’t seen a smaller one.

In the video below, [Daniel] crafts the diminutive tool from a small block of wood by first slicing off a square using a band saw and then switching over to a small hand saw to cut out the individual pieces. These are glued together to make the body of the plane, and the shank of a small drill bit is used to hold down the wedge and blade. All told it’s about 1/2 of an inch long, and is fully functional…or at least, as functional as a 1/2 inch wood plane can be.

Interested in more miniature tools? Believe it or not, we’ve got you covered.

Continue reading “Here’s The World’s Smallest Wood Plane…Probably”

Dual Power Supply In A Pinch

Recently I needed a dual voltage power supply to test a newly-arrived PCB, but my usual beast of a lab power supply was temporarily at a client’s site. I had a FNIRSI programmable power supply which would have been perfect, but alas, I had only one. While digging around in my junk box I found several USB-C power-delivery “trigger” boards which I bought for an upcoming project. These seemed almost too small for the task at hand, but after a little research I realized they would work quite well.

The ones I had used the Injoinic IP2721 USB-C power delivery chip, commonly used in many of these boards. Mine had been sold pre-configured for certain output voltages, but they were easy to re-jumper to the voltages I needed, +5 VDC  and +20 VDC. The most challenging aspect was physically using them — they are the size of a fingernail. This version had through-hole output pads on 0.1″ centers, so I decided to solder them to the base of a standard MTA pin header. A few crimps later and I was up and running, along with the requisite pair of USB-C cables and power adapters.

For just a few dollars each, these trigger boards are useful to have in your toolbox, both for individual projects and for use in a pinch. We reviewed these modules a couple of years ago, and check out the far more flexible PD Micro that we covered last year.

Cluster Your Pi Zeros In Style With 3D Printed Cray-1

From a performance standpoint we know building a homebrew Raspberry Pi cluster doesn’t make a lot of sense, as even a fairly run of the mill desktop x86 machine is sure to run circles around it. That said, there’s an argument to be made that rigging up a dozen little Linux boards gives you a compact and affordable playground to experiment with things like parallel computing and load balancing. Is it a perfect argument? Not really. But if you’re anything like us, the whole thing starts making a lot more sense when you realize your cluster of Pi Zeros can be built to look like the iconic Cray-1 supercomputer.

This clever 3D printed enclosure comes from [Kevin McAleer], who says he was looking to learn more about deploying software using Ansible, Docker, Flask, and other modern frameworks with fancy sounding names. After somehow managing to purchase a dozen Raspberry Pi Zero 2s, he needed a way to keep them all in a tidy package. Beyond looking fantastically cool, the symmetrical design of the Cray-1 allowed him to design his miniature version in such a way that each individual wedge is made up of the same identical  set of 3D printed parts.

In the video after the break, [Kevin] explains some of the variations the design went through. We appreciate his initial goal of making it so you didn’t need any additional hardware to assemble the thing, but in the end you’ll need to pick up some M2.5 standoffs and matching screws if you want to build one yourself. We particularly like how you can hide all the USB power cables inside the lower “cushion” area with the help of some 90-degree cables, leaving the center core open.

This isn’t the first time we’ve seen somebody build their own tiny Cray-1. A particularly dedicated hacker built his own 1/10th scale replica of the 1970s supercomputer powered by an FPGA back in 2010, and eventually got to the point of trying to boot original software on it.

Continue reading “Cluster Your Pi Zeros In Style With 3D Printed Cray-1”

Miniature Space Invaders game

Arduino And An OLED Make This Space Invaders Cabinet Tiny

For as simple as it appears now, Space Invaders was one machine from the Golden Age of video games that always seemed to have a long line waiting for a chance to lose a couple of quarters. And by way of celebrating the seminal game’s influence, [Nick Cranch] has executed what might just be the world’s smallest Space Invaders replica.

It appears that this started mainly as an exercise in what’s possible with what’s on hand, which included a couple of quite small OLED displays. For the build photos it looks like there’s an Arduino Nano running the show; [Nick] relates that the chosen hardware proved challenging, and that he had to hack the driver library to make it work. Once he got a working game, [Nick] didn’t rest on his laurels. Rather, he went the extra mile and built a miniature cabinet to house everything in.

The video quality below may be poor, but it’s more than enough to see how much work he put into detailing the cabinet. The graphics of the original US release of the game cabinet are accurately represented, right down to the art on the front glass. The cabinet itself is made from 1.5 mm plywood which he cut by hand. It even looks like he recreated the original scheme of cellophane overlays on the monochrome screen to add a little color to the game. Nice touch!

We really appreciate the attention to detail here, with our only quibble being no schematics or code being posted. Hopefully, we’ll see those later, but for now, this looks like a fun project and a nice trip down memory lane. But if you think it’s too small, no worries — we’ve got a much, much bigger version of the game too.

Continue reading “Arduino And An OLED Make This Space Invaders Cabinet Tiny”

A model roller coaster

3D Printed Model Roller Coaster Accurately Simulates The Real Thing

While they don’t give the physical thrill of a real one, model roller coasters are always fun to watch. However, they actually make a poor analog of a full-sized ride, as gravitational force and aerodynamic drag don’t scale down in the same way, model roller coasters usually move way faster than the same design would in the real world. [Jon Mendenhall] fixed this deficiency by designing a model roller coaster that accurately simulates a full-sized ride.

The track and cart are all made of 3D printed pieces, which altogether took about 400 hours to print. The main trick to the system’s unique motion is that the cart is motorized: a brushless DC motor moves it along the track using a rack-and-pinion system. This means that technically this model isn’t a roller coaster, since the cart never makes a gravity-powered drop; it’s actually a small rack railway, powered by a lithium-ion battery carried on board the cart. An ESP32 drives the motor, receiving its commands through WiFi, while the complete setup is controlled by a Raspberry Pi that runs the cart through a predetermined sequence.

The design of the track was inspired by the Fury 325 roller coaster and simulated in NoLimits 2. [Jon] wrote his own software to generate all the pieces to be printed based on outputs from the simulator. This included all the track pieces as well as the large A-frames holding it up; some of these were too long to fit in [Jon]’s 3D printers and had to be built from smaller pieces. The physics simulation also provided the inputs to the controller in the form of a script that contains the proper speed and acceleration at each point along the track.

The end result looks rather slow compared to other model roller coasters, but actually feels realistic if you imagine yourself inside the cart. While it’s not the first 3D printed roller coaster we’ve seen, it’s probably the only one that accurately simulates the real thing. If you’re more interested in a roller coaster’s safety systems, we’ve featured them too.

Continue reading “3D Printed Model Roller Coaster Accurately Simulates The Real Thing”