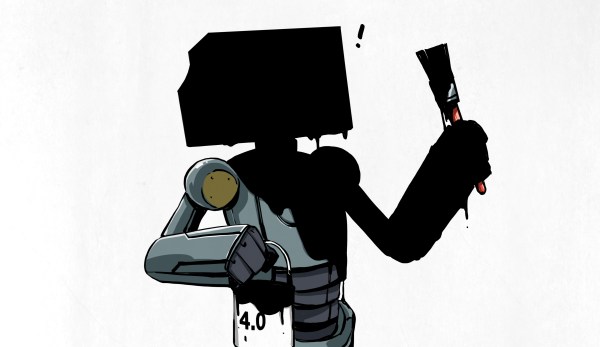
Vantablack is a special coating material, moreso than a paint. It’s well-known as one of the blackest possible coatings around, capable of absorbing almost all visible light in its nanotube complex structure. However, it’s complicated to apply, delicate, and not readily available, especially to those in the art world.
It was these drawbacks that led Stuart Semple to create his own incredibly black paint. Over the years, he’s refined the formula and improved its performance, steadily building a greater product available to all. His latest effort is Black 4.0, and it’s promising to be the black paint to dominate all others.
It started with [KB9ENS] looking into paints or coatings for passive or radiative cooling, and in the process he decided to DIY his own. Not only is it perfectly accessible to a home experimenter, his initial results look like they have some promise, as well.
[KB9ENS] read about a type of ultra-white paint formulation that not only reflects heat, but is able to radiate it into space, cooling the painted surface to below ambient temperature. This is intriguing because while commercial paints can insulate and reflect heat, they cannot make a surface cooler than its surroundings.
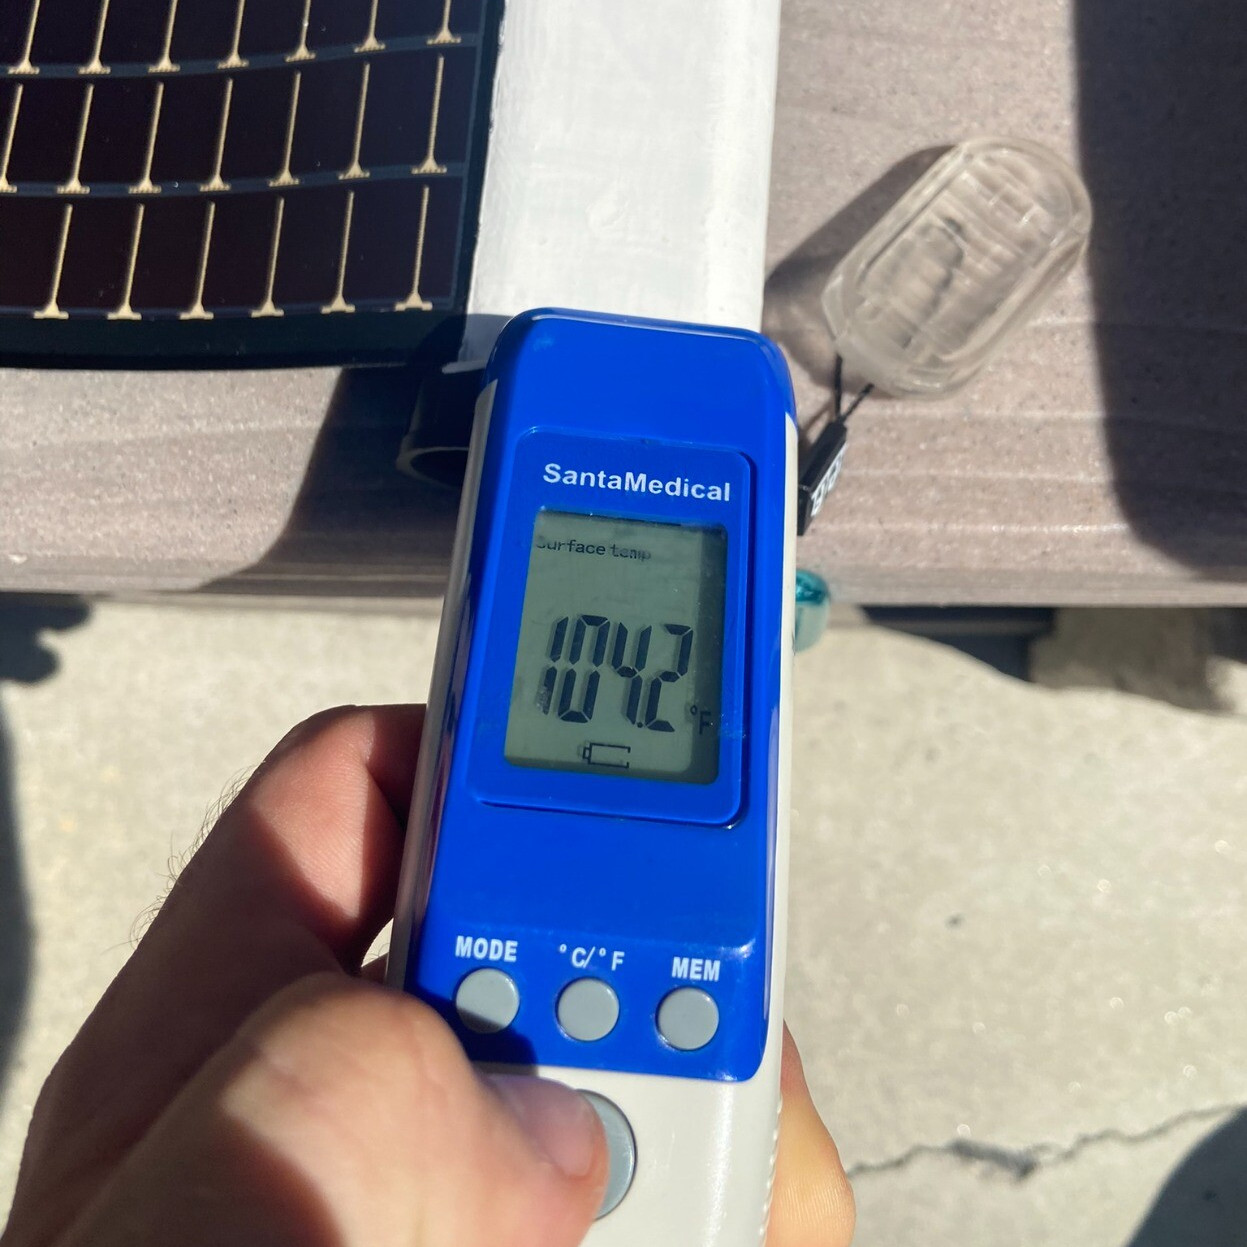
Anecdotally speaking, this painted battery section of a solar recharger gets too hot to touch in full sunlight. But when painted over, it was merely warm.
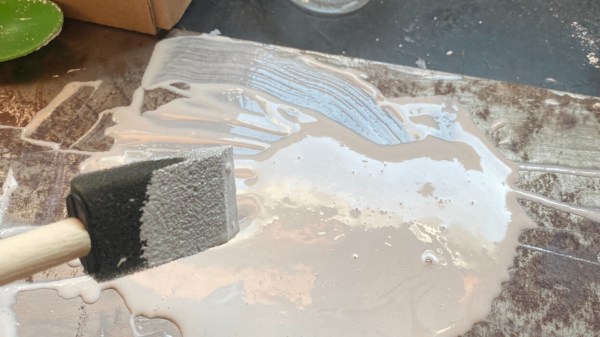
What really got [KB9ENS] thinking was that at its core, the passively-cooling paint in the research is essentially a whole lot of different particle sizes of barium sulfate (BaSO₄) mixed into an acrylic binder. These two ingredients are remarkably accessible. A half-pound of BaSO₄ from a pottery supply shop was only a few dollars, and a plain acrylic base is easily obtained from almost any paint or art supplier.
[KB9ENS] decided to mix up a crude batch of BaSO₄ paint, apply it to some things, and see how well it compared to other paints and coatings. He wetted the BaSO₄ with some isopropyl alcohol to help it mix into the base, and made a few different concentrations. A 60% concentration by volume seemed to give the best overall results.
There’s no indication of whether any lower-than-ambient cooling is happening, but according to a non-contact thermometer even this homemade mixture does a better job of keeping sunlight from heating things up compared to similarly-applied commercial paints (although it fared only slightly better than titanium dioxide-based white paint in the initial test.)
[KB9ENS] also painted the battery section of a solar recharger with his homemade paint and noted that while under normal circumstances — that is to say, in full sunlight — that section becomes too hot to touch, with the paint coating it was merely warm.
Actual passive cooling can do more than just keep something less warm than it would be otherwise. We’ve seen it recently used to passively and continuously generate power thanks to its ability to create a constant temperature differential, day and night.
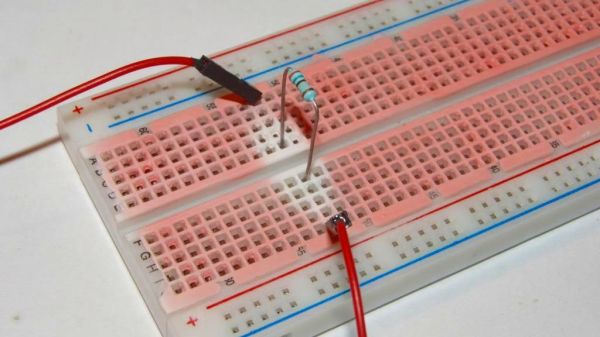
There’s a point in a component’s thermal regime that’s between normal operation and overloaded to the point of obvious failure. That’s a dangerous region, because the component isn’t quite hot enough to release the Magic Smoke, but hot enough to singe any finger you poke around with the see if everything’s running right. So if you’re looking to keep your fingerprints unmodified, but you don’t want to invest in a thermal camera, you might want to let this thermochromic breadboard point the way to overloaded components.
We’re not sure where this tip came from, but judging by the look of the website it was sometime in the late 90s. We’re also not sure who’s behind this little hack, so we’ll just credit [improwis]. The idea is pretty simple — white acrylic paint is mixed with thermochromic pigment, and the mixture is carefully painted onto the plastic surface of a standard-issue solderless breadboard. Care is taken to apply thin coats, lest the paint gets into the contacts and really muck things up. Once the paint is dry you’re ready to build your circuit. We have to admit we’re surprised at how sensitive the paint is; judging by the pictures, the heat coming off a 1/4-watt resistor dissipating 350 mW is plenty, even when the body of the resistor is well above the surface of the breadboard. We’d imagine the paint would point out not only hot components but probably the breadboard contacts too, if things got really toasty.
This seems like such a great application of thermochromism, one that’s a bit more useful than clocks and Pi Day celebrations. If you’re going to try this yourself, you’ll have to track down your own supply of thermochromic pigment, though — the link in the article is long dead. That’s not a problem, though, as Amazon sells scads of the stuff, seemingly aimed mainly at nail salons. The more you know.
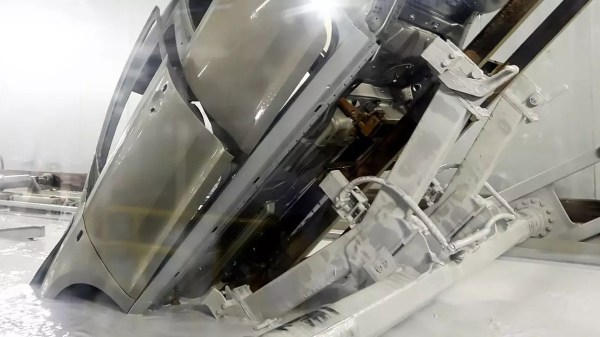
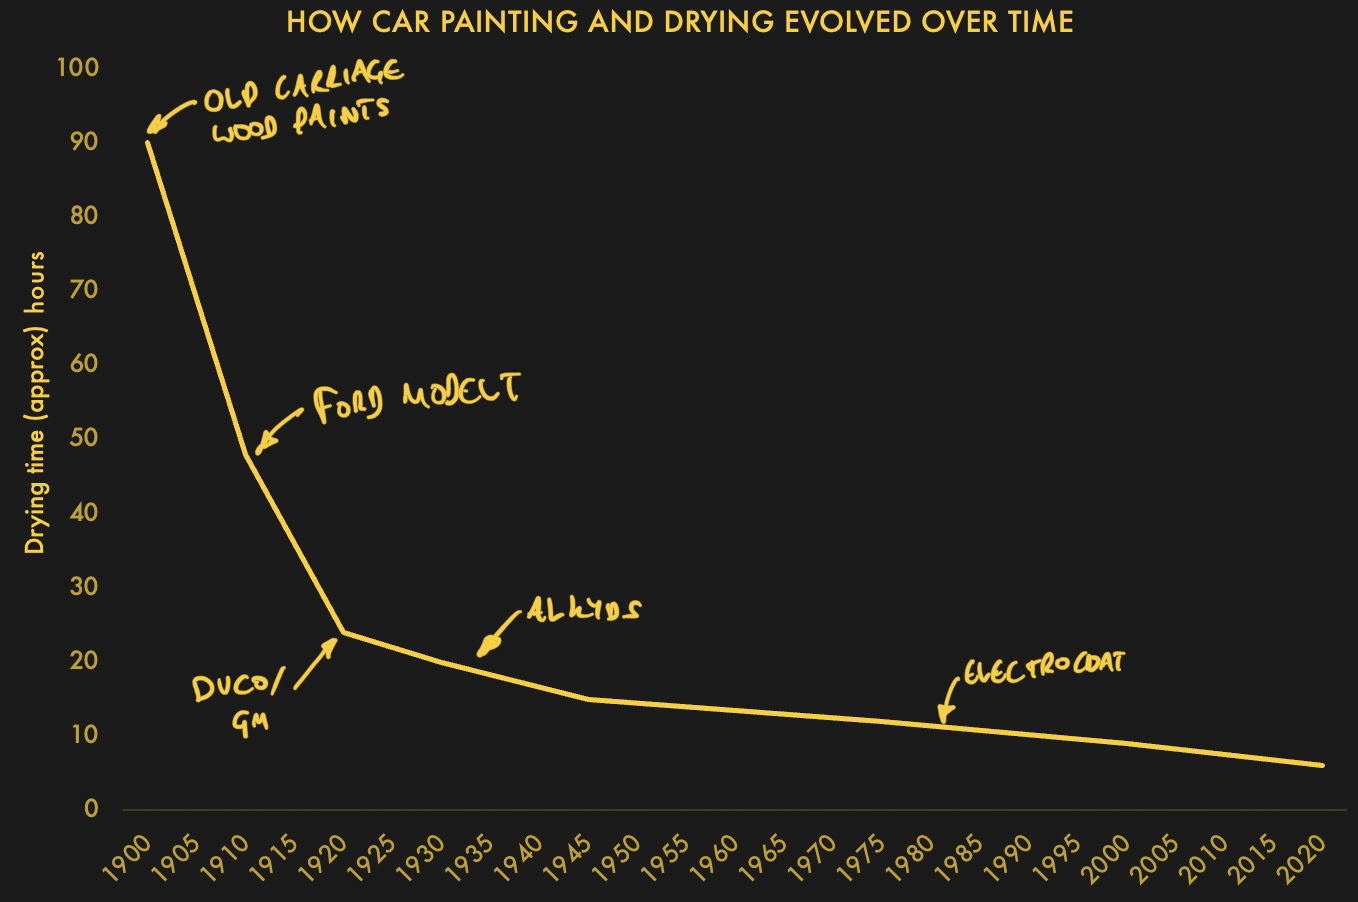
In it, we learn that the aforementioned black paint from Ford had so much asphalt in it that black was the only color that would work. Not to go down a This Is Spinal Tap rabbit hole, but there were several kinds of black on those Model Ts. Over 30 of them were used for various purposes. The paints also dried in different ways. While the assembly only took 12 hours, the paint drying time took days, even weeks backing up production and begging for innovation. [edconway] then fast-forwards to an era of “conspicuous consumption and ‘planned obsolescence’” with DuPont’s invention of Duco that brought color to the world of automobiles.
See the article for the real story of advances in paint technology and drying time. Paint application technology has also steadily improved over the years, so we recommend diving in to get the century’s long story.
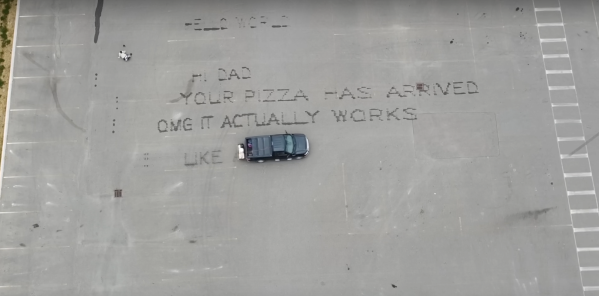
[RyderCalmDown] was watching a road painting vehicle lay down fresh stripes on the road one day and started thinking about the mechanism that lets it paint stripes in such a precise way. Effectively the system that paints the interspersed lines acts as a dot matrix printer that can only print at a single frequency. With enough of these systems on the same vehicle, and a little bit more fine control of when the solenoids activate and deactivate, [RyderCalmDown] decided to build this device on the back of his truck which can paint words on a roadway as he drives by. (Video, embedded below.)
Of course, he’s not using actual paint for this one; that might be prohibitively expensive and likely violate a few laws. Instead he’s using a water-based system which only leaves temporary lettering on the pavement. To accomplish this he’s rigged up a series of solenoids attached to a hitch-mounted cargo rack. A pump delivers water to each of the solenoids, and a series of relays wired to a Raspberry Pi controls the precise timing needed to make sure the device can print readable letters in much the same way a dot matrix printer works. There’s an algorithm running that converts the inputted text to the pattern needed for the dot matrix, and after a little bit of troubleshooting it’s ready for print.
Even though the printer works fairly well, [RyderCalmDown] had a problem thinking of things to write out on the roadways using this system, but it’s an impressive build based around a unique idea nonetheless. Dot matrix printers, despite being mostly obsolete, have a somewhat vintage aesthetic that plenty of people still find desirable and recreate them in plenty of other ways as well, like this 3D printer that was modified to produce dot matrix artwork.
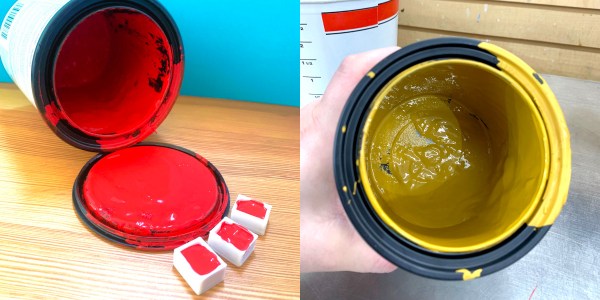
How can the big box store mix the perfect shade of English Wedgwood right before your eyes? The answer is in highly-concentrated pigments that come in many different sizes up to a whopping five gallons. Now, just imagine the amount of watercolor, acrylic, or other types of paint that could be made by simply scraping the walls of an empty 5-gallon tub, which you know is just getting thrown away with all that usable pigment inside.
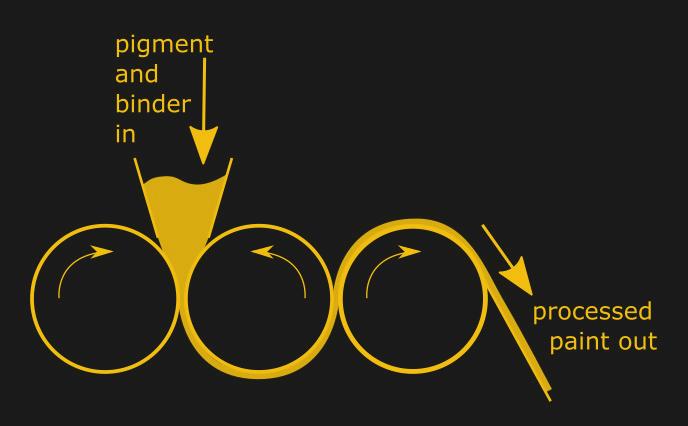
The process will likely take the form of an open-source three-roller milling machine, which are commonly used in paint manufacture. Basically you have three rollers that process the pigment and binder, and the mixture is run through as many times as necessary. Although they are fairly simple machines in design, building them to work well requires adherence to precise technical specs.
We can’t wait to see what [technoplastique] comes up with to use for the stainless steel rollers. The rest of the plan involves a Raspberry Pi Pico, one DC motor per roller, a motor shield, and a power supply, but the rollers are pretty crucial. If you have any ideas other than steel rolling pins (the kitchen kind) or pipe couplings (which are too short, anyway), let us know in the comments!
We’ve all learned in primary school art classes that blue and yellow make green, and that adding a little black to a color will make it darker. But what if you want to paint with a color that exactly matches something else? Usually, that requires a lot of trial and error (and paint), and the end result may not look the way you wanted after all.
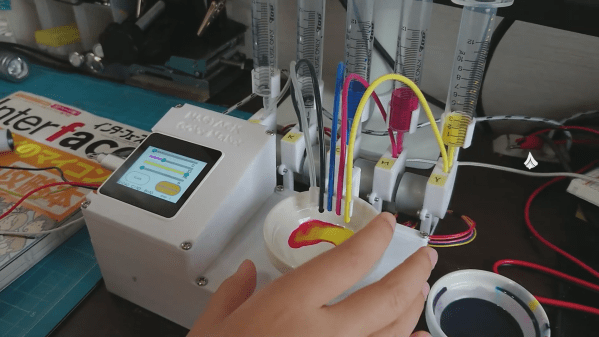
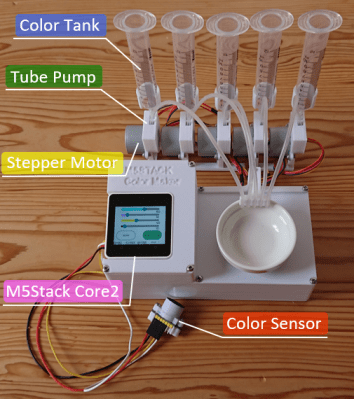
To help aspiring artists, [Airpocket] made the M5Stack Color Maker. This is a device that reads out a color sensor and automatically mixes watercolor paint in the right proportions to match what it sensed. It dispenses drops of cyan, magenta, yellow and black paint (CMYK) into a small bowl, from which you can then apply it with a paintbrush.
The color sensor is similar in use to the color picker (or “dropper”) tool present in most graphics programs: simply point it at something that has the right color, and it will generate the correct values for you. It is based on an AMS TCS34725 color sensor, which is housed in a 3D-printed shell that also includes a white LED. The sensor outputs Red, Green and Blue (RGB) values, which are converted into the corresponding CMYK values by a Raspberry Pi Pico. A touch-sensitive screen allows the user to make adjustments before activating the paint pumps.
Those pumps are tube pumps, which have been specifically designed (and also 3D printed) to allow them to move tiny amounts of liquid while minimizing the pulsing motion typical with this type of pump. They are driven by stepper motors which are controlled by the Pi Pico.

 The color sensor is similar in use to the color picker (or “dropper”) tool present in most graphics programs: simply point it at something that has the right color, and it will generate the correct values for you. It is based on an AMS TCS34725 color sensor, which is housed in a 3D-printed shell that also includes a white LED. The sensor outputs Red, Green and Blue (RGB) values, which are converted into the corresponding CMYK values by a Raspberry Pi Pico. A touch-sensitive screen allows the user to make adjustments before activating the paint pumps.


