DIY “Project Glass” Clone Looks Almost Too Good To Be True

vuzix-project-glass

By now we’re assuming you are all familiar with Google’s “Project Glass”, an ambitious augmented reality project for which they revealed a promotional video last week. [Will Powell] saw the promo vid and was so inspired that he attempted to rig up a demo of Project Glass for himself at home.

While it might seem like a daunting project to take on, [Will] does a lot of work with Kinect-based augmented reality, so his Vuzix/HD webcam/Dragon Naturally Speaking mashup wasn’t a huge step beyond what he does at work. As you can see in the video below, the interface he implemented looks very much like the one Google showed off in their demo, responding to his voice commands in a similar fashion.

He says that the video was recorded in “real time”, though there are plenty of people who debate that claim. We’re guessing that he recorded the video stream fed into the Vuzix glasses rather than recording what was being shown in the glasses, which would make the most sense.

We’d hate to think that the video was faked, mostly because we would love to see Google encounter some healthy competition, but you can decide for yourself.

Continue reading “DIY “Project Glass” Clone Looks Almost Too Good To Be True”

Building A Game Clock For Go Or Chess

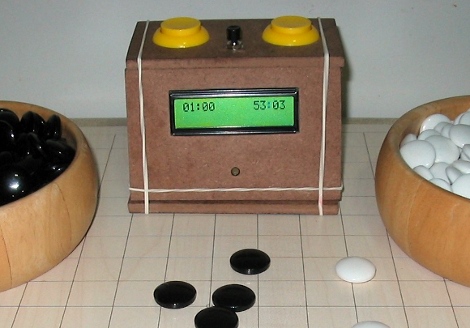
[Matias] is just getting into hobby electronics and decided to push the limits of his skill by building this game clock (site dead try Internet Archive). He comes from a software design background and that really shows through in the UI design seen in the video after the break. We enjoy the journey through his prototyping process which started with an Arduino and a breadboard, and ended with this standalone timer.

After building the first working prototype with four buttons and a character LCD, he migrated to a plastic ice cream container as an enclosure. This worked well enough, but the flimsy case needed an upgrade. As he looked toward the next version he decided to move to an Arduino Nano board to save on space. The rest of the components were soldered to some protoboard, with a pair of pin headers to receive the Nano. The finished board is the same length as the Nano and only about twice as wide.

The box was modeled on the computer (it looks like SketchUp to us be we could be wrong) then cut from pieces of Masonite. It hosts the character LCD with a pair of arcade buttons for each player to shift the time burden to his or her opponent. The middle button pauses the game, and there’s a trimpot on the back to adjust the screen contrast. [Matias] managed to include a surprising number of settings which will make this little box useful for a wide range of game types.

Continue reading “Building A Game Clock For Go Or Chess”

Board Lets You Know When To Hold ’em; Know When To Fold ’em

Don’t mind me, I’m just listening to some tunes during our poker game. Well, that and getting some electronic coaching about poker odds. This board lets you wiggle your toes to input the upcards, and those in your hand. After each entry the gadget will tell you your odds of winning the hand. Take it easy with this kind of stuff, if Rounders was at all realistic, getting caught cheating is a painful mistake.

The thing we find interesting about the system is that it doesn’t use a stored odds database. Instead, the Propeller chip runs a simulation of 1000 hands of poker based on the cards you have entered and uses the results to calculate the odds. [Nick] says that this runs quickly because he’s using multiple cores for the calculations, and it cuts down on the data that the device needs to have on board. Right now the feedback uses a text-to-speech generated voice, but you can customize the audio clips if you’d like. Check out a demo of the device in the clip after the break.

Not looking to get the beat down for cheating? Here’s a poker tournament timer that we assure you is on the up-and-up. Continue reading “Board Lets You Know When To Hold ’em; Know When To Fold ’em”

Automated Turntable Photography

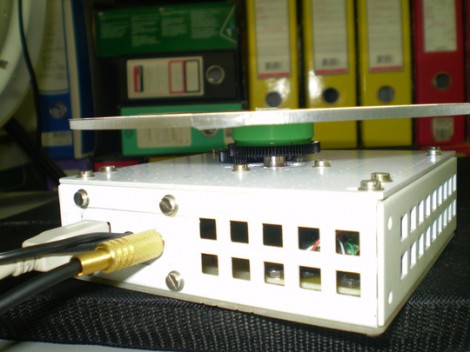
[Muris] has a friend who is selling items on the internet. This friend wanted a simple way to make rotating images of the products and asked him to help. The result of his labors is this base unit that drives the turn table and controls the camera.

The first iteration of the turntable was powered by the stepper motor from a floppy drive. A disc was mounted directly on the motor spindle, but the results were a bit poor. This is because the motor had a fairly low resolution of 200 steps per rotation. That doesn’t allow for smooth animation, and there was a lot of vibration in the system. An upgrade to the geared system you see above included swapping out that motor for one from an old scanner. Now it achieves 1200 steps per rotation and the vibration is gone.

The connectors seen in the base are USB, incoming power, and shutter control. [Muris] wrote a program to control the PIC 16F628A inside the base. The program sends commands via USB and has parameters for number of frames per rotation, direction of rotation, and the like. Set it up as desired, place the product on the turntable, and hit start. Unfortunately there’s no video of this in action because [Muris] gave it to his friend as soon as it was finished. We guess the fact that he didn’t get it back means it’s working great.

If you don’t mind some rough edges and exposed wiring you can throw a system of your own together pretty quickly.

Hackaday Links: April 11, 2012

This hurts our head

You know you can ‘freeze’ drops of water in mid-air by flashing a LED at the right time, right? Well, according to this video you don’t even need a strobing light; just use the frame rate of the camera. Much cooler if you don’t know how it works, in our humble opinion.

Now do Junkyard Wars!

[James Cameron] and [Mark Burnett] (the guy who created Survivor) are bringing Battlebots back to the Discovery Channel. The new show is called Robogeddon and calls upon the current talent in the fighting robot world. Our prediction? Someone is going to build an amazing piece of art that will be completely destroyed in the first round; a wedge with wheels will take the championship.

A steam engine made out of rocks

[Hansmeevis] just spent 230 hours hand carving a steam engine out of gems. It’s called “Dragon’s Breath” and it’s an amazing piece of work: the cylinder is carved out of quartz, while the flywheel, mount, and base are carved out of jasper, onyx, zugalite, and other semi precious gems. Amazing artistry and it works.

Don’t lose a finger on all that science over there

[Dr. W] is a science teacher in Saint-Louis, France. Next year, his students will be learning about reaction propulsion and impulse conservation. To demonstrate these properties, [Dr. W] hacked up an old vacuum cleaner in to a jet engine and built a Pitot tube to measure the 140 km/h wind speed. Google translation.

Circuit bending a Sega Saturn

Making cool glitched-up graphics from Ataris and Nintendos is old hat, but not much has been done with circuit bending slightly more modern consoles. [big pauper] found his old Sega Saturn in his grandma’s attic and wondered what secrets this forgotten box held. It turns out he can make some pretty cool sounds and even cooler glitched out graphics. The pic above is from Virtua Fighter; done correctly these glitched low-polygon graphics could easily find themselves in a very stylistic indie game.

Experimenting With 8-bit Graphics

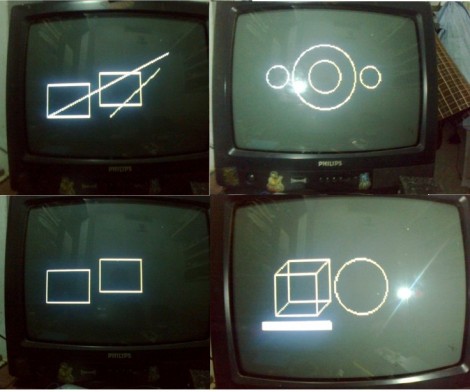
[Vinod] has done a lot of work with microcontrollers, but this is his first try at displaying graphics using composite video. He had a small PAL television on hand, and an ATmega32 which just needs a stable clock source and a few resistors to get things going.

There are a lot of other hacks around that use composite video out with microcontrollers. But this is a ground-up approach which will help you understand the concepts behind these graphics. [Vinod] started by calculating the possible resolution. He needs to hold a frame buffer in memory, and since his chip has just 2 kilobytes of SRAM this will be the limiting factor. He settled on a display area of 128 by 64 pixels. This divides evenly by 8 so he’s not wasting any bits, and it totals 1k, leaving half of the SRAM for use in calculating the shapes which populate the buffer. An interrupt service routine runs ever 64 microseconds to feed data for each line of the display.

With the scanning in place, he moved on to fill the frame buffer. Two functions are used, one which sets a pixel the other clears a pixel. He compares these to using a pencil and an eraser. By calling these functions from his main program he is able to draw lines, boxes, and circles. A bit of creative looping and he’ll have animations as well, but that’s a concept for a different post.

Separating A Working Scanner From Its Broken Printer

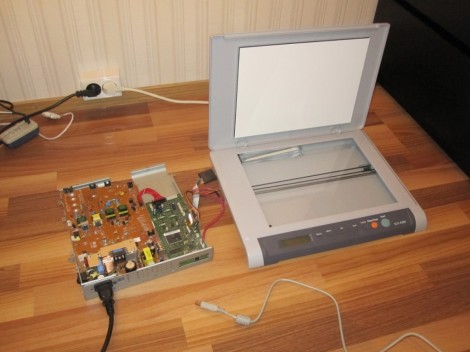
The laser printer portion of this all-in-one machine gave up the ghost and [Entropia] couldn’t get it working again. But the scanner was still functioning so he decided to separate the scanner from its dead printer module.

The model in question is a Samsung SCX-4200. The design is actually perfect for separation because the scanner sits on top of the out feed tray of the printer. It can even be lifted to allow more room for printed pages to pile up. All he has to do is separate the hinged connector and reroute the flat cables. But the real question in [Entropia’s] mind was whether or not the control board would work without the laser printer components connected to it.

He carefully disassembled the unit, spilling toner here and there which is left over from a catastrophic knock-off toner cartridge incident. A quick test showed him that although the drivers complain that the paper tray is open, the scanner does still work. He glued the controller board seen on the left to the bottom of the scanner enclosure, and added some felt feet. Now his scanner is closer to the size you’d expect. And on the plus side he gained a geared stepper motor, laser scanning unit, exhaust fan, and a couple of solenoids to use in future projects.