Working Jet Pack

Finally, A Working Jet Pack

Well, kind of. This is one of [Jason Kerestes’] latest projects as a masters engineering student at the Arizona State University — A jet pack designed to increase your running speed by quite literally giving you a boost.

It’s one of the proposed solutions to the 4MM (4 Minute Mile) project, which is part of the ASU Program called iProjects, which brings students and industry together to solve problems. The 4MM project is trying to find a way to make any soldier able to run the 4 minute mile — quite ambitious, but DARPA is actually working on it with [Jason]!

The whole rig only weighs 13lbs and features two electric turbines which provide the thrust. They originally tested the concept by seeing if you could pull a person with an electric golf cart around a track to make them run faster — turns out, you can. Further more scientific testing led them to find that there is a specific thrust to body-weight ratio that works best, with the direction of thrust about 25 degrees below horizontal.  Continue reading “Finally, A Working Jet Pack”

Environmental Sound Detectors 

We all know that sound. That sound of a noisy yapping dog, or the sound of a disruptive garbage truck loudly picking up the trash while making a ruckus along the way. It can be extremely distracting and frustrating to deal with. And more often than not, we have little control over the noise pollution in the area. Unless of course, you build a monitoring solution to raise awareness of the situation, like this one that [Edmund] made.

It was designed in conjunction with the Earth Journalism Network (EJN) in order to, as their website states, “facilitate story-telling of the sources and health impacts of noise from around the world“. An Arduino Pro Mini was the backbone of the project. Being open-source in nature meant that it could be customized easily with a wide array of sensors. [Edmund] chose to use an Electric Imp adding WiFi capability to the device. His step-by-step tutorial showed the design process, leading into the prototyping of the parts, and contains schematics for the circuit. As of the time that this article was published, the coding section of project hasn’t been released yet, but the first three parts give enough information to get the ball rolling.

This type of monitoring solution has the potential to record the noise levels of neighborhoods all across the world. With a large enough pool of data, API’s can be developed for uses like house hunting web searches that show which areas in town are the quietest, or which ones are the loudest. This will surely provide a wealth of knowledge about noise pollution, and it will be interesting to see how people utilize this (and projects similar) in the future.

THP Semifinalist: Secure Your Internets With Web Security Everywhere

[Arcadia Labs] has created a great little device in Web Security Everywhere, a semifinalist in The Hackaday Prize. At the center of it all is UnJailPi, a Raspberry Pi device which can act as a secure router between a protected network and the unprotected internet. UnJailPi can create OpenVPN and Tor connections on the fly from its touch screen interface. The full details are right up on [Arcadia’s] Hackaday.io project page.

One of the most amazing things about the project is its creator, [Arcadia Labs]. [Arcadia] started from square one learning python just 1 year ago. Since then he’s become a proficient python coder, and created UnJailPi’s  entire user interface with pygame.

[Arcadia] is also working with simple hand tools. He has no access to the CNC routers, 3D printers, or milling machines used in many of the projects we see here on Hackaday. All the work on UnJailPi’s acrylic case was done with a handsaw, a file, and a heck of a lot of patience.

Currently [Arcadia’s] biggest hurdle is finding a good power supply for his project. UnJailPi is designed to work both on AC or an internal battery. His current power circuit throws off enough heat that the Raspberry Pi resets while the battery is charging.

We’re sure [Arcadia] will figure out his power issues, but if you have any suggestions, leave a comment here, or head over to the project page and let him know!


SpaceWrencherThe project featured in this post is a semifinalist in The Hackaday Prize.

The Current State Of ESP8266 Development

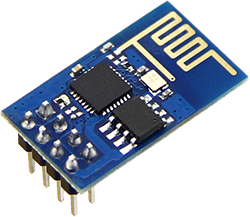
A few weeks ago we caught wind of a very cool new chip. It’s called the ESP8266, and it’s a WiFi module that allows you to connect just about any project to an 802.11 b/g/n network. It also costs $5. Yes, there was much rejoicing when this chip was announced.

Since we learned of the ESP8266, there has been a lot of work done to translate the datasheets from Chinese, figure out how the SOC can be programmed, and a few preliminary attempts at getting this module working with an Arduino. Keep in mind, very few people have one of these modules in hand right now, so all this information is completely untested. Here’s what we have so far:

Over on Hackaday Projects, [bafeigum] has been working to research the capabilities of this module. Most of the comments deal with the AT Command set for the module and figuring out what is actually returned when certain commands are called.

The ESP8266 community forum is about a week old, but already there’s a wealth of information. Most of the efforts seem to be centered on getting GCC to program this chip, something that would make the ESP8266 a single-solution chip for anything that needs WiFi and a bit of processing power. Everyone (including the great [Sprite_TM]) has currently hit a roadblock, so if you have a ton of experience with GCC and the Xtensa microcontroller, check out that thread. Failing that, we’ll have to wait until someone from Tensilica, the company behind the guts of this chip, to chime in and help everyone figure out how this thing actually works.

The Arduino-heads out there will have a much easier time. There’s already a tutorial for using the ESP8266 as a serial WiFi module. Note the ESP operates on 3.3 Volts, so connecting this module to the 5V pin means you’ll be out $5 and several weeks of shipping time.

This is an incredible amount of development in a very short amount of time, made even more remarkable by the fact that no one has one of these WiFi modules yet. When these modules do arrive to workbenches around the world, we’ll expect the Hackaday tip line to be flooded with very small and somewhat battery friendly WiFi builds.

kaleidoscope

Arduino Powered Digital Kaleidoscope

[Jose’s] latest project brings an old visual effect toy up to date with digital electronics. Most of us are familiar with inexpensive kaleidoscope toys. Some of us have even built cheap versions of them with paper tubes, mirrors, and beads. [Jose] wanted to try to recreate the colorful pattern effects created by a kaleidoscope using an Arduino and an addressable LED strip.

The build is actually pretty simple. The base is a disc of PVC cut to just a few inches in diameter. [Jose] started with an addressable LED strip containing 60 LEDs. He then cut it into 12 sections, each containing five LEDs. The smaller strips were then mounted to the disc, similar to spokes on a bicycle wheel. The LED strip already has an adhesive backing, so that part was trivial.

The final step was to add some kind of diffuser screen. The LED strips on their own are not all that interesting. The diffuser allows the light to blend together, forming interesting patterns that are more reminiscent of the patterns you might see in a real kaleidoscope. Without the diffuser you would just see individual points of light, rather than blended color patterns.

The whole thing is controlled by a small Arduino. [Jose] has made the code available at the bottom of his blog post. Be sure to watch the video of the system in action below. Continue reading “Arduino Powered Digital Kaleidoscope”

Welcome To The Garage Of The Future

Over the last several years, hackerspaces have cropped up all over the world. These places have become a home base for hackers, tinkerers, makers, designers, and engineers alike. One of the biggest problems associated with these creative environments is the hours that are typically available. A lot of the time you just can’t walk in at odd hours of the night and expect to do anything at all. Granted, the best hackerspaces give out 24 hour access keys to those that pay for it, but sometimes it just feels better to do the work from the comfort of one’s home. Also, if a person doesn’t have the privilege of having a hackerspace in the area, then transforming a garage into a work shop can provide a nice entry point into the continuation of the maker revolution.

A trend is emerging where garages are being turned into hackerspace-like workshops that are neatly packed away within ordinary neighborhoods. A great example is EdsJunk Home Shop. His two car garage was converted into a maker shop complete with 3D printers, laser cutters, CNC machines, and more tools than one can dream of. The key, as [Ed] states, to creating such a useful home shop is organizing everything strategically.

This project has been a 5 year venture so far and there is still plenty to do. Years of experience have taught [Ed] to coordinate the tools in out-of-the-box ways. His air compressor, for instance, is stored in the attic with a retractable hose descending from the roof down into the garage which helps to save space and reduce noise.

Continue reading “Welcome To The Garage Of The Future”

Lots of battery reviews and more!

An Obsessively Thorough Battery (and More) Showdown

There are a number of resources scattered across the Internet that provide detailed breakdowns of common products, such as batteries, but we haven’t seen anything quite as impressive as this site. It’s an overwhelming presentation of data that addresses batteries of all types, including 18650’s (and others close in size)26650’s, and more chargers than you can shake a LiPo at. It’s an amazing site with pictures of the product both assembled and disassembled, graphs for charge and discharge rates, comparisons for different chemistries, and even some thermal images to illustrate how the chargers deal with heat dissipation.

Check out the review for the SysMax Intellicharger i4 to see a typical example. If you make it to the bottom of that novel-length repository of information, you’ll see that each entry includes a link to the methodology used for testing these chargers.

But wait, there’s more! You can also find equally thorough reviews of flashlights, USB chargers, LED drivers, and a few miscellaneous overviews of the equipment used for these tests.

[Thanks TM]