Mobile Planter Chases The Sun

There are two types of people: ones with green thumbs, and ones that kill their cacti  because they forgot to water them for over a year. Sadly, we are of the latter group. We currently have a resilient spider plant that looks like it could use more sun. Now there’s a way for it to catch those rays wherever they may shine, thanks to [Dot Matrix] of Instructables. She made a mobile planter that actively seeks out sunlight.

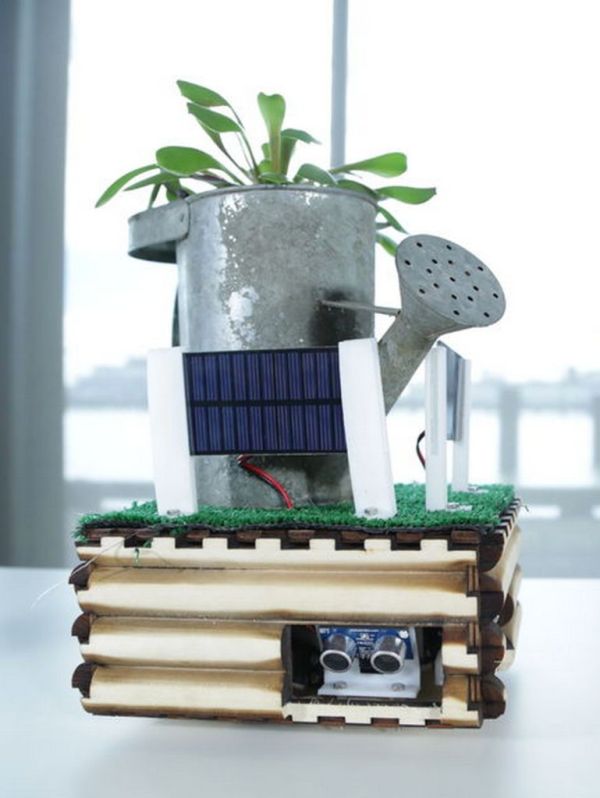
The planter’s base was made of plywood, topped with fake grass and a watering can to hold the plant. Anything above the planter base can be modified to whatever desired aesthetic. A CRT planter may be too heavy, but there are countless ways to personalize it. [Dot] used an Afinia 3D printer to make various mounts and brackets with ABS plastic. The planter was controlled by an Arduino Micro and used a pair of 0.5W solar panels and Parallax PING))) sensors to decide how it should move from its current position. If the planter would fall or hit an object moving forward, it would reverse and turn on wheels powered by Parallax continuous rotation servos. It would evaluate its new position, repeating the process if it was in danger. Once the planter was safe, it used the solar panels to detect the most sunlight: the sum of the panels determines the area’s brightness while the individual panels’ readings were used to move the planter towards a brighter area. The sun-seeking continued until the sunniest spot was found (defined in the code). Here, the planter remained idle for 10 minutes before restarting the process.

We think [Dot’s] planter is a fun way to keep plants happy and healthy in spite of us. See a video of the planter after the break.

Continue reading “Mobile Planter Chases The Sun”

Monitor Shield Leaves No Pin Unused

What doesn’t this Arduino Mega shield have? Ponder that as you realize that it doesn’t just attach itself to the pin headers, but uses every single one of the mega’s connections.

This isn’t a bunch of components kludged together either. [Carsten] is an a EE and that explains a lot of the really great choices he made like buffering, opto-isolation, and the clean assembly despite a schematic that’s so busy it’s difficult figure out where to start.

So, what does it do? Looks like a one-stop-shop for quick prototyping needs. For instance, there’s a pushbutton, toggle-switch, and a couple of trimpots for quick and easy input. At the center of the board is a 7-segment display, and multiple rows of LED bar displays (assembled from SMD components and protoboard) to provide feedback to the user.

There are also a number of sensors at the party, including a mercury shake sensor, temperature sensor, microphone, thermistor, and light dependent resistor. If what you need isn’t on the board there are multiple options for connecting external gear including opto-isolated input and output, and a LEMO for digital I/O with another for analog. All of that and we forgot to mention the moving coil voltmeter that measures PWM.

Interactive Sound With Glove And Tape

Here’s a way to explore new spaces in untraditional manners: a sonophore, or a glove equipped with a tape heads meant to explore spaces with magnetic tape tracing the walls.

This project is a followup to the analogue tape glove from a few years ago. In that project, aligned strips of magnetic tape cover a canvas, leaving anyone wearing the glove to track their hand horizontally swiping across different tracts, or vertically listening to each track.

This project takes a glove similar to the analogue tape glove, but the tape is spread out along the walls of the installation. There’s no way of knowing what strange voices are contained on the tapes; the only way to know is to explore the space.

Video of the project below. It’s a Vimeo, so you know it’s artistic.

Continue reading “Interactive Sound With Glove And Tape”

Breadboarding A 68000 Computer In Under A Week

We’ve been lurking over at Big Mess ‘o Wires as [Steve] geared up for his 68000 computer build. One of his previous posts mentioned a working breadboard version but we figured it would be a ways off. Surprise, he’s got it working and what you see above took just 6 days of “occasional work” to get running.

The chip in use is actually a 68008 but we remember reading that he does plan to migrate to a 68000 because this one lacks the memory pins to address more than 1 MB of RAM. The trick here was just to get the thing running and he made some common choices to get there. For instance, he grounded the /DTACK in much the same way [Brian Benchoff] explained in his own 68k build.

We’re not sure if his address decoding was a time saver or not. If you study [Steve’s] original planning post you’ll learn that he’s going to use programmable logic to handle the address decoding. But above he wired up 74-series logic chips to perform these functions. On the one hand you know your Hardware Description Language isn’t the problem, but did you terminate one of those wires where you ought not?

Additional tripping points include a bouncing reset pin. Looking at that we’d tell [Steve] there’s a problem with his chip, except that this was his first thought as well. He went the extra mile by building and testing a replica of the reset system. This makes our brain spin… shouldn’t the reset be among the most reliable parts of a processor?

At any rate, great work so far. We can’t wait to see where this goes and we hope that it unfolds in a way that is as exciting as watching [Quinn Dunki’s] Veronica project take shape.

Tesla Truck

Tesla Truck Wants To Bring The Makerspace To The Children

With so many budget cuts, many public schools find themselves having to cut “unnecessary” programs such as shop, art, and music classes. They simply can’t afford to keep those things running and also teach other important concepts like math, language, and history. The obvious side effect is that kids don’t have a safe place to be creative and learn to make things with their hands.

Luckily, the maker movement has been rapidly growing over the last few years with makerspaces popping up all over the globe. These places are picking up the slack left behind by the budget cuts that hurt our public schools. But while makerspaces are getting more and more common, they still don’t exist everywhere. Even in those places lucky enough to have a makerspace, not everyone is aware that they exist and not everyone can afford to be a full-time member. This is where Tesla Truck comes in.

The Tesla Truck’s mission statement is “to provide a cutting-edge, mobile, hands-on STEM lab, where students, teachers, and makers can teach, learn, collaborate, create, and innovate.” It’s a noble cause for sure, but how do they plan to do this? This group intends to outfit a truck with the kinds of tools every maker dreams of. These would include a 3D printer, laser cutter, CNC plasma cutter, mill and lathe, electronics bench, and more.

Obviously just having a bunch of high-end tools is not going to cut it. Someone is going to have to teach people how to properly use these tools. The group behind the Tesla Truck is made up of educators, engineers, and published researches who have been doing this kind of thing for a while now. This group has been packing up their own personal tools into their hatchbacks and setting up shop in school classrooms around New York City, only to have to break down at the end of the day and bring them all home again. Together with the students, this group has built things like robots, quadcopters, and water purifiers. The Tesla Truck will give them the ability to reach more people much more easily.

The Tesla Truck is looking to raise a total of $62,804.01 to make their dream a reality. They have raised more than half of that outside of crowd funding. They’ve now turned to Indiegogo to raise the last $24,300. They have ten days left and they are almost halfway to their goal. You can watch their campaign video below to get a better feel for what they are all about. Continue reading “Tesla Truck Wants To Bring The Makerspace To The Children”

Using Tetris Like MS Paint

Check out Samus looking boss in this pixelated image. Who would have thought of using Tetris as a canvas for these types of graphics? Coming up with the original idea of strategically clearing and leaving Tetris pieces to end up with what is shown above is hard enough. But how in the heck do you implement the algorithm that generated this programmatically?

First off, two thing should not be surprising about this. It wasn’t manually generated during normal gameplay. That would be beyond savant level. The other thing to note is that the order in which pieces occurred was not random, but strategically calculated by the algorithm. The challenge is not only to occupy and clear the correct pixels, but to make sure the correctly colored pieces remain.

You need to see the fast-motion video embedded after the break to fully appreciate the coding masterpiece at work. We’re not going to try to paraphrase how the algorithms functions, but get comfy with the link above which walks through all of the theory (in addition to supplying the code so you can try it yourself).

Continue reading “Using Tetris Like MS Paint”

Dog Tracker Knows Where The Dirt Is

[Eric] is well on his way to making one of the less pleasant chores of pet ownership a bit easier with his dog tracking system. The dog tracker is actually a small part of [Eric’s] much larger OpenHAB system, which we featured back in July.

As a dog owner, [Eric] hates searching the yard for his pet’s droppings. He had been planning a system to make this easier, and a local hackerspace event provided just the opportunity to flesh his ideas out. The Dog Tracker’s primary sensor is a GPS. Most dogs remain motionless for a few seconds while they go about their business. [Eric’s] Arduino-frgbased system uses this fact, coupled with a tilt sensor to determine if the family pet has left any presents.

The tracker relays this information to the home base station using a HopeRF RFM69 transceiver. The RFM69 only has about a 900 foot range, so folks with larger properties will probably want to spring for a cellular network based tracking system. Once the droppings have been tracked, OpenHAB has an interface

[Eric] has also covered runaway dogs in his design. If Fido passes a geo-fence, OpenHAB will raise the alarm. A handheld dog tracker with its own RFM69 can be used to chase down dogs on the run. Future plans are to miniaturize the dog tracker such that it will be more comfortable for a dog to wear.

Continue reading “Dog Tracker Knows Where The Dirt Is”