PCB Laser Printer

PCB Toner Transfer Method, Now Without The Transfer

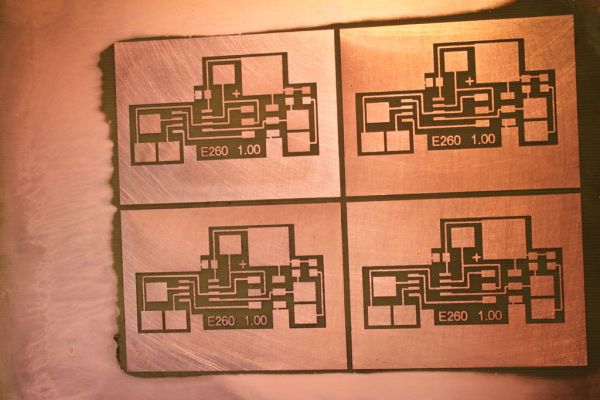
A common way to create a custom PCB at home is to do what is called the Toner Transfer Method. In this process, the trace layout of the board is printed out on a piece of special toner transfer paper that allows the ink to come off in the following step. The toner transfer paper is then put print-side-down on a copper clad PCB blank, heated and pressed with an iron. The heat and pressure from the iron transfers the toner from the paper to the copper. The exposed copper then is chemically removed, the previously applied toner protects the copper in the pad and trace areas. The toner is then removed using paint thinner.

That is a long process with many critical steps. [mlerman] wondered why no one was printing the toner directly to the PCB. He has been tinkering with printing directly on PCB blanks for 4 years now. He’s made hundreds of boards over that time and can now make a PCB in under 15 minutes.

The obvious route to take would be to modify a current laser printer to accept the much-thicker-than-paper PCB boards. A few printer models were tried but [mlerman] feels the Lexmark E260 works the best due to the cost, internal mechanical components and an easily modifiable manual feed system. There is also a Local Printer Utility that allows the majority of the printer parameters to be adjusted.

Continue reading “PCB Toner Transfer Method, Now Without The Transfer”

Ghost Gunner Machines Your AR-15

Defense Distributed and founder [Cody Wilson] have released Ghost Gunner. Defense Distributed entered the public eye a couple of years ago with The Liberator, the world’s first 3D printed gun. Since anyone with a 3D printer can print a Liberator, it is effectively untraceable. This raised a lot of questions in the media and public eye.

Ghost Gunner is a variation on the untraceable theme. Essentially, Ghost Gunner is a CNC designed for one purpose: final drilling and milling steps for AR-15 lower receivers. The reason for this has to do with federal gun laws in the United States. According to US law, the lower receiver is the actual firearm, and is regulated. But when does a block of aluminum become a lower receiver? Here, US law states that the metal becomes a regulated receiver when the machining operations are more than 80% complete.

ghostgunnergun
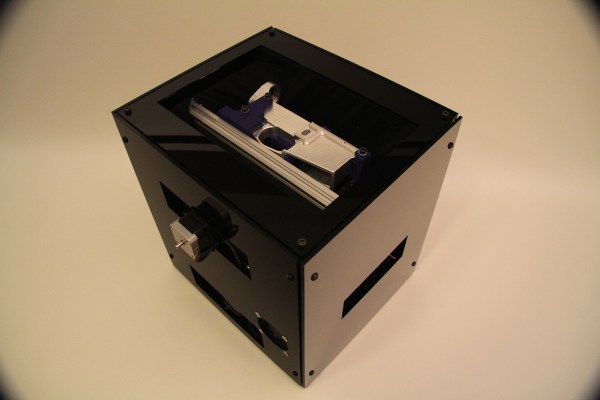
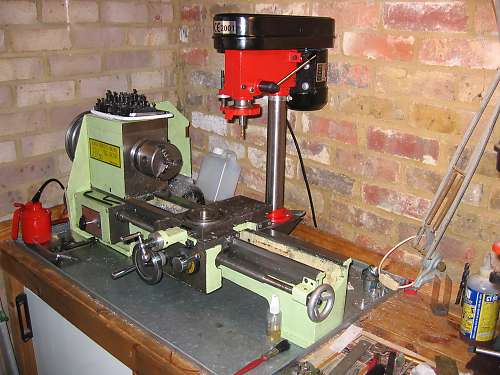
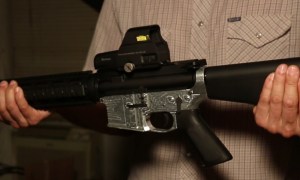
Anyone can legally buy a barrel, trigger, stock, upper receiver, and various other parts to build an AR-15. To complete the weapon, they only need to buy an 80% lower receiver and perform the last 20% of the metal work. This work can be performed with everything from a drill press to a milling machine to hand tools. Ghost Gunner partially automates this process, making it easier and faster to complete lower receivers and build weapons.

Defense Distributed calls Ghost Gunner an open source hardware project, though we were unable to find the files available for download at this time. It appears that the slides are made up of MakerSlide or a similar aluminum extrusion. The steppers appear to be standard Nema 17 size.

Defense Distributed says that they’ve been having a hard time keeping up with the Ghost Gunner pre-orders. At $1300 each though, we think a general purpose mill or small CNC would be a better deal.

Continue reading “Ghost Gunner Machines Your AR-15”

Convert a Drill Press to a Mill

Bench Top Drill Press Converted To Milling Machine, Mounted To Lathe

Milling machines are nice to have around for precisely drilling holes or removing unwanted material from a part. However, they can be expensive and may not get a lot of use, two reasons why a mill purchase may not make sense for a home shop. [David] didn’t need a mill, he wanted one and he didn’t want to spend a lot of money. He did have an old bench top drill press and a lathe in his shop and thought it would be a good idea to combine them them into a DIY Milling Machine.

The problem with just throwing a milling bit in a drill press and trying to mill metal is that the drill press spindle ball bearings are not made for radial loading. [David] knew this and replaced the stock ball bearings with angular roller bearings. These new bearings would require an axial preload applied to keep the spindle in place. This was done by machining threads into the spindle’s shaft and adding a nut to secure and preload the new angular roller bearings.

[David] did not have an XY Table to donate to the project so he decided to mount the drill press to his lathe and use the lathe axes to move the work piece around underneath the mill. Thick plate steel was welded together to form a hefty bracket that bolted to both the lathe bed and drill press column. And yes, the lathe is still functional and the changeover process is simple. To go from Mill to Lathe; the work piece is removed from the lathe’s cross slide and replaced with the lathe tool holder. That’s it!

Overall, [David] is happy with his conversion. He doesn’t expect his project to be as precise or rigid as a proper milling machine but says he has no problem cutting 1mm deep passes in steel when using a 6mm diameter mill bit.

Arduino Floppy Music Shield

A Simple Floppy Music Controller

While playing music with floppy drives has been done many times over, making any device with a stepper motor play music still appeals to the hacker in all of us. [Tyler] designed an Arduino shield and a library which lets you get up and running in no time. [Tyler]’s shield includes pin headers to connect 4 floppy drives, which plug directly into the shield. The drives don’t need any modification before being used.

While you could simply wire a few floppy drives up to an Arduino with some jumpers, this breakout shield makes connecting your drives trivial. In addition to designing the shield, [Tyler] released an Arduino library to make things even easier. The library lets you simply set the frequency you want each drive to play, which saves a bit of legwork.

The floppy-controlling Arduino library is available on GitHub and a video of the controller is included after the break.

Continue reading “A Simple Floppy Music Controller”

Automatic Desk

College Dorm Transforms Into High Tech Office

College dorms are notoriously tiny; which either forces most students into a life of minimalism, or for [Thomas Hopmans], innovation to overcome the lack of square-footage.

His first step was getting a Murphy bed, which saves tons of space. But he wanted to add a few extra features to his, so instead he decided to make his own! He designed the entire thing in SolidWorks, which might seem like overkill, but he’s an Industrial Design student, and has become quite proficient in the software from his various work internships.

The bed uses pneumatic struts to make lifting and lowering the bed frame easy — the cool part is the mechanism he designed which causes his dual 28″ monitors to pop up from the desk. They’re directly coupled to the bed with a linkage which ensures they’ll never get accidentally crushed by the bed.

He admits he could have just mounted the monitors to the bottom of the bed, but that wouldn’t have been nearly as fun as this.  He estimates the total cost was around $350 for whole thing, which isn’t half bad for a bed… and a desk!

Continue reading “College Dorm Transforms Into High Tech Office”

Build Your Own Stand Alone Web Radio

If you’re the type who enjoys passing idle time by keeping up with podcasts or listening to web stations but don’t always want to occupy your laptop or tablet, this Arduino based radio player will provide a base station for tunes.

The Web Radio project by [Vassilis Serasidis] outlines in a pleasing amount of detail exactly how to wire up a short list of four modules. These including an Ethernet shield, LCD screen, MP3 decoder, and USB serial converter, with an Arduino Mini in order to bookmark and play fourteen of your favorite channels. His hand-soldered board couples everything into one neatly stacked package. The instructional video shows this off and he even explains how to locate your favorite stations on internet-radio.com and copy their port and IP number directly into an example sketch which is provided for use. If you’ve been wanting to build a self contained radio node for your desk free of extra baggage, this is a no-sweat project for both the hardware savvy and those more oriented with code writing.

If you’re going to build your own radio, it’s always cool to disguise your high-tech creation as something more rustic. Check out this project by [Dominic Buchstaller] for a great example of a vintage radio given a second calling.

Continue reading “Build Your Own Stand Alone Web Radio”

Mutant Kitchen TV Computer

In need of a kitchen entertainment system, [BoaSoft] headed to the parts bin and produced a project that can easily be called a mutant. That being said, we love the results!

Here’s the link to the original Russian language post. If your Russian is a bit rusty here’s a really awful machine translation. So let’s see if we can decipher this hack.

Sounds like [BoaSoft] had a broken Acer laptop on hand. Problem was the laptop can’t play over-the-air television (and similarly, a television can’t surf the net). The solution was to figure out how to utilized a TV tuner of unknown origin, combine that with the laptop and a computer monitor, then add back all the user interface you’d expect from an entertainment device.

The board shown in the first post of the thread is familiar to us. It seems to be based on the IgorPlug board which is a hack that goes waaaay back. This allows for the use of an IR media center remote and those input signals are easy to map to functions. The computer runs Windows Media Center which is already optimized for remote control but can use a wireless keyboard and mouse when more computer-centric functions are necessary.

With all on track the rest of the hack deals with hacking together a case. The laptop’s original body was ditched for some extended sides for the back of the monitor. [BoaSoft] did a great job of installing all the necessary ports in these extensions. Once in the kitchen everything is nice and neat and should stand the test of time.

[Thanks Dmitry]