Edge Lit Plastic Bike

Edge-Lit Clear Plastic Bike Combines Nighttime Riding Safety With Aurora Borealis Flair

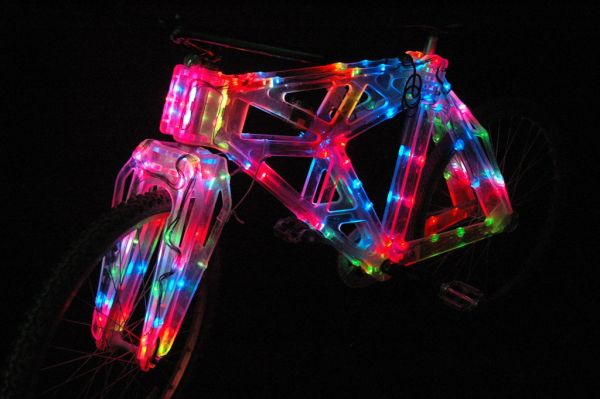
Several years ago [dan] saw some plastic frame bikes designed by MIT students. Ever since he saw those bikes he thought it would be cool to make an edge-lit plastic framed bike.

The frame is made from 1/8″ and 3/8″ thick polycarbonate sheet. The parts were designed with tongue and grooves so they fit together nicely. The joints were glued to hold everything together. Holes were drilled in the edge of the plastic large enough to fit an LED. Once the LED was inserted in the hole, it was wired up and secured with hot glue. There are about 200 LEDs on the bike, powered by a constant current LED driver circuit that [dan] designed specifically for this project.

The build process was certainly not flawless. For example, the plastic holding the bottom bracket (where the crank and pedals attach) broke. This can be avoided by increasing the amount of material in that area prior to cutting out the pieces. [dan] was able to fiberglass his broken parts back together.

[dan] admits that the bike is heavy and a little wobbly, but is definitely ride-able. He did us a favor and made all his CAD files available to anyone that wants to make one themselves. If polycarbonate is too expensive for your blood, check out this bike make from cardboard.

Repairing A Router Plagued By Capacitors

[psgarcha]’s modem/router comes straight from his internet provider, is on 24/7, and is built with the cheapest components imaginable. Eventually, this will be a problem and for [psgarcha], this problem manifested itself sooner than expected. Fortunately, there was a soldering iron handy.

The problems began with a boot loop – starting the router up, watching the blinking LEDs, and watching these lights follow the same pattern forever. Initially thinking this would be a problem with the firmware, [psgarcha] did the only thing he could do – take it apart. Inside, he found some bulging capacitors. Unsheathing his iron and replacing the obviously faulty components, [psgarcha] plugged the router in and had everything work. Great. Until those caps failed again a few months later.

There was obviously something wrong with the circuit, or wrong with the environment. Figuring it was hot out anyway, [psgarcha] replaced those caps again and added a fan and a small heatsink to the largest chip on the board. This should solve any overheating problems, but the real testing must be done in summer (or putting the router in a well-insulated enclosure). It’s an easy fix, a good reminder of exactly how often caps fail, and a great example of reducing the electronic cruft building up in landfills.

SingLock

SingLock Protects Your Valuables From Shy People

Two Cornell students have designed their own multi-factor authentication system. This system uses a PIN combined with a form of voice recognition to authenticate a user. Their system is not as simple as speaking a passphrase, though. Instead, you have to sing the correct tones into the lock.

The system runs on an ATMEL MEGA1284P. The chip is not sophisticated enough to be able to easily identify actual human speech. The team decided to focus their effort on detecting pitch instead. The result is a lock that requires you to sing the perfect sequence of pitches. We would be worried about an attacker eavesdropping and attempting to sing the key themselves, but the team has a few mechanisms in place to protect against this attack. First, the system also requires a valid PIN.  An attacker can’t deduce your PIN simply by listening from around the corner. Second, the system also maintains the user’s specific voice signature.

The project page delves much more deeply into the mathematical theory behind how the system works. It’s worth a read if you are a math or audio geek. Check out the video below for a demonstration. Continue reading “SingLock Protects Your Valuables From Shy People”

Derby the Dog

Derby’s Got Legs, He Knows How To Use Them

There’s just something about the holidays and man’s best friend that brings out the best in people. [Tara Anderson], Director of CJP Product Management at 3D Systems, fostered a husky mix named Derby.  Derby was born with a congenital defect: his forelegs were underdeveloped with no paws.  This precluded the poor fellow from running around and doing all of the things dogs love to do.  [Tara] had fitted him with a wheel cart, but she still felt that Derby deserved more mobility and freedom.  Deciding that 3D-printed prosthetics was the answer, she turned to her colleagues and collaborated with Derrick Campana, a certified Animal Orthotist, to create a new set of forelegs for Derby.

The design is different from typical leg prosthetics; Tara felt that the typical “running man” design would not work for a dog, since they’d just sink right into the ground. Instead, the “loop” design was used, allowing for more playful canine antics. They were constructed using MultiJet Printing on the 3DS’ ProJet 5500X.  MultiJet Printing enabled the prosthetics to be printed with firm and soft parts, both needed for comfort and durability.

Continue reading “Derby’s Got Legs, He Knows How To Use Them”

Drawing On Glow In The Dark Surfaces With Lasers

What do you get when you have a computer-controlled laser pointer and a big sheet of glow in the dark material? Something very cool, apparently. [Riley] put together a great build that goes far beyond a simple laser diode and servo build. He’s using stepper motors and a proper motion control software for this one.

The theory behind the device is simple – point a laser at some glow in the dark surface – but [Riley] is doing this project right. Instead of jittery servos, the X and Y axes of the laser pointer are stepper motors. These are controlled by an Arduino Due and TinyG motion control software. This isn’t [Riley]’s first rodeo with TinyG; we saw him at Maker Faire NYC with a pendulum demonstration that was absolutely phenomenal.

Right now, [Riley] is taking SVG images, converting them to Gcode, and putting them up on some glow in the dark vinyl. Since the Hackaday Skull ‘n Wrenches is available in SVG format, that was an easy call to make on what to display in weird phosphorescent green. You can see a video of that along with a few others below.

Continue reading “Drawing On Glow In The Dark Surfaces With Lasers”

Lumographic Images Created With Lens Only

Lumographic images are those patterns you see at the bottom of swimming pools. When water works as a lens, the light patterns of bright and dark are random and wandering based on the waves above. [Matthew] figured out a way to create fixed images from lens shape alone. The images only morph into view clearly when light shines at the proper angle. At near angles an eerie fun-house mirror effect appears, but too far off and it scatters unrecognisably.

The exact method for designing the optics is not explained, though we are sure someone in our readership could figure it out. The artist claims it to be a hundred year old million-variable math problem. The lenses are often quite thick and do not resemble much of anything. The effect however, is sharp, clear and detailed.

At first he suspected he needed astronomically-expensive military-grade 50 nanometer (0.000002″) precision machining for the lenses, but some friends in the autobody industry gave him a few tips to squeeze good enough accuracy from more affordable industrial machines. The technique also allows for images to appear from mirrors and internal reflections. It is probably not something you can 3D print or machine yourself, but it would be interesting to see someone try.

[Matthew]’s work is on display in the “Composite” gallery at the National Museum of Math in New York (MoMath). See the video after the break for a peak at the machinery he uses to manipulate the lenses to enhance the visuals in the exhibit.

Continue reading “Lumographic Images Created With Lens Only”

The Most Minimal WS2812B Driver

Whether you call them individually controllable RGB LEDs, WS2812, or NeoPixels, there’s no denying they are extremely popular and a staple of every glowey and blinkey project. Fresh off the reel, they’re nearly useless – you need a controller, and that has led to many people coming up with many different solutions to the same problem. Here’s another solution, notable because it’s the most minimal WS2812 driver we’ve ever seen.

The critical component in this build is NXP’s LPC810, an ARM Cortex M0+ in an 8-pin DIP package. Yes, it’s the only ARM in a DIP-8, but still able to run at 30MHz, and hold a 4kB program.

JeeLabs is using the SPI bus on the LPC810 to clock out data at the rate required by the LEDs. The only hardware required is a small LED to drop the voltage from 5V to 3.3V and a decoupling capacitor. Yes, you could easily get away with this as a one-component build.

The build consists of a ring of sixty WS2812b RGB LEDs, and the chip dutifully clocking out bits at the correct rate. It’s the perfect start to an LED clock project, an Iron Man arc reactor (are we still doing those?), or just random blinkey LEDs stuffed into a wearable.

Thanks [Martyn] for sending this one in.