SAINTCON Badge (Badge Hacking For Mortals)

[Josh] attended his first SAINTCON this weekend before last and had a great time participating in the badge hacking challenge.

The 2014 SAINTCON is only the second time that the conference has been open to the public. They give out conference badges which are just an unpopulated circuit board. This makes a lot of sense if you figure the number of people who actually hack their badges at conferences is fairly low. So he headed off to the hardware hacking village to solder on the components by hand — it’s an Arduino clone.

This is merely the start of the puzzle. We really like that the published badge resources include a crash course on how to read a schematic. The faq also attests that the staff won’t solder it for you and to get your microcontroller you have to trade in your security screw (nice touch). Once up and running you need to pull up the terminal on the chip and solve the puzzles in the firmware’s menu system. This continues with added hardware for each round: an IR receiver, thermistor, EEPROM, great stuff if you’re new to microcontrollers.

[Josh] mentions that this is nothing compared to the DEFCON badge. Badge hacking at DEFCON is **HARD**; and that’s good. It’s in the top-tier of security conferences and people who start the badge-solving journey expect the challenge. But if you’re not ready for that level of puzzle, DEFCON does have other activities like Darknet. That is somewhere in the same ballpark as the SAINTCON badge — much more friendly to those just beginning to developing their crypto and hardware hacking prowess. After all, everyone’s a beginner at some point. If that’s you quit making excuses and dig into something fun like this!

Restoring A PDP-10 Console Panel

The PDP-10 was one of the first computers [Jörg] had gotten his hands on, and there are very, very few people that can deny the beauty of a panel full of buttons, LEDs, dials, and analog meters. When one of the front panels for a PDP-10 showed up on eBay, [Jörg] couldn’t resist; a purchase that would lead him towards repairing this classic console and making it functional again with a BeagleBone.

The console [Jörg] picked up is old enough to have voted for more than one Bush administration, and over the years a lot of grime has covered the beautiful acrylic panels. After washing the panel in a bathtub, [Jörg] found the dried panel actually looked worse, like an old, damaged oil painting. This was fixed by carefully scraping off the clear coat over two weeks; an important lesson in preserving these old machines. They’re literally falling apart, even the ones in museums.

With the front panel cleaned, [Jörg] turned his attention to the guts of this panel. The panel was wired up for LEDs, and each of the tiny flashlight bulbs in the pushbuttons were replaced. The panel was then connected to a BlinkenBone with a ton of wiring, and the SIMH simulator installed. That turns this console into a complete, working PDP-10, without sucking down kilowatts of power and heating up the room

This isn’t the first time we’ve seen [Jörg] with a BeagleBone and some old DEC equipment; earlier he connected the front panel of a PDP-11 variant to one of these adapters running the same software.

3d printed glider gets engines

Flying Wing Project Uses 3D Printing To Reach New Heights

A team of engineers from the Advanced Manufacturing Research Centre at the University of Sheffield have just put the finishing touches on their 3D printed Flying Wing with electric ducted fan engines — a mini electric jet so to speak.

Earlier this year they had created a completely 3D printed fixed wing UAV, which the new Flying Wing is based off of. Designed specifically for the FDM process, they were able to optimize the design so that all parts could be printed out in 24 hours flat using ABS plastic.

The new design also almost exclusively uses FDM technology — however the wings are molded carbon fibre… using a 3D printed mold of course!  The original glider weighed 2kg, and with the upgrades to the design, the Flying Wing weighs 3.5kg, with speed capabilities of around 45mph.

Continue reading “Flying Wing Project Uses 3D Printing To Reach New Heights”

Hybrid 50cc Ultracapacitor Scooter

We’re all familiar with hybrid gas-electric cars these days, but how about a hybrid scooter that uses supercapacitors instead of batteries? Our hats are off to [Alex] from Labs Bell for the almost entirely-DIY conversion.

The hybrid idea is to drive the vehicle’s wheels with electric motors, but generate the electricity with a normal gasoline engine. This allows the hybrid to control the engine speed almost independently of the wheel motors’ demand for power, allowing the gas engine to run at its most efficient speed and charge up batteries with the extra energy. As an extra bonus, many hybrids also use regenerative braking to recoup some of the energy normally wasted as heat in your brake pads.

[Alex]’s hybrid scooter does all of the above and more. Since the stock vehicle is a 50cc scooter, any increase in acceleration is doubtless welcome. We’d love to see the scooter starting from stop with a full charge. Using supercapacitors as storage instead of batteries is a win for charging efficiency. In urban stop-and-go traffic, the natural habitat of the 50cc scooter, the regenerative braking should help further with gas consumption.

What’s most impressive to us is the completely DIY hybrid control unit that takes some simple inputs (wheel speed and throttle position) and controls regenerative braking, the gas engine’s throttle, etc. Since the hybrid control system is currently under development, there’s even a button to switch between different trial algorithms on the fly. Very cool!

Oh yeah, and [Alex] points out the fire extinguisher on-board. He had occasion to use it for his hybrid motorcycle V1. Safety first!

Arduino Pumpkin

8×8 LED Arrays Make For One Creepy Animated Pumpkin

[Michal Janyst] wrote in to tell us about a little project he made for his nephew in preparation for Halloween – a jack-o-lantern with facial expressions.

Pumpkin Eyes uses two MAX7219 LED arrays, an Arduino nano, and a USB power supply. Yeah, it’s pretty simple — but after watching the video you’ll probably want to make one too. It’s just so cute! Or creepy. We can’t decide. He’s also thrown up the code on GitHub for those interested.

Of course, if you want a bit more of an advanced project you could make a Tetris jack-o-lantern, featuring a whopping 8×16 array of LEDs embedded directly into the pumpkin… or if you’re a Halloween purist and believe electronics have no place in a pumpkin, the least you could do is make your jack-o-lantern breath fire.

Continue reading “8×8 LED Arrays Make For One Creepy Animated Pumpkin”

Who Will Win The Hackaday Prize? Judging Begins Tonight

It’s been a long road for each of the five finalists; but after tonight they can breathe easy. The last judging round of the 2014 Hackaday Prize begins at 11:50pm PDT.

Each finalist must finish documenting their project by that time as a cached version of each of the project pages will be sent off to our orbital judges. Joining the panel that judged the semifinal round is [Chris Anderson], CEO of 3D Robotics, founder of DIY Drones, former Editor-in-Chief of Wired, and technology visionary. These nine are charged with deciding who has built a project cool enough to go to space.

In case you’ve forgotten, the final five projects selected by our team of launch judges are:

  • ChipWhisperer, an embedded hardware security research device for hardware penetration testing.
  • Open Source Science Tricorder, a realization of science fiction technology made possible by today’s electronics hardware advances.
  • PortableSDR, is a compact Software Defined Radio module that was originally designed for Ham Radio operators.
  • ramanPi, a 3D printed Raman Spectrometer built around a Raspberry Pi.
  • SatNOGS, a global network of satellite ground stations.

The ultimate results of the judging will be revealed at The Hackaday Prize party we’re holding in Munich during Electronica 2014. We’re also holding an Embedded Hardware Workshop with Moog synths, robots, hacked routers, computer vision, and a name that’s official-sounding enough to convince your boss to give you the day off work. We hope to see you there!

Bike Persistance of Vision

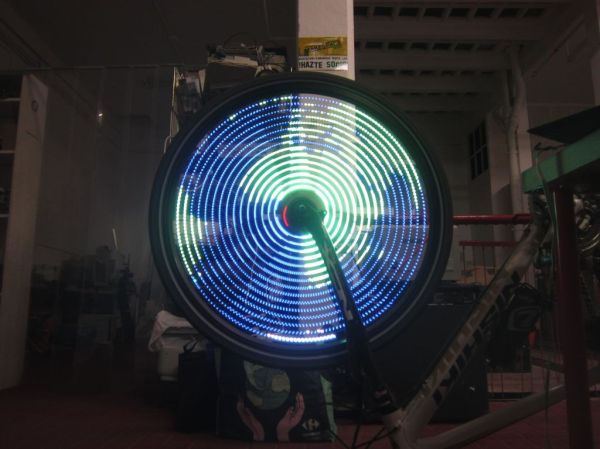
Simple POV Bike Effects With WS2811 Strips

[Andrew] wrote in with a new take on the classic persistence of vision bike spoke hack. While many of these POV setups use custom PCBs and discrete LEDs, [Andrew]’s design uses readily available off-the-shelf components: WS2811 LED strips, an Arduino, an Invensense IMU breakout board, and some small LiPo batteries.

[Andrew] also implemented a clever method of controlling his lights. His code detects when the rider taps the brakes in certain patterns, which allows changing between different light patterns. He does note that this method isn’t incredibly reliable due to some issues with his IMU, so now he senses when the rider taps on the handlebars as well.

If you want to build your own bike POV setup, you’re in luck. [Andrew] wrote up detailed instructions that outline the entire build process. He also provides links to sources for each part to make building your own setup even easier. His design is pretty affordable too, coming in at just under $50 per wheel. Check out a video of [Andrew]’s setup in action after the break.

Continue reading “Simple POV Bike Effects With WS2811 Strips”