3D Printering: Laser Cutting 3D Objects

3D printing can create just about any shape imaginable, but ask anyone who has babysat a printer for several hours, and they’ll tell you 3D printing’s biggest problem: it takes forever to produce a print. The HCI lab at Potsdam University has some up with a solution to this problem using the second most common tool found in a hackerspace. They’re using a laser cutter to speed up part production by a factor of twenty or more.

Instead of printing a 3D file directly, this system, Platener, breaks a model down into its component parts. These parts can then be laser cut out of acrylic or plywood, assembled, and iterated on much more quickly.

You might think laser-cut parts would only be good for flat surfaces, but with techniques like kerf bending, and stacking layer upon layer of material on top of each other, just about anything that can be produced with a 3D printer is also possible with Platener.

To test their theory that Platener is faster than 3D printing, the team behind Platener downloaded over two thousand objects from Thingiverse. The print time for these objects can be easily calculated for both traditional 3D printing and the Platener system, and it turns out Platener is more than 20 times faster than printing more than thirty percent of the time.

You can check out the team’s video presentation below, with links to a PDF and slides on the project’s site.

Thanks [Olivier] for the tip.

Continue reading “3D Printering: Laser Cutting 3D Objects”

Hackaday Prize Entry: Building A Car, From Scratch, Out Of Foam

Want an impressive example of what a few people can do in a garage? How about building an electric car, from scratch, starting with a gigantic chunk of foam?

The Luka EV from [MW Motors] had a few project aims: it should be all-electric, naturally, with a top speed of 130km/h or 80mph. It should have a range of over 300km, and it should look good. That last line item is tricky; it’s not too hard to build an electric car, but to make one look good is a challenge.

The design of the car actually started out as a digital file. A large block of foam was acquired and carefully carved into the desired shape. This foam is covered fiberglass, and parts are pulled off this fiberglass mold. This is a great way to do low-volume production – once the molds are complete, it’s a relatively simple matter to build another body for a second Luka EV.

With all the lights, accessories, windows, and trim installed, it’s time to put this body on a chassis. This was welded out of square tube and serves as a test rig that can be independent of the mess of fiberglass. In the chassis are batteries, suspension, motor controllers, and wheels loaded up with hub motors. It works well, even with one motor.

There’s a lot more to this project, including a great guide on building a road legal car in the UK. The team isn’t based in the UK, but it’s a much more friendly environment for ‘small series’ vehicles. The requirements are easy to meet – “have a horn”, for example – but there are a lot of them.

Already the car is beautiful, and that’s just with it sitting on a trailer. We can’t wait to see this thing hit the road.


The 2015 Hackaday Prize is sponsored by:

Use A Lamp To See Into The Future

We’ve heard of magic lamps before, but this one is actually real. [Alex] has created a wall-mounted lamp that can tell you what the future will be like; at least as far as the weather is concerned. It is appropriately named “Project Aladdin” and allows you to tell a great deal about the weather at a glance as you walk out of the door.

The lamp consists of twelve LED strips arranged vertically. The bottom strip represents the current hour, and each strip above represents another hour in the future. The color of each strip indicates the temperature, and various animations of the LEDs within each strip indicate wind speed and precipitation.

The system uses a weather forecasting backend built-in Java, which is available on the project’s page. The LEDs are controlled by an application that is written in C, and the entire set of LEDs are enclosed in a translucent housing which gives it a very professional appearance. Be sure to check out the demo video after the break. Be sure to check out some other takes on weather lamps which use regular desk lamps instead of intricate scratch-made LED lamps.

Continue reading “Use A Lamp To See Into The Future”

Using The Sun To Beat The Heat

It’s practically May, and that means the sweltering heat of summer is nearly upon us. Soon you’ll be sitting outside somewhere, perhaps by a lake, or fishing from a canoe, or atop a blanket spread out on the grass at a music festival, all the while wishing you had built yourself a solar-powered personal air conditioner.

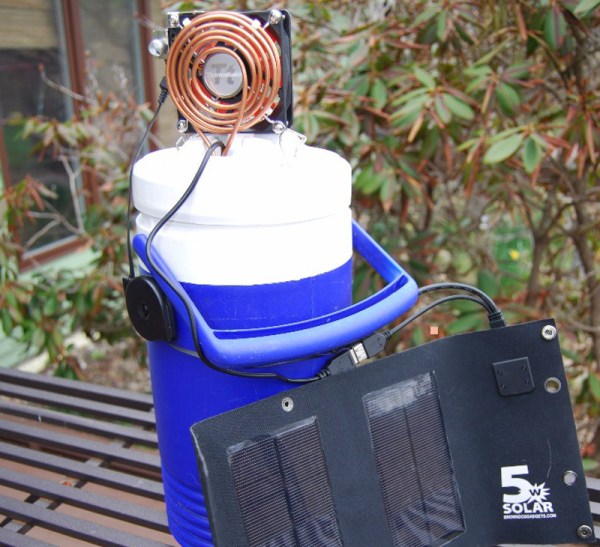
[Nords] created his from a large insulated beverage vessel. The imbibing spout offers a pre-made path to the depths of said vessel and the heart of this build, the ice water refrigerant. [Nords] fashioned a coil out of copper tubing to use as a heat exchanger and strapped it to the fan that performed best in a noise-benefit analysis.

A small USB-powered submersible pump moves the ice water up through the copper tubing. Both the pump and the fan run off of a 5V solar panel and are connected with a USB Y cable, eliminating the need for soldering. Even if you spend the summer inside, you could still find yourself uncomfortably warm. Provided you have access to ice, you could make this really cool desktop air conditioner.

[via Embedded Lab]

Arduino GPS

A Simple And Inexpensive GPS Navigation Device

There are plenty of GPS navigation units on the market today, but it’s always fun to build something yourself. That’s what [middelbeek] did with his $25 GPS device. He managed to find a few good deals on electronics components online, including and Arduino Uno, a GPS module, and a TFT display.

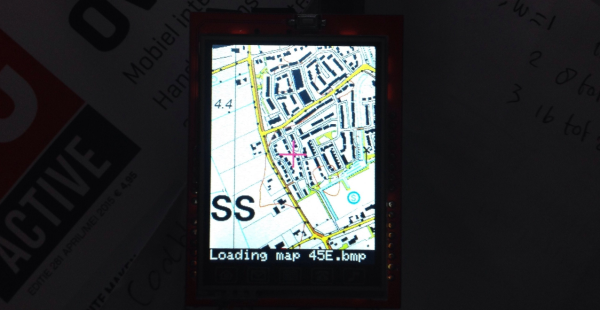
In order to get the map images on the device, [middelbeek] has to go through a manual process. First he has to download a GEOTIFF of the area he wants mapped. A GEOTIFF is a metadata standard that allows georeferencing information to be embedded into a TIFF image file.  [middelbeek] then has to convert the GEOTIFF into an 8-bit BMP image file. The BMP images get stored on an SD card along with a .dat file that describes the boundaries of each BMP. The .dat file was also manually created.

The Arduino loads this data and displays the correct map onto the 320×240 TFT display. [middelbeek] explains on his github page that he is currently unable to display data from two map files at once, which can lead to problems when the position moves to the edge of the map. We suspect that with some more work and tuning this system could be improved and made easier to use, of course for under $25 you can’t expect too much.

[Jay] Turns Over A New Leaf, Scores Batteries

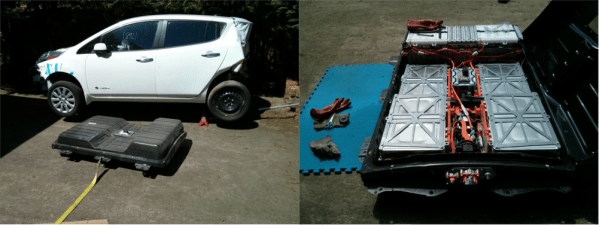
[Jay] got a pretty good deal on a low milage Nissan Leaf battery. Unfortunately, it came wrapped in a wrecked Nissan Leaf. There are more and more electric cars on the road each year, and that means there are more cars coming off the road as well due to accidents. Electric cars are specifically designed to protect their batteries, so as we’ve seen before with Tesla vehicles,  a salvage car often will still contain a serviceable battery pack. [Jay] used this knowledge to his advantage, and walks us through his experience buying, testing, and dismantling Hoja, his very own salvage Leaf.

[Jay] set up an account on Copart, an auto salvage auction website here in the USA. “Live” online Auto auctions tend to work a bit differently than E-bay, so [Jay] walks us through the process of buying the car, and gives some tips for getting through the process. [Jay’s] particular car was delivered to him on a trailer. It had been rear ended so hard that the rear tires were not usable. The car was also electrically dead. Thankfully, the electrical problems turned out to be a discharged 12 volt accessory battery. A quick charge of the accessory battery caused the Leaf to spring to life – and display a ton of trouble codes. [Jay] cleared the codes with his trusty OBD II scanner, and the car was ready to drive, at least as much as a wrecked car can drive. It did move under its own power though – with the rear end riding on dollies.

Now that the battery was known to be good, [Jay] set about liberating it from its crushed Leaf cocoon. Nissan’s service manual assumes one would be doing this with a lift. [Jay] had no such luxuries in his driveway, so he used 3 floor jacks to lower the 600 lb battery and dollies to pull it out from under the car.

Click past the break for the rest of the story.

Continue reading “[Jay] Turns Over A New Leaf, Scores Batteries”

Teardown: An Electronic Master Lock

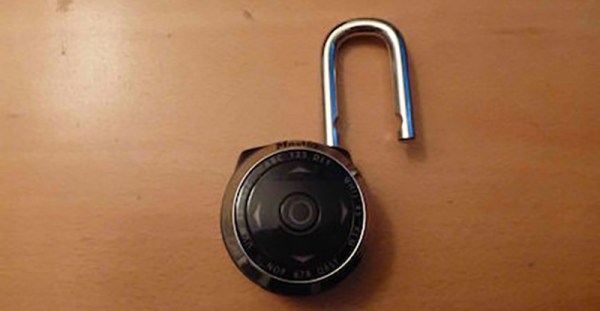
[rohare] has an interesting teardown for us over on the keypicking lock picking forums. It’s a Masterlock combination lock – specifically the Masterlock 1500eXD – and yes, it’s a completely electronic lock with buttons and LEDs. Think that’s the mark of a terrible lock? You might be surprised.

The first impressions of this lock were surprisingly positive. It was heavy, the shackle doesn’t move at all when you pull on it. Even the buttons and LEDs made sense. Once the back of the lock was drilled open, things got even more impressive. This lock might actually be well-built, with a ‘butterfly’ mechanism resembling a legendary padlock, actuated by a small but sufficient motor. Even the electronics are well-designed, with the programming port blocked by the shackle when it’s closed. [rohare] suspects the electronics aren’t made by Masterlock, but they are installed in a very secure enclosure.

The teardown concludes with a fair assessment that could also be interpreted as a challenge: [rohare] couldn’t find any obvious flaws to be exploited, or a simple way to break the lock. He concludes the most probable way of breaking this lock would be, “knowing some trick of logic that bypasses the codes on the electronics”. That sounds like a good enough challenge for us, and we’re eagerly awaiting the first person to digitally unlock this physical lock.