Retro TO-3 Switching Voltage Regulator

Restoring old gear often means replacing unavailable parts with modern equivalents. [Alex Eisenhut] needed to replace some old TO-3 voltage regulators and decided to make an authentic-looking switching power supply replacement. These three pin metal cans were very common, especially the LM340 5V regulator which was, of course, a linear regulator. Today, you are more likely to see a 7805 in a TO-220 case or something surface mount for a comparable linear regulator.

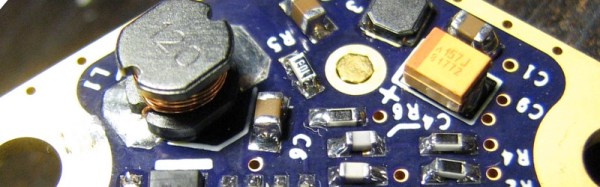
As you might expect, the board uses surface mount components. [Alex] used Mill Max machine pins to match the original regulator footprint and calls the regulator Ton3y. He plans to cover it up with a 3D printed lid, but it seems a shame to hide the fine PCB work.

In the pictures, you can see that the machine pins are a tight fit. [Alex] used a hammer to lightly tap them into place. Of course, the original TO-3 regulators were linear and would generate a lot of heat. The Ton3y, as you’d expect from a switching power supply, runs cool (according to the scientific measurement made with [Alex]’s pinky finger) and surely has a wider input voltage range and more output current capacity.

We’ve seen replacement switching regulators before, but this one is really a work of art.

3D Printing Helps Rekindle Old Love With An Uncommon Truck 

People may know many name and brands of cars and trucks, and there’s tons of scale models available for the average popular ones. What happens if your favorite truck is a 1960 Bucegi? You could do what [Arin] did and 3D print your own custom model.

[Arin] used to drive these machine back in his youth and it made an impression on him. In the few years of production, the 140HP V8 truck was adapted to all sorts of uses from farm trucks to military vehicles and even cranes.  The base truck and the desired configuration is modeled up in quite a bit of detail, then it’s 3D printed.

Once the printing is done the models are smoothed out using body filling primer paint, (and we imagine some fine sanding) , painted with acrylic paint, and assembled into an accurate model complete with working steering systems.

Below is a video showing assembly and painting and a second video showing off the steering system.

Continue reading “3D Printing Helps Rekindle Old Love With An Uncommon Truck “

Ninja Chess

Make Your Own Ninja Chess Board

You’re going to want to take a look at this fun project [Alistair MacDonald] just finished up. He calls it Ninja Chess.

He’s had the idea to 3D print a complete set of ninjas vs pirates for a chess board, but, let’s be real;  printing thirty-two chess pieces would take a long time. He opted to use a laser cutter instead, and so far, only has the Ninja characters drawn. But it still makes for a pretty awesome chess board.

Ninja Character

He drew the characters in Inkscape and they’re pretty darn cute. He has all the files available over on his Instructable including the .DXF for the laser cut outlines, and the image files for you to print off the decals. But unless you’re good with scissors, we recommend using your hackerspace’s automated paper cutter to help speed things up.

Is it a hack? Not really, but it’d be an excellent addition to anyone’s workshop. And while we sail under the Jolly Wrencher, we too can appreciate the novelty of a Ninja chess board.

For a more detailed build, did you see the 3D laser cut chess pieces we shared a few weeks ago? No that’s not a typo — you can use a laser cutter to do more than just two-dimensional cutting…

Hackaday Prize Entry: From Q To NAND

The apocalypse is coming, and the last time I checked, not many people have a semiconductor fab in their garage. We’ll need computers after the end of the world, and [matseng]’s project for the Hackaday Prize is just that – a framework to build computers out of discrete components.

The apocalyptic spin on this project is slightly exaggerated, but there is a lot someone can learn by building digital devices out of transistors, resistors, and diodes. The building blocks of [matseng]’s computer are as simple as they come: he’s using three resistors, four diodes, and one NPN transistor to build a single NAND gate. These NAND gates can then be assembled into any form of digital logic. You’re never going to get a better visual example of functional completeness.

A project like this must be approached from both the top down and bottom up. To go from a high level to ones and zeros, [matseng] built an assembler and an emulator. Some ideas of what the instruction set will be are laid out in this project log, and for now [matseng] is going for a Harvard architecture with eight registers. It’s a lot of work for a computer that will be limited by how much memory [matseng] can be wired up, but as far as ambition goes, there aren’t many projects in the Hackaday Prize that can match this tiny, huge computer.

The 2015 Hackaday Prize is sponsored by:

Coffee Alarm

Alarm Notifies The Office When The Coffee Is Ready

[Stian] thought it would be nice if his coworkers could be electronically notified when the latest batch of coffee is ready. He ended up building an inexpensive coffee alarm system to do exactly that. When the coffee is done, the brewer can press a giant button to notify the rest of the office that it’s time for a cuppa joe.

[Stian’s] first project requirement was to activate the system using a big physical button. He chose a button from Sparkfun, although he ended up modifying it to better suit his needs. The original button came with a single LED built-in. This wasn’t enough for [Stian], so he added two more LEDs. All three LEDs are driven by a ULN2003A NPN transistor array. Now he can flash them in sequence to make a simple animation.

This momentary push button supplies power to a ESP8266 microcontroller using a soft latch power switch. When the momentary switch is pressed, it supplies power to the latch. The latch then powers up the main circuit and continues supplying power even when the push button is released. The reason for this power trickery is to conserve power from the 18650 li-on battery.

The core functionality of the alarm uses a combination of physical hardware and two cloud-based services. The ESP8266 was chosen because it includes a built-in WiFi chip and it only costs five dollars. The microcontroller is configured to connect to the WiFi network with the push of a button. The device also monitors the giant alarm button.

When the button is pressed, it sends an HTTP request to a custom clojure app running on a cloud service called Heroku. The clojure app then stores brewing information in a database and sends a notification to the Slack cloud service. Slack is a sort of project management app that allows multiple users to work on projects and communicate easier over the internet. [Stian] has tapped into it in order to send the actual text notification to his coworkers to let them know that the coffee is ready. Be sure to watch the demo video below. Continue reading “Alarm Notifies The Office When The Coffee Is Ready”

Astronaut Or Astronot: The Final Round Is Over

For the last few months, we’ve been asking the Hackaday.io community for their thoughts on what the best projects are in the 2015 Hackaday Prize. We’ve also been giving away some fabulous prizes to people who have voted, and we just wrapped up the last round of voting? Did anyone win? Check out the video below.

Continue reading “Astronaut Or Astronot: The Final Round Is Over”

It Keeps On Going And… Arduino Edition

How long can you keep an Arduino circuit running on three AA batteries? With careful design, [educ8s] built a temperature sensor that lasts well over a year on a single charge of three 2250 mAH rechargeable cells (or, at least, should last that long).

Like most long-life designs, this temperature sensor spends most of its time sleeping. The design uses a DS18B20 temperature sensor and a Nokia 5110 LCD display. It also uses a photoresistor to shut off the LCD display in the dark for further power savings.

During sleep, the device only draws 260 microamps with the display on and 70 microamps with the display off. Every two minutes, the processor wakes up and reads the temperature, drawing about 12 milliamps for a very short time.

Along with the code, [educ8s] has a spreadsheet that computes the battery life based on the different measured parameters and the battery vendor’s claimed self discharge rate.

Of course, with a bigger battery pack, you could get even more service from a charge. If you need a refresher on battery selection, we covered that not long ago. Or you can check out a ridiculously complete battery comparison site if you want to improve your battery selection.

Continue reading “It Keeps On Going And… Arduino Edition”