RetroPie Game Gear

RetroPie Meets Game Gear, Again

If you’re a fan of video game systems of yesteryear then you are probably familiar with RetroPie. For those who aren’t, RetorPie is a collection of software and video game emulators that can run on a Raspberry Pi. The package makes it easy to get your fix of old games without having to own a bunch of consoles or loose your breath blowing on cartridges.

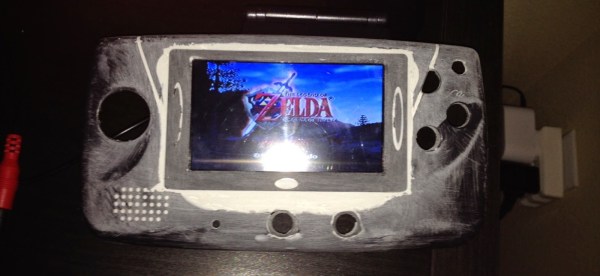
[brooksyx] already had a broken Game Gear, Raspberry Pi and a 4.3 inch LCD screen kicking around so he thought it would be a good idea to put them together into a handheld RetroPie. Clearly, the new screen was not going to fit in the old screen’s place. The Game Gear’s case was cut and the bezel from the new LCD screen was epoxied in place, gaps filled and finally sanded.

RetroPie Game Gear


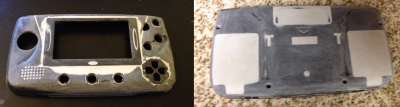
The screen is not the only modifications done to the case. Down on the bottom right of the case front [brooksyx] added 4 buttons for the N64 C-buttons. Out back the battery compartments and cartridge slot were filled in.

This project isn’t done yet and we are excited to see how it comes out. If you’re digging this RetroPie portable, you may like this Game Gear with an unmodified case or this large-screened Game Boy.

VCF East X: The Quarternet Steering Committee

Today was the first day of the Vintage Computer Festival East X. As is the tradition, the first day was packed with talks and classes about various retrocomputing ephemera, with this year featuring a great talk from [David Riley] about 8-bit computer music, a class on system architecture from our own [Bil Herd] (video coming soon), and a talk about vintage teletypes. One of these talks was about creating new hardware: [Jim Brain]’s steering committee on a networking solution for vintage microcontrollers. It’s called Quarternet: a two-bit solution for an eight bit world.

While minicomputers are easily networkable, designed around multi-user operating systems, and have the hardware for a lot of networking hardware, 8-bit micros are the exact opposite. That doesn’t mean 8-bitters don’t have networking; you can get an Ethernet cart for a C64, and just about everything can connect to a BBS. [Jim]’s talk was about whittling down the use cases for the Quarternet to something that could be implemented easily, but still give the most capability.

During the talk, the audience settled on using a serial connection from the micro to the outside world; this makes sense, as everything has a serial port. A ‘lightweight API’ was suggested to take up the software side of the problem, but there wasn’t much agreement over what that API would actually do.

[Jim]’s idea is for a box that plugs into the serial port of any old microcomputer and would connect to the Internet somehow. Ethernet, WiFi, or even a modem isn’t out of the question here. That takes care of connecting to the Internet, but there’s also the question of the cooler side of networking – network drives, file sharing, and the like.

For this, [Jim] is imagining a box with a serial port on one end, and a network port on the other. In the middle would be a cartridge slot for any hardware imaginable. If you want to plug in an Apple II disk drive, just insert the right cartridge and you’re good to go. If you need network access to a Commodore 1541 drive, just insert another cartridge, and it’ll just work.

It’s an interesting idea, but [Jim] is really interested in getting even more feedback for a networking system for old microcomputers. If you have any ideas, leave a note for him in the comments.

Energia Multitasking Uses RTOS On MSP432

We keep wondering where the Arduino world is headed with the hardware getting more and more powerful. If the IDE doesn’t keep up what’s the point? Now we have at least one answer to that problem. Energia is the Arduino-like-framework for Texas Instruments based boards. They just came out with a multitasking system built into Energia targeted at the ARM Cortex-M4F based MSP432 Launchpad which we covered a few weeks back.

The announcement post gives a couple of examples of uses for multitasking. The simplest is blinking LEDs at different rates. If you wanted to do this closer to the metal you’re talking about multiple timers, or multiple compares on a single timer, perhaps a interrupt-driven-system-tick that has a high enough resolution for a wide range of your blinking needs. But these are not always easy to set up unless you are intimately comfortable with this particular architecture. The Energia multitasking will handle this for you. It’s upon the TI Real Time Operating System (TI-RTOS) but wraped in the familiar IDE.

The UI divorces you from thinking about the hardware at all. You simply launch a new tab and start coding as if you’re using a completely separate piece of hardware. The announcement post linked above mentions that these Sketches are running “in parallel”. Well… we know it’s not a multi-core system like the Propeller but we’ll let it slide. It is certainly easier than building your own scheduler for this type of hardware.

[Thanks MycoWx]

“Easy Bake” Vacuformer

One of our favorite things about Hackerspaces is people tend to spend a lot of time building tools, or repairing/upgrading older ones. This is a case of the former. The vacuum former.

[Adam] wrote in to tell us about this vacuum forming machine which he and few other members built for FizzPOP, a hackerspace in Birmingham, England. The device is used to suck hot sagging plastic around a mold. This is accomplished in two parts, the vacuum table and the heating mechanism to put the sheet of plastic into that sagging state.

vacuum-forming-signThe vacuum part of these tools has been easy to DIY for a long time. Pegboard makes for a very good table surface, with some type of vacuum motor (usually a shopvac or two) in an enclosure below the surface. This design adheres to that common formula.

On the other hand, the heating mechanism is more difficult to solve. The plastic is unwieldy and fragile when hot so a frame is very common. Following the example of commercially available models, the FizzPOP crew built a frame that slides along four vertical rails (envision table legs) extending above the vacuum surface. These legs also hold up the heating element. Often this is a nichrome wire array, but not this time. They went with an array of 70 halogen bulbs in a 10×7 orientation. A PCB was milled for each, with a system of bus-bars connecting them all. The trial run showed that the intensity of the bulbs made hotspots directly below each. But a bit more testing helped them solve the issue by keeping the frame further from the array in the heating phase.

The team’s 13-seconds of fame are found after the break. A black sheet of High-Impact Polystyrene (HIPS) is formed around a compilation of tools spelling out the name of the hackerspace.

Continue reading ““Easy Bake” Vacuformer”

You Betta’ Recognize The Aluminum Beverage Can

He’s back, [Bill Hammack] aka The Engineer Guy. He has a habit of revealing how the ordinary is extraordinary with a meticulous unveiling of all the engineering that goes into a thing. This time around it’s the aluminum beverage can. You might know it as a soda can, a beer can, or a salt-free air can. But we challenge you find someone who isn’t intimately familiar with these containers.

We know what you’re thinking: you already saw how these come into being on an episode of How It’s Made. You’re wrong. We saw that episode too. But just give [Bill] a few minutes of your time and he’ll suck you in for the rest of the episode. Now the die-forming of the base and side-wall, we’ll give it to you that you know what that’s all about. But then [Bill] busts into the history of these containers, citing the aluminum savings through reducing the top diameter of the can. He rounds it out with a celebration of the ingenuity of the modern “stay-on” tab which should make your glasses fall off with excitement.

If this is your first time hearing of The Engineer Guy you have a delightful weekend ahead of you. Binge watch his entire back cataolog! Our favorites include an analysis of a mechanical Fourier computer and the concepts involved in color anodization. We even read his book.

Continue reading “You Betta’ Recognize The Aluminum Beverage Can”

Hacklet 43 – Flashlight Projects

Mankind has always looked for ways to light up the night as they walk around. Fires are great for this, but they aren’t very safe or portable. Even kept safe in a lantern, an open flame is still dangerous – especially around cows.  Enter the flashlight, or torch if you’re from the other side of the pond. Since its invention in 1899, the flashlight has become a vital tool in modern society. From patrolling the dark corners of the city, to reading a book under the covers, flashlights enable us to beat back the night. The last decade or so has seen the everyday flashlight change from incandescent bulbs to LEDs as a light source. Hackers and makers were some of the first people to try out LED flashlights, and they’re still tinkering and improving them today. This weeks Hacklet focuses on some of the best flashlight projects on Hackaday.io!

light1We start with [Norman], and the LED Flashlight V2. Norman built a flashlight around a 100 Watt LED. These LEDs used to be quite expensive, but thanks to mass production, they’ve gotten down to around $6 USD or so. Norman mounted his LED a custom aluminum case. At this power level, even LEDs get hot. An extruded aluminum heatsink and fan keeps things cool. Power is from a 6 cell LiPo battery, which powers the LED through a boost converter. It goes without saying that this flashing is incredibly bright. Even if the low-cost LEDs aren’t quite 100 Watts, they still put many automotive headlights to shame! Nice work, [Norman].

light2A tip of the fedora to [Terrence Kayne] and his Grain-Of-Light LED LIGHT. [Terrence] loves LED flashlights, be he wanted one that had a bit of old school elegance. Anyone familiar with LEDs knows CREE is one of the biggest names in the industry. [Terrence] used a CREE XM-L2 emitter for his flashlight. He coupled the LED to a reflector package from Carlco Optics. The power source is an 18650 Lithium cell, which powers a multi-mode LED driver. [Terrence] spent much of his time turning down the wooden shell and aluminum tube frame of the flashlight. His workmanship shows! Our only suggestion would be to go with a lower profile switch. The toggle [Terrence] used would have us constantly checking our pockets to make sure the flashlight hadn’t accidentally been activated.

light3Harbor Freight’s flashlights are a lot like their multimeters: They generally work, but you wouldn’t want to trust your life to them. That wasn’t a problem for [Steel_9] since he needed a strobe/party light. [Steel_9] hacked a $5 “27 LED” light into a stylish strobe light. He started by cutting the power traces running to the LED array. He then added in an adjustable oscillator circuit: two BJTs and a handful of discrete components make up an astable multivibrator. A third transistor switches the LEDs. Switching a load like this with a 2N3906 probably isn’t the most efficient way to do things, but it works, and the magic smoke is still safely inside the semiconductors.  [Steel_9] built the circuit dead bug style, and was able to fit everything inside the original plastic case.  Rave on, [Steel_9]!

If you want to see more flashlight projects, check out our new list on Hackaday.io! That’s about all the time we have for this week’s Hacklet. As always, see you next week. Same hack time, same hack channel, bringing you the best of Hackaday.io!

Wireless Trackpad Looks Like Fingernail Polish

All hands are on deck over at MIT where a very handy new trackpad has been created that will be able to give users a free hand to do other tasks. The device is called the NailO and attaches to one’s thumbnail, which allows the user an easy and reportedly natural way to use a trackpad while your hands are full, dirty, or otherwise occupied.

The device reportedly works like any normal trackpad, but is about the size of a quarter and attaches to the thumbnail in such a way that it takes advantage of the natural motion of running an index finger over the thumbnail. It communicates via Bluetooth radio, and has four layers which all go hand-in-hand: an artistic covering (to replicate the look of a painted fingernail), the sensors, the circuitry, the battery, and presumably an adhesive of some sort.

Details are quite sparse, but the device is scheduled to make its debut at the Computer Human Interaction conference in Seoul, South Korea very soon. If it can be made less bulky (although it’s somewhat uncomfortable to call something smaller than a quarter “bulky”) this might be, hands down, the next greatest evolution in mouse technology since multi-touch. We have to hand it to MIT for coming up with such a unique wearable!