We run a lot of posts on amateur radio here at Hackaday, and a majority of our writers and editors* are licensed hams. Why? Because playing around with radio electronics is fun, and because having a license makes a lot more experimentation legal. (*We’re sure you have good reasons for slacking, Szczys.)
So let’s say that you want to get your “ticket” (and you live in the USA). It’s easy: just study for an exam or two, and take them. How to study? We’re glad you asked, because we just found this incredibly long video that’ll prep you for the exam.
At six and a half hours, we’ll admit that we haven’t watched the whole thing, but what we did see looks great. Admittedly, we were a little bit unnerved by [John (KD65CY)]’s overdone enthusiasm. But the content is fundamental, broad-ranging, and relevant. Heck, even a bit entertaining.
Even if you’re not interested in taking the exam, but are just interested in some radio basics, it’s worth looking. If you give it a shot, and like what you see, let us know in the comments what times stamps you found interesting.
In our experience, the Technician exam is easy enough that it’s probably worth your while to study up for the General exam as well. You have to take the former before the latter, but there’s nothing stopping you from taking them all in one sitting. (General gets you a lot more international shortwave frequencies, so it’s at least worth a shot.)
But don’t let that slow you down. Just getting the Tech license is easily worth studying up for a couple of hours or so. You have no excuses now. Go do it!
[Paddy Neumann] is an Australian physicist and founder of Neumann Space, a space start-up with a record-breaking ion drive.
The team at Neumann Space built an ion engine that broke the previous specific impulse (bounce per ounce) record. NASA’s HIPEP thruster previously held this record with a specific impulse of ~9600 seconds (+/- 200 seconds). The Neumann Drive’s specific impulse as recorded by the University of Sydney was ~14,690 seconds (+/- 2,000 seconds). This all equates to better efficiency by the Neumann Drive, however its acceleration does not match that of the HIPEP.
Simplified ion engine diagram courtesy of Neumann Space
The Neumann Drive has another unique advantage in its range of usable fuels. In comparison to the HIPEP which uses Xenon gas as fuel the Neumann Drive accepts a variety of metals including: Molybdenum, Magnesium, Aluminum, Carbon, Titanium, Vanadium, Tin, last and also least according to Neumann Space is Bismuth.
Interestingly, Neumann offered his intellectual property (IP) to the University of Sydney, since the research was done at the University but they passed on the offer. This allowed the IP to be returned to Paddy and he subsequently applied for a patent and began the search for funding for continued research.
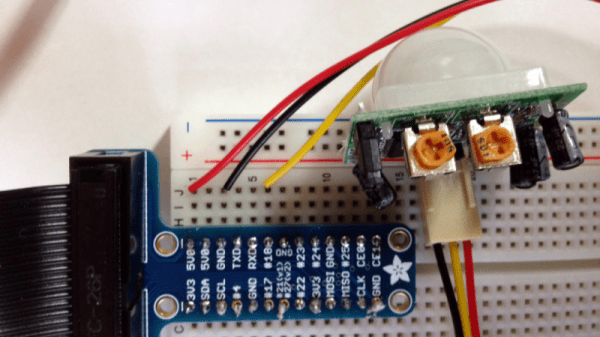
Strong is the Force, with this Padawan. To coincide with the latest installment of the continuing saga from a galaxy far, far away, [Rohit Gupta] built a Star-Wars themed interactive doormat. The doormat detects a footstep using capacitive sensing and plays a random Star Wars audio clip like the opening theme or the Imperial March or a famous phrase from the movie. Check out the video below the break.
The current setup is temporarily breadboarded, but we are sure it will be popular enough with his visitors to make him tidy it up. The hardware consists of an Arduino with an audio shield connected to a pair of speakers. A capacitive wire loop under the mat and a capacitive sensor tuned to the mat size wire take care of the sensing.
When Earth people step on the mat, the sensor triggers the Arduino to play a random audio clip from the SD card. The capacitive sensing is taken care by the TP223 1-key touch pad detector chip (PDF), which he mounted on a home etched board with SMD parts. The whole bundle is powered by a small “power bank” battery pack like the ones used to charge mobile phones.
When you move into a new house, there’s always something that needs fixing up. A bit of paint and some new drapes may help freshen up the place and put your mark on it, but things like exposed wiring and a very utilitarian looking electrical panel in your front hall are altogether different. Unwilling to live with the mess, [John Whittington] decided to enclose his utility panel and add a Nixie tube IoT watt meter to dress things up while monitoring energy usage.
Looking at the “before” pictures on [John]’s blog, we can see why he’d want to invest the effort – not exactly an attractive way to greet guests at the front door. A simple wooden box to replace the previous cover would have sufficed, but why pass up the opportunity to add value? [John] opted for a Nixie tube display to complement the glass of the electric meter. The Nixie modules were a bit on the pricey side, though, so with only a pair of tubes to work with, [John] came up with a clever system to indicate the scale of the display. We doubt he’ll ever see megawatt-level instantaneous power draw, but the meter is also capable of totalling energy use, and as a bonus an ESP-8266 gives lets him stream data to the web.
We’ve featured tons of Nixie projects before – everything from clocks to cufflinks. We have to agree that [John]’s Nixie project turned out great, and it’s sure to be a conversation starter with arriving guests.
The second video, below, shows some older example projects including a simple home alarm with a PIR sensor. Not the kind of thing that Wolfram is known for, but fine as a “hello world” project. There is even a project that uses an Arduino for more I/O. Between the two videos, you can get a good idea of the sort of things you can accomplish using a Pi with the language.
No doubt many of you have spent a happy Christmas tearing away layers of wrapping paper to expose some new gadget. But did you stop to spare a thought for the “sticky-back plastic” holding your precious gift paper together?
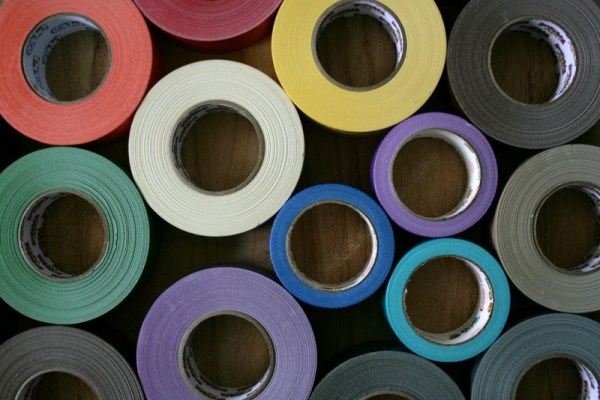
There are a crazy number of adhesive tapes available, and in this article I’d like to discuss a few of the ones I’ve found useful in my lab, and their sometimes surprising applications. I’d be interested in your own favorite tapes and adhesives too, so please comment below!
But first, I’d like to start with the tapes that I don’t use. Normal cellulose tape, while useful outside the lab, is less than ideally suited to most lab applications. The same goes for vinyl-based insulating tapes, which I find have a tendency to fall off leaving a messy sticky residue. When insulation is necessary, heatshrink seems to serve better.
The one tape I have in my lab which is similar to common cellulose tape however is Scotch Magic Tape. Scotch Magic tape, made from a cellulose acetate, and has a number of surprising properties. It’s often favored because of it’s matte finish. It can easily be written on and when taped to paper appears completely transparent. It’s also easy to tear/shape and remove. But for my purposes I’m more interested in it’s scientific applications.
Here’s a neat trick you can try at home. Take a roll of tape (I’ve tried this with Scotch Magic tape but other tapes may work too) to a dark room. Now start unrolling the tape and look at interface where the tape leaves the rest of the roll. You should see a dim blue illumination. The effect is quite striking and rather surprising. It’s called triboluminescence and has been observed since the 1950s in tapes and far earlier in other materials (even sugar when scraped in a dark room will apparently illuminate). The mechanism, however, is poorly understood.
It was perhaps this strange effect that led researchers to try unrolling tape in a vacuum. In 1953 a group of Russian researchers attempted this and bizarrely enough, were able to generate X-rays. Their results were unfortunately forgotten for many years, but were replicated in 2008 and even used to X-ray a researcher’s finger! As usual Ben Krasnow has an awesome video on the topic:
In my lab however I mostly use Scotch tape to remove surface layers. In certain experiments it’s valuable to have an atomically flat surface. Both Mica and HOPG (a kind of graphite) are composed of atomically flat layers. Scotch tape can be used to remove the upper layers leaving a clean flat surface for experimentation.
Researchers have also modified this technique to produce graphene. Graphene is composed of single carbon layers and has a number of amazing properties, highly conductive, incredibly strong, and transparent. For years producing small quantities of graphene provided difficult. But in 2004 a simple method was developed at the University of Manchester using nothing but bulk ordered graphite (HOPG) and a little Scotch tape. When repeatedly pressed between the Scotch tape, the Graphite layers can be separated until eventually only a signal layer of graphene remains.
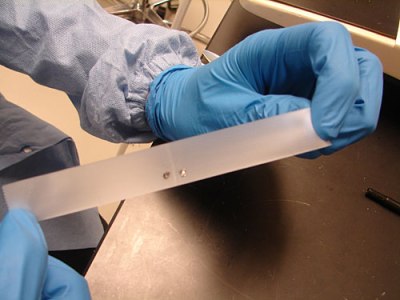
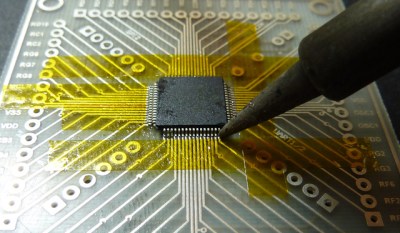
The other non-conductive tape I use regularly in my lab is of course Kapton tape. While Kapton is a Dupoint brand name, it’s basically a polyimide film tape which is thermally stable up to 400 degrees C. This makes it ideal for work holding in electronics (or masking out pins) when soldering. You can also use it for insulating (though it’s inadvisable for production applications). Typically polyimide tape is available under a number of dubious synonyms (one example is Kaptan) from a variety of Chinese suppliers at low cost.
Carbon tape is conductive in all axes. This means it you can create a electrical connection by simply taping to your devices. It’s resistance however is somewhat high. I’ve most commonly come across this when using electron microscopes. Carbon tape is used both to keep a sample in place and create an electrical connection between the sample and the sample mount.
Carbon tape, applied to a SEM mount.
Other conducting tapes are available with lower resistance, creating a electrical connection without soldering is valuable in a number of situations. Particularly when heat might damage the device. One example of this is piezoelectric materials. Not only does solder often bond poorly to ceramic materials, but it may also depole the material removing its piezoelectric properties. I tend to use conductive epoxies in these situations, but conductive tapes appear to be an attractive option.
Aluminum tape is commonly used for (heat) insulation in homes. It’s therefore very cheap and easily available. As well as conducting heat aluminum tape of course also conducts electricity. Around the lab this can be pretty handy. While the adhesive is not conductive, making it less attractive for connection parts, I’ve found aluminum tape great of sealing up holes in shielded enclosures. It also makes a great accompaniment to aluminum foil which is used to provide ad-hoc shielding in many scientific environments. Copper tape is also easily obtained, though slightly more expensive.
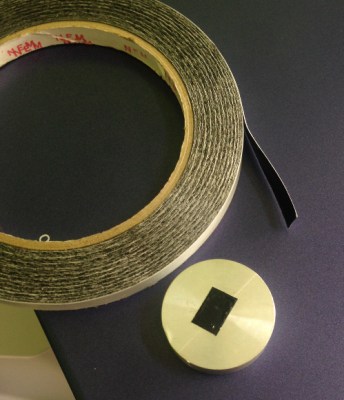
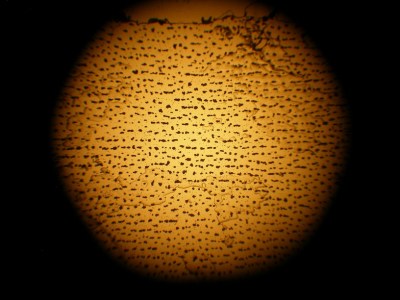
Z tape under a microscope
A much less common, but far cooler conductive tape is so called Z tape. This tape is composed of regular double-sided tape impregnated with spaced conductors. The result is a tape that conducts in only one direction (from the top to the bottom). This makes it similar in structure to a zebra strip, commonly used to connect LCDs. Z tape is unfortunately pretty expensive, a short 100mm strip can cost 5 dollars. What exactly 3M had in mind when creating Z tape is unclear. But it can be used for repairing FPC connectors on LCDs or in other situations where soldering is impractical.
One of the more awesome applications is Jie and Bunnie’s circuit sticker project. The kits are designed to allow kids to assemble circuits simply by sticking components together. Z tape is ideal for this, as it allows multiple connections to be made using the same piece to tape.
I couldn’t write an article on tape without mentioning the somewhat apocryphal “Invisible Electrostatic Wall” incident. A report at the 17th Annual EOS/ESD Symposium describes a “force field” like wall that appeared during the production of polypropylene film. While the story seems slightly dubious, it reminds us of the surprising applications and utility of tapes.
Next time you’re sending off a package or ripping open a package, spare a thought for the humble tape that holds it together.
Macs have always been favorites of case modders, with projects ranging from turning a Mac Plus into an aquarium to retrofuturistic machines that look like they came from the set of [Terry Gilliam]’s Brazil. Some of these casemods are of the steampunk variety, an aesthetic that usually means gluing gears to wood. [Valeriy] and [Cyrill] are bucking that trend with a beautiful iMac crafted from wood, brass, and leather (Russian, Google Translate)
The machine in question is a late-model, impossibly thin iMac. Unlike the old all-in-one computers with clunky CRTs, there’s not much space to dig around inside this iMac, and doing so would probably ruin the machine, anyway. Instead of a complete disassembly a wooden frame was constructed around the display, the aluminum base was covered in veneer, and the back of the iMac was covered in leather.
This is a steampunk computer, though, and that means gears. In this case, the gears and steam elements actually do something. The front of the computer is adorned with a decent replica of the drivetrain of a locomotive that spins with the help of an electric motor. There’s a USB port attached to the front, ensconced in a cylindrical enclosure that opens when a switch is flipped.
If a complete reworking of a modern iMac isn’t enough, the build also included the steampunkification of the Apple Bluetooth keyboard. That in itself is an amazing build, but to see the entire thing in action, you’ll have to check out the video below.
 At six and a half hours, we’ll admit that we haven’t watched the whole thing, but what we did see looks great. Admittedly, we were a little bit unnerved by [John (KD65CY)]’s overdone enthusiasm. But the content is fundamental, broad-ranging, and relevant. Heck, even a bit entertaining.

 Looking at the “before” pictures on [John]’s blog, we can see why he’d want to invest the effort – not exactly an attractive way to greet guests at the front door. A simple wooden box to replace the previous cover would have sufficed, but why pass up the opportunity to add value? [John] opted for a Nixie tube display to complement the glass of the electric meter. The Nixie modules were a bit on the pricey side, though, so with only a pair of tubes to work with, [John] came up with a clever system to indicate the scale of the display. We doubt he’ll ever see megawatt-level instantaneous power draw, but the meter is also capable of totalling energy use, and as a bonus an ESP-8266 gives lets him stream data to the web.