Mindstorms Forkliftbots Gonna Take Your Job

With every advance in robotics, we get closer to being able to order stuff from Amazon and have no human being participate in its delivery. Key step in this dream: warehouse robots, smart forklifts able to control and inventory and entire warehouse full of pallets, without the meat community getting involved. [Thomas Risager] designed just such a system as part of his Masters Thesis in Software Engineering. It consists of five LEGO Mindstorms robots working in concert (video embedded below), linked via WiFi to a central laptop. Mindstorms’ native OS doesn’t support WiFi (!!!) so he reflashed the EV3’s ARM9 chip with software developed using Java and running under LeJOS. On the laptop side [Thomas] wrote a C++ application that handles the coordination and routing of the forklifts. We can see a lot of weary forklift drivers ready to kick back and let a robot have the full-time job for a change.

The robots use WiFi to a central laptop. Mindstorms’ native OS doesn’t support WiFi (!!!) so [Thomas] reflashed the EV3’s ARM9 chip with software developed using Java and running under LeJOS. On the laptop side he wrote a C++ application that handles the coordination and routing of the forklifts. [Thomas] is sharing his forklift design.

Now to scale up — maybe with DIY forklifts like we published earlier? We can see a lot of weary forklift drivers ready to kick back and let a robot have the full-time job for a change.

Continue reading “Mindstorms Forkliftbots Gonna Take Your Job”

Hacking The IKEA Trådfri Light Bulb

[BasilFX] wanted to shoehorn custom firmware onto his IKEA Trådfri light bulb. The product consists of a GU10-size light bulb with a LED driver as well as IKEA’s custom ZigBee module controlling it all. A diffuser, enclosure shell, and Edison-screw base give the whole thing the same form factor as a standard A-series bulb. The Trådfri module, which ties together IKEA’s home automation products, consists of an ARM Cortex M4 MCU with integrated 2.4Ghz radio and 256 Kb of flash — not bad for 7 euros!

Coincidentally, [BasilFX] had just contributed EFM32 support to RIOT-OS (“the friendly OS for IoT”) so he was already halfway there. He used a JTAG/SWD-compatible debugger to flash the chip on the light bulb while the chip was still attached.

[BasilFX] admits the whole project is a proof of concept with no real use yet, though he has turned his eye toward getting the radio to work, with a goal of creating a network of light bulbs. You can find more info on his code repository.

We ran a post on Trådfri hacking earlier this year, as well as one on the reverse-engineering process used to suss out the bulb’s secrets.

Continue reading “Hacking The IKEA Trådfri Light Bulb”

Modernizing A 170 Year Old Antique Grandfather Clock

Frankly, we let out a yelp of despair when we read this in the tip line “Antique Grandfather clock with Arduino insides“! But before you too roll your eyes, groan, or post snark, do check out [David Henshaw]’s amazing blog post on how he spent almost eight months working on the conversion.

Before you jump to any conclusions about his credentials, we must point out that [David] is an ace hacker who has been building electronic clocks for a long time. In this project, he takes the antique grandfather clock from 1847, and puts inside it a new movement built from Meccano pieces, stepper motors, hall sensors, LEDs, an Arduino and lots of breadboard and jumper wires while making sure that it still looks and sounds as close to the original as possible.

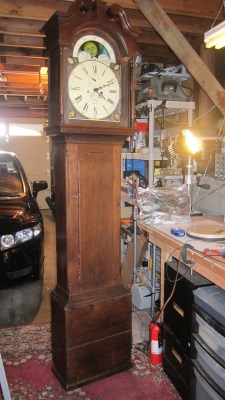
He starts off by building a custom electro-mechanical clock movement, and since he’s planning as he progresses, meccano, breadboard and jumper wires were the way to go. Hot glue helps preserve sanity by keeping all the jumper wires in place. To interface with all of the peripherals in the clock, he decided to use a bank of shift registers driven from a regular Arduino Uno. The more expensive DS3231 RTC module ensures better accuracy compared to the cheaper DS1307 or similar clones. A bank of RGB LEDs acts as an annunciator panel inside the clock to help provide various status indications. The mechanical movement itself went through several iterations to get the time display working with a smooth movement of the hands. Besides displaying time, [David] also added a moon phase indicator dial. A five-rod chime is struck using a stepper motor driven cam and a separate solenoid is used to pull and release three chime hammers simultaneously to generate the loud gong sounds.

And here’s the amazing part – he did all of this before laying his hands on the actual grandfather clock – which was shipped to him in California from an antique clock specialist in England and took two months to arrive. [David] ordered just the clock housing, dial/face and external parts, with none of the original inner mechanism. Once he received it, his custom clock-work assembly needed some more tweaking to get all the positions right for the various hands and dials. A clock like this without its typical “ticktock” sound would be pretty lame, so [David] used a pair of solenoids to provide the sound effect, with each one being turned on for a different duration to produce the characteristic ticktock.

At the end of eight months, the result – christened Judge – was pretty satisfying. Check the video below to judge the Judge for yourself. If you would like to see some more of [David]’s clockwork, check out Dottie the Flip Dot Clock and A Reel to Reel Clock.

Continue reading “Modernizing A 170 Year Old Antique Grandfather Clock”

What Actually Happens At A Hardware Hacking Con

The Hackaday Superconference was last weekend, and it was the greatest hardware con on the planet. What can you build out of a conference badge? If you answered “a resin-based 3D printer” you would have won a prize. If you decided to put your badge in a conference water bottle and make a stun gun you’d receive adoration of all in attendance. Yeah, it got that crazy.

Yes, there’s a Supercon badge in that bottle and it’s now a stun gun.

At other tech conferences, you’ll find gaggles of nerds sitting around a table with MacBooks and Thinkpads. The Superconference is different. Here, you’ll find soldering irons, tackle boxes filled with components, and loose WS2812s scattered about the floor. The smell of solder flux wafts through the air. You detect a hint of ozone.

The depth and breadth of hacks that came out of this were simply stunning. We a binocular virtual reality hack, an internet trolling badge, blinky add-on boards, audio add-on boards, a film festival was shot on the badge, and much more which you’ll find below.

We have started a Badge Hacks list and want to see details of all of the hacks. So if you were at Supercon be sure to publish them on Hackaday.io and send a DM to be added to the list.

Starting Up An Extra Day of Hacking

To get all of this creativity rolling we did something a bit different for this year’s Superconference. Instead of opening the doors up on Saturday morning, we set up a badge hacking area and party on Friday afternoon. The drinks flowed like the meniscus on a properly soldered lead, and by 2pm on Friday, everyone was hacking firmware on the incredible camera badge for this year’s con.

We didn’t stop on Friday. The Superconference is a hardware hacking conference, and that meant we brought out the soldering irons, experimented with melting aluminum with gallium, reflowed a few boards, and created a few deadbug LED cubes. This went on all weekend.

Continue reading “What Actually Happens At A Hardware Hacking Con”

DIY Capacitive Rotational Encoder On The Cheap With FR4

Rotary encoders are critical to many applications, even at the hobbyist level. While considering his own rotary encoding needs for upcoming projects, it occurred to [Jan Mrázek] to try making his own DIY capacitive rotary encoder. If successful, such an encoder could be cheap and very fast; it could also in part be made directly on a PCB.

First prototype, two etched plates with transparent tape as dielectric material. Disc is 15 mm in diameter.

The encoder design [Jan] settled on was to make a simple adjustable plate capacitor using PCB elements with transparent tape as the dielectric material. This was used as the timing element for a 555 timer in astable mode. A 555 in this configuration therefore generates a square wave that changes in proportion to how much the plates in the simple capacitor overlap. Turn the plate, and the square wave’s period changes in response. Response time would be fast, and a 555 and some PCB space is certainly cheap materials-wise.

The first prototype gave positive results but had a lot of problems, including noise and possibly a sensitivity to temperature and humidity. The second attempt refined the design and had much better results, with an ESP32 reliably reading 140 discrete positions at a rate of 100 kHz. It seems that there is a tradeoff between resolution and speed; lowering the rate allows more positions to be reliably detected. There are still issues, but ultimately [Jan] feels that high-speed capacitive encoders requiring little more than some PCB real estate and some 555s are probably feasible.

This project is a reminder that FR4 (whether copper-clad, etched, or blank) shows up in clever applications: copper tape and blank FR4 can be used to quickly prototype RF filters, PocketNC built an entire small CNC tool around FR4, and our own [Voja] wrote a full guide on making beautiful enclosures from FR4.

Goodbye, TechShop

The CEO of TechShop, [Dan Woods], has hit the legal E-stop and declared Chapter-7 bankruptcy for the business. All ten US locations were shuttered on Wednesday with absolutely no advance warning. You can read the full statement from [Dan] here.

We are deeply saddened to hear of TechShop’s closing, and while it wasn’t implausible that this might happen someday, the abrupt shuttering must come as a painful shock to many for whom TechShop was an important part of their personal and professional lives. We owe a lot to the work and effort they put forth; they led the way as a pioneering makerspace and for more than ten years, TechShop provided access to tools, taught classes, and created opportunities for the DIY world that are still as important today as they were in the mid-aughts.

Leading the Way

Jim Newton, founder of TechShop, originally wanted a space to tinker with his pet projects. “I’m a frustrated inventor who needs to have access to this kind of stuff. And people always say that the best companies are the ones where the founders are passionate about what they are creating, which is exactly what I am,” Jim said in an interview in 2007, at the beginnings of TechShop.

It turned out that there were a lot of other tinkerers who wanted to work their pet projects too.

TechShop took a risk. All new business ventures are risky and most fail quite quickly, but in 2006, this whole movement, this idea that people could build things and take advantage of new technologies, personal fabrication, ad-hoc manufacturing, and rapid prototyping outside of universities and commercial R&D labs, was just a dream.

Adafruit was incubating in Limor’s dorm room. Arduino was just the name of some pub in Italy. Eben Upton was wiring prototype Raspberry Pi’s by hand. Nathan Seidle was still reflowing Sparkfun’s boards with a toaster oven. Maker Faire, “The World’s Largest Show and Tell,” wouldn’t even launch until the following year.

In the fading light of high school shop classes, people often were shown the ways of woodworking, light metalwork, and maybe how to fix a car or two. Filling a business with a smorgasbord of advanced machinery and teaching people how to use it, was, and still is, a relatively new concept. TechShop had a dream and made it real with the dedication of hardworking support staff and instructors around the country. Continue reading “Goodbye, TechShop”

Is Intel’s Management Engine Broken Yet?

Our own [Brian Benchoff] asked this same question just six months ago in a similar headline. At that time, the answer was no. Or kind of no. Some exploits existed but with some preconditions that limited the impact of the bugs found in Intel Management Engine (IME). But 2017 is an unforgiving year for the blue teams, as lot of serious bugs have been found throughout the year in virtually every fields of computing. Researchers from Positive Technologies report that they found a flaw that allows them to execute unsigned code on computers running the IME. The cherry on top of the cake is that they are able to do it via a USB port acting as a JTAG port. Does this mean the zombie apocalypse is coming?

Before the Skylake CPU line, released in 2015, the JTAG interface was only accessible by connecting a special device to the ITP-XDP port found on the motherboard, inside a computer’s chassis. Starting with the Skylake CPU, Intel replaced the ITP-XDP interface and allowed developers and engineers to access the debugging utility via common USB 3.0 ports, accessible from the device’s exterior, through a new a new technology called Direct Connect Interface (DCI). Basically the DCI provides access to CPU/PCH JTAG via USB 3.0. So the researchers manage to debug the IME processor itself via USB DCI, which is pretty awesome, but USB DCI is turned off by default, like one of the researchers states, which is pretty good news for the ordinary user. So don’t worry too much just yet.

Continue reading “Is Intel’s Management Engine Broken Yet?”