Astro Cat: Raspberry Pi Telescope Controller

When somebody tackles an engineering problem, there are two possible paths: they can throw together a quick and dirty fix that fits their needs (the classic “hack”, as it were), or they can go the extra mile to develop a well documented solution that helps the community as a whole. We cover it all here at Hackaday, but we’ve certainly got a soft spot for the latter approach, even if some may feel it falls into the dreaded territory of “Not A Hack”.
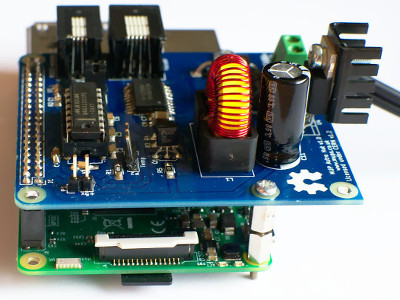
When [Gary Preston] wanted to control his telescope and astrophotography hardware, he took the second path in a big way. Over the course of several posts on his blog, [Gary] walks us though the creation of his open source Raspberry Pi add-on board that controls a laundry list of sensors and optical gear. Just don’t call it a HAT, while it may look the part, [Gary] is very specific that it does not officially meet the HAT specifications put out by the Raspberry Pi Foundation.

Even if you aren’t terribly interested in peering into the infinite void above, the extremely detailed write-up [Gary] has done contains tons of multidisciplinary information that you may find useful. From showing how to modify the Pi’s boot configuration to enable true hardware UART (by default, the Pi 3 ties it up with Bluetooth) and level shifting it with a ST3232 to a breakdown of the mistakes he made in his PCB layout, there’s plenty to learn.

Astro CAT is a completely open source project, with the hardware side released under the CERN Open Hardware License v1.2, and the INDI driver component is available under the GPL v3.

If this looks a bit daunting for your first stab at astrophotography with the Raspberry Pi, fear not. We’ve covered builds which can get you up and running no matter what your budget or experience level is.

EasyEDA Two Years Later

Some people want everything on the cloud, while others refuse to put even the smallest scrap of data on the Internet. Most of us fall somewhere in between. A few years ago, we talked about a few cloud-based PCB layout programs including one called EasyEDA. We were impressed because it was a full package: schematic capture, simulation, and PCB layout. It was free to use, although they would give you a quote for producing your boards, though you were under no obligation to buy them. Of course things change in two years, so if you are curious how EasyEDA is doing, [Yahya Tawil] posted an in-depth review.

Some of the new features include an autorouter and the ability to order parts from a BOM directly, not just PCBs. The cloud aspect is handy, not only because you don’t have to install and update software to use it anywhere, but because it is very natural to collaborate with others on projects. We did notice, though, that the autorouter can run in the cloud, or you can download and run it local because it apparently loads the server significantly.

Continue reading “EasyEDA Two Years Later”

Need A Hand? How About Two?

A helping hand goes a long way to accomplishing a task. Sometimes that comes in the form of a friend, and sometimes it’s a pair of robotic hands attached to your arm.

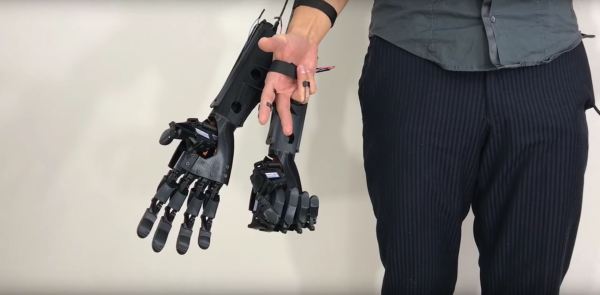
Italian startup [Youbionic] have developed this pair of 3D printed hands which aim to extend the user’s multi-tasking capacity. Strapped to the forearm and extending past the user’s natural hand, they are individually operated by flexing either the index or ring fingers. This motion is picked up by a pair of flex sensor strips — a sharp movement will close the fist, while a slower shift will close it halfway.

At present, the hands are limited in their use — they are fixed to the mounting plate and so are restricted to gripping tasks, but with a bit of practice could end up being quite handy. Check out the video of them in action after the break!

Continue reading “Need A Hand? How About Two?”

CNC Calculator Does What You Can’t

The Hackaday community — and the greater hacker community — can do absolutely anything. Readers of Hackaday regularly pilot spaceships. The transmutation of the elements is a simple science project here, one easily attainable by a high school student. Hackaday readers have solved international crises, climbed Everest, and one day we’re going to have readers accessing Hackaday from an IP address on Mars. There is almost no limit to what our community can do.

This project does the one thing Hackaday readers are utterly incapable of doing. As a cool little bonus, the enclosure for this device is a beautiful work of milled aluminum, anodized in a deep, beautiful black and engraved with exacting precision.

The guts of this build are in essence an Arduino loaded up with some special code that does what no human is capable of doing. Added onto that is a small lithium battery, charging circuit, character display, and a small keypad. There’s really nothing here that can’t be sourced from your favorite AliDXExtremeDeal shop.

The real show here is the beautiful milled aluminum enclosure. This was designed in Fusion360 and milled away on a Tormach CNC loaded up with a slightly worn endmill. The engraving was done with a Lakeshore carbide engraver. The first prototype was finished with a powder coat because that’s the easiest way for someone in a home shop to put a great finish on a milled enclosure. The production versions of this amazing device (available here, although it’s sold out at the time of this writing) are anodized and look fantastic.

If this is the sort of project that appeals to your desire for logic with just a touch of anti-Americanism, be sure to check out the number one most commented post on Hackaday ever. There are a lot of great opinions in the comments section there, even if the topic being discussed is obtuse and weird to the entire Hackaday community.

Continue reading “CNC Calculator Does What You Can’t”

Joe Kim: Where Technology And Art Collide

The rewards of being a writer for Hackaday are many, but aside from the obvious perks like the secret Hackaday handshake and admission to the private writer’s washroom, having the opportunity to write original content articles is probably the best part of the job. It gets even better, though, because after you submit an article, you’ll eventually get an email from Supplyframe Art Director Joe Kim with a Dropbox link to the original art he has created to accompany your piece. No matter where I am when that email comes in, I click on the link immediately, eager to see what Joe has come up with. And I’m never disappointed.

Continue reading “Joe Kim: Where Technology And Art Collide”

Disrupting The Computer Industry Before It Existed: Rear Admiral Grace Hopper

The feature of being easier to write than assembly is often seen as the biggest advantage of high-level programming languages. The other benefit that comes with them is portability. With high-level languages, algorithms can be developed independently from the underlying hardware. This allows software to live on once the hardware becomes obsolete.

The compiler was a concept that was met with resistance when it was first introduced. This was at a time when computers were custom-built machines bearing individual names like ENIAC, UNIVAC and Mark I. A time when the global demand for computers was estimated to be around five units by the CEO of IBM. In this scenario, it took a visionary to foresee a future where the number of computers would outgrow the number of programmers and hardware would evolve so much faster than software that a compiler would make sense. One visionary was [Grace Hopper].

Continue reading “Disrupting The Computer Industry Before It Existed: Rear Admiral Grace Hopper”

3D Print Yourself A Flame Thrower

For a large proportion of the world’s population, it’s now winter, which means there’s plenty of rain and snow to go around. With the surrounding environment generally cooler and wetter than usual, it’s a great time to experiment with dangerous flame based projects, like this wrist mounted flame thrower.

It’s a build that does things in both a simple and complicated way, all at once. Fuel is provided by a butane canister with a nozzle that needs to be pressed to release the gas.  A servo is used to push the canister into a 3D printed housing, releasing the gas into a pipe to guide the fuel towards the end of the user’s wrist. The fuel is then ignited by a heated coil of wire. The heated wire and the servo are both controlled by standard radio control gear typically seen on RC cars or buggies. Using the brushed speed controller to run the heated coil is particularly off-beat, but it does the job admirably.

Overall, it goes without saying that this build presents some serious risks of burns and other injuries. However, the fundamental premise is sound, and it does what it says on the tin with parts that could be readily found in the average junk box.

For another take on a wrist-mounted flame thrower, check out this version using a scavenged solenoid valve.