Impressive Drawing Machine For One Made So Simply

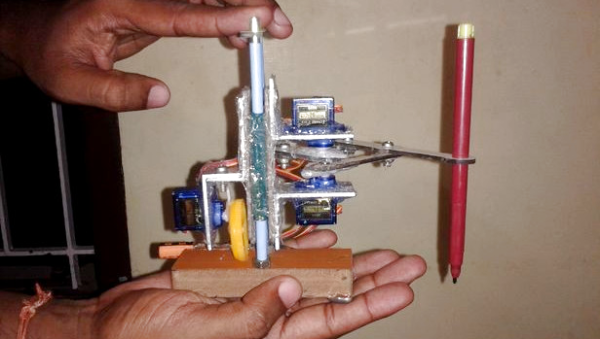
Not all of us have CNC machines, laser cutters and 3D printers, and I’ll bet most of us didn’t start out that well equipped. The low-cost drawing machine that [jegatheesan] made for his daughter reminds us that you can prototype, and then make a functioning mechanical Da Vinci with very basic materials and mostly hand tools. He also wrote his own drawing software, with an interface that has its own simplicity.

There really are a lot of things to like about [jegatheesan]’s project. He first works out the math himself by doing something the likes of which we’ve all enjoyed, digging out the old school trigonometry and algebra books for a refresher. Then he got started on his prototype, made using a cardboard tube for the main support and straws and safety pins for the drawing arms. He already had a motor shield for his Arduino but it supported only 2 servos, so he made his own 3-servo shield. In the end, the prototype told him he had to redo some calculations, allowing him to move on to the final machine.

One thing we can say about the final machine is that hot glue must truly be the maker’s connect-all — you won’t find many screws here. Even the servos are held in place with copious quantities of glue. And the mechanism for lifting the pen is also quite clever. The whole thing is mounted on two vertical guide rods, so that it can easily slide up and down. To get it to actually move up and down, he glued a toy car wheel off-center on a servo arm. When the servo turns, the off-center wheel acts like a cam, pushing down on the wooden base to either lift the machine up or lower it down, depending on where the wheel is in its rotation.

See his hackaday.io page for the full step-by-step development process. But first check out the videos below to see how impressive such a simply made machine is in action.

Continue reading “Impressive Drawing Machine For One Made So Simply”

A Floppy Drive For Apple’s Pippin

The Pippin was Apple’s first and last foray into gaming consoles. At its heart, the Pippin was a strange ‘multimedia device’ with a CD-ROM, the potential for Internet access, a few neat controllers, and the guts of a very bare-bones PowerPC Macintosh. Think of a cross between a 3DO and WebTV, and you’ll get an idea of what Apple was trying to build here.

The Pippin is rare, and that means the related accessories, ranging from magneto-optical drives to floppy drives, are incredibly hard to come by. Now, one of those peripherals isn’t rare anymore; [Pierre] has cloned the (passive) PCB that allows a Macintosh floppy drive to plug directly into the Pippin.

The expansion capabilities for the Pippin are locked away inside a PCI connector strategically located on the bottom of this set-top box. The official floppy drive accessory injection molded case, a standard Mac floppy drive, and a PCB. After finding one of these rare floppy drive accessories, [Pierre] simply took a meter to all the pins, traced out the circuit, and created a PCB with a PCI connector on one end, and 20-pin connector on the other. The PCB is shared on OSH Park if you want to check this out.

Although recreating this hardware was relatively easy, testing it was not. The first test used the Floppy Emu, a neat device that allows old Macs to read disk images off an SD card. This worked beautifully, but testing it out with a real floppy drive did not. Some disks simply didn’t work, although [Pierre] is chalking that one up to a problem with the USB floppy drive and a Mac running Sierra.

Rolling Around A 4th Axis

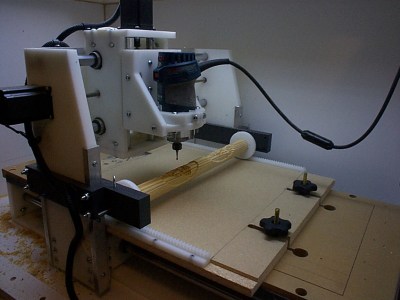
[Perry] was interested in adding a 4th axis to his CNC machine, but not very excited at the prospect of spending hundreds of dollars on the parts and electronics to make it work. There is a very clever and very inexpensive way to add a 4th axis to a CNC machine, though, and after a bit of fabrication, he was able to add a ‘rolling’ 4th axis to his machine.

[Bob]’s ‘rolling’ 4th axis.
The idea for this build comes from [Bob] over on the CNC Shark forums. Instead of adding a motor to rotate a work piece around, [Bob]’s build simply mounts it between two jaws, and rolls everything around against the bed of the CNC router. Don’t have a clue what that means? Check out the picture to the right, and you’ll see brilliance built in Delrin and HDPE.  By mounting two rack gears to the bed and two geared jaws to the carriage of the machine, moving the router in the Y axis also rotates the 4th axis. This is far, far too clever; it doesn’t require any additional electronics and the only software tweaks are a bit of G-code hacking.

[Perry] took one look at [Bob]’s project and decided this would be the perfect build to get him a 4th axis. The parts for this build were fabricated out of black HDPE, with the only real change to the design being a ‘variable length’ 4th axis. Instead of two rack gears mounted to the bed of the machine, [Perry]’s build only uses one rack, with the other end simply rolling on the bed.

There are a lot of clever inventions that don’t work, so what’s the verdict with this CNC hack? It actually looks pretty good. [Perry] was able to turn some square stock into round stock, and able to engrave a spiral around a cylinder. You can check out those videos below.

Continue reading “Rolling Around A 4th Axis”

Polyurethane, Meet 3D Printing

3D printing makes prototyping wonderful. But what do you do when your plastics of choice just aren’t strong enough? For [Michael Memeteau], the answer was to combine the strength of a vacuum-poured polyurethane part with the ease of 3D-printed molds. The write-up is a fantastic walk through of a particular problem and all of the false steps along the way to a solution.

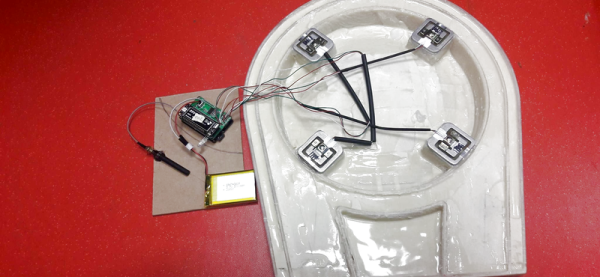
The prototype is a connected scale for LPG canisters, so the frame would have to support 80 kg and survive an outdoor environment. Lego or MDF lattice were considered and abandoned as options early on. 3D printing at 100% infill might have worked, but because of the frame’s size, it would have to be assembled in pieces and took far too long anyway.

The next approach was to make a mold with the 3D printer and pour the chosen polyurethane resin in, but a simple hollow mold didn’t work because the polyurethane heats as it cures. The combined weight and heat deformed the PLA mold. Worse, their polyurethane of choice was viscous and cured too quickly.

The solution, in the end, was a PET filament that deforms less with heat, clever choice of internal support structures to hold the stress in while being permeable, and finally pouring the polyurethane in a vacuum bag to help it fill and degas. The 3D-printed hull is part of the final product, but the strength comes from the polyurethane.

Mold-making is one of the killer apps of 3D printing. We’ve seen 3D prints used as molds for spin-casting hollow parts, and used as a sacrificial shell for otherwise epoxy parts. But for really complex shapes, strength, and ease of fabrication, we have to say that [Michael]’s approach looks promising.

Hackaday Links Column Banner

Hackaday Links: September 3, 2017

The TI-83, TI-84, and TI-86 have been the standard graphing calculators in classrooms for two decades. This is the subject of an xkcd. Now, hopefully, there’s a contender for the throne. Numworks is a graphing calculator that looks like it was designed in at least 2006 (so very modern), and apparently, there’s a huge community behind it.

Juicero is shutting down. No one could have seen this one coming. The Juicero was a $700 press that turned proprietary, DRM’ed juice packs into juice and garbage. It was exquisitely engineered, but it turns out very few people want to spend thousands of dollars per year on DRM’ed juice. Oh, since the Juicero phones home, those $700 presses probably won’t work in the future.

Are you in the Bay area? Do you need test equipment? There’s a gigantic auction happening somewhere around San Jose. [Dave] tipped everyone off to this one, and this auction is pretty freakin’ spectacular. Spectrum analyzers, signal gens, a ‘mega zoom’ oscilloscope, and 4-channel, 500 MHz scopes for $50. There are a thousand lots in this auction. It’s nuts.

Everybody loves PCB art, and [Uri] has a guide for designing custom, functional electronic circuit boards. The toolchain used in this guide is Inkscape and KiCad, with blinky hearts, blinky pandas, and other blinky PCBs.

This one is a little out there even for us. Here’s how you build your own AA batteries. It’s a dozen #10 copper washers, a dozen or so #10 zinc washers, some cardboard, vinegar, salt, and some heat shrink tubing. The assembly of this battery is exactly what you would expect, and yes, it does work. Here’s the thing, though: The very crude tests suggest these batteries have a capacity of about 800-1000 mAh, which is far more than we would expect. Who has a programmable load and wants to do a few experiments? Also, these batteries are ‘rechargeable’ by taking them apart, sanding the crud off each washer, and adding new electrolyte.

[Jan] has made a name for himself stuffing synthesizers into tiny little microcontrollers. The latest project is the Infinity37, a polyphonic synth with MIDI, envelopes, and a whole bunch of cool stuff. Check out the video.

[rctestflight] is building a solar powered aircraft. It’s has a beautiful wing studded with solar panels. The latest flight was four hours, long enough to make piloting a plane through some FatSharks extremely tedious. Future developments will probably include a MPPT charging solution, and probably an autopilot.

Hackaday Prize Entry: Remote Control By Head Gestures

Some people may think they’re having a bad day when they can’t find the TV remote. Yet there are some people who can’t even hold a remote, let alone root around in the couch cushions where the remote inevitably winds up. This entry in the Assistive Technologies phase of the 2017 Hackaday Prize seeks to help such folks, with a universal remote triggered by head gestures.

Mobility impairments can range from fine motor control issues to quadriplegia, and people who suffer from them are often cut off from technology by the inability to operate devices. [Cassio Batista] concentrated on controlling a TV for his project, but it’s easy to see how his method could interface with other IR remotes to achieve control over everything from alarm systems to windows and drapes. His open-source project uses a web cam to watch a user’s head gestures, and OpenCV running on a CHIP SBC looks for motion in the pitch, yaw, and roll axes to control volume, channel, and power. An Arduino takes care the IR commands to the TV. The prototype works well in the video below; with the power of OpenCV we can imagine mouth gestures and even eye blinks adding to the controller’s repertoire.

The Assistive Tech phase wraps up tomorrow, so be sure to get your entries in. You’ll have some stiff competition, like this robotic exoskeleton. But don’t let that discourage you.

Continue reading “Hackaday Prize Entry: Remote Control By Head Gestures”

Have Alexa Open Your Garage Door

[yoyotechKnows] built an Alexa-controlled garage door opener after his Liftmaster stopped working. Now all he has to do is holler at his mobile phone and he can raise and lower his garage doors at will.

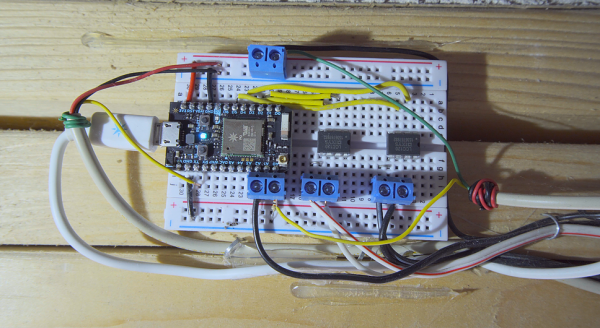
His project is based around a Photon WiFi kit, with a pair of LCC 120 digital relays triggering the two doors, reed switches, and a serial-equipped LCD to display door status, with Alexa, IFTTT, and OpenHab to process the commands. You can find his code in the project writeup.

Currently he has a LCD display informing him of the status of each door, hot glued a reed switch to keep track of whether each one is closed. This might seem a little bit extraneous since he can also just look at the doors from within the garage. However, he’s thinking about putting the display inside his house. But couldn’t he just ask Alexa?

We love us our home automation here at Hackaday, with everything from swimming pools to chicken coops rigged for app control and datalogging.

Continue reading “Have Alexa Open Your Garage Door”