Exploring Options For DIY Waterproofing

TL;DR — Don’t use silicone to pot electronics.

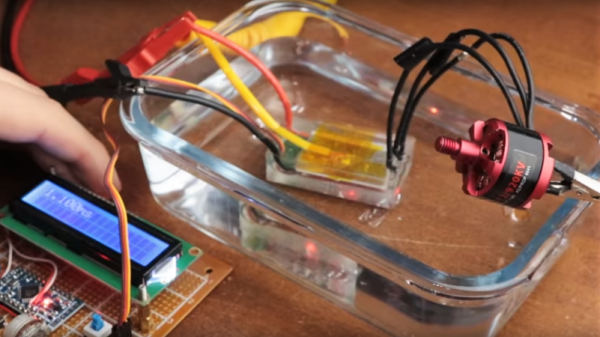
That’s the conclusion [GreatScott!] comes to after trying out several methods for waterproofing electronics. His efforts stem from a recent video in which he discovered that water and electricity sometimes actually do mix, as long as the water is distilled and the electronics in the drink are relatively simple. He found that the main problem was, unsurprisingly, electrolytic corrosion, so he set out to experiment with various waterproofing coatings. In a series of careful experiments he goes through the pros and cons of both conformal coatings and potting compounds. The conformal tests used simple clear nail polish on an ESC board; that worked pretty well, but it was a little hard to reach all the nooks and crannies. He also tried potting with a thick black silicone compound, but that ended up never really curing in the middle. A final attempt with legitimate two-part epoxy potting compound sealed up the ESC tight, although we doubt the resulting brick would perform well on a quadcopter.

If you want to explore potting a bit further, check out this introduction to the basics.

Continue reading “Exploring Options For DIY Waterproofing”

LiquidWatch Is Dripping With Style

Some of the entries for the 2017 Coin Cell Challenge have already redefined what most would have considered possible just a month ago. From starting cars to welding metal, coin cells are being pushed way outside of their comfort zone with some very clever engineering. But not every entry has to drag a coin cell kicking and screaming into a task it was never intended for; some are hoping to make their mark on the Challenge with elegance rather than brute strength.

A perfect example is the LiquidWatch by [CF]. There’s no fancy high voltage circuitry here, no wireless telemetry. For this entry, a coin cell is simply doing what it’s arguably best known for: powering a wrist watch. But it’s doing it with style.

The LiquidWatch is powered by an Arduino-compatible Atmega328 and uses two concentric rings of LEDs to display the time. Minutes and seconds are represented by the outer ring of 60 LEDs, and the 36 LEDs of the inner ring show hours. The hours ring might sound counter-intuitive with 36 positions, but the idea is to think of the ring as the hour hand of an analog watch rather than a direct representation of the hour. Having 36 LEDs for the hour allows for finer graduation than simply having one LED for each hour of the day. Plus it looks cool, so there’s that.

Square and round versions of the LiquidWatch’s are in development, with some nice production images of [CF] laser cutting the square version out of some apple wood. The wooden case and leather band give the LiquidWatch a very organic vibe which contrasts nicely with the high-tech look of the exposed PCB display. Even if you are one of the legion that are no longer inclined to wear a timepiece on their wrist, you’ve got to admit this one is pretty slick.

Whether you’re looking to break new ground or simply refine a classic, there’s still plenty of time to enter your project in the 2017 Coin Cell Challenge.

A Visit From Saint Rich

With apologies to Clement Clarke Moore, Richard Stallman, and the English-speaking world in general — ed.

‘Twas the night before Christmas
While up in my bed,
I stared at the ceiling
With feelings of dread.

I’d really no reason for portents of doom
Lying there, sleepless, in gathering gloom.
We’d wrapped all the presents, and decked out the tree,
But still, there was something niggling at me.

Continue reading “A Visit From Saint Rich”

An Automated Ice Cream Topper For The Ultimate In Zero Effort Desserts

It’s a highly personal facet of the eating experience, the choice of topping applied to your frozen dessert. Everybody has their own preferences when it comes to whipped cream, sprinkles, and chocolate syrup. Should the maintenance of those preferences become a chore, there is a machine for that, and it comes courtesy of [Kristen Vilcans] and [Ramita Pinsuwannakub] in the form of their Cornell University project as students of [Bruce Land]. Their Automated Ice Cream Topper holds profiles for each registered user, and dispenses whipped cream, chocolate sauce, and candy sprinkles onto ice cream at the simple push of a button.

The hardware seems simple enough until you appreciate the many iterations used to ensure that it works smoothly. The bowl of ice cream sits on a motorised turntable, and a can of whipped cream is suspended above it upon rails made from kebab skewers. A servo and lever operates the can to release the cream.  Meanwhile the sprinkles come from an inverted spice jar with a motorised disc to momentary align a hole with the jar’s spout, and the chocolate syrup comes courtesy of an air pump and some plastic tubing. The whole is controlled from a PIC32 microcontroller.

It is refreshing to see that such projects do not have to tackle especially high-tech problems to be extremely successful. We could all dispense our own toppings, but now we know there’s s machine for the task, who wouldn’t want to give it a try!

If ice cream student projects are your thing, perhaps you’d like a 3D printer?

Fast 3D Printing With Raspberry Pi — But Not How You Think

Although we tend to think of 3D printers as high-tech toys, most of them are not especially powerful in the brain department. There are some exceptions, but most 3D printers run on either an 8-bit Arduino or some Arduino variant with a lot of I/O. There are a few 32-bit boards, but if you grab a random 3D printer, its brain is going to be an 8-bit AVR running something like Marlin or Repetier. It isn’t uncommon to see a Raspberry Pi connected to a printer, too, but — again, in general — it is a network interface that handles sending G-code to the 8-bit controller that runs the stepper motors. Would it make more sense to do things like parse G-code, map out curves, and set accelerations in the relatively powerful Raspberry Pi and relegate the 8-bit AVR to just commanding motors and heaters? [KevinOConnor] thinks so, and he wrote Klipper to prove it.

Klipper is mostly written in Python and it does most of the functions of traditional 3D printing firmware. It communicates with the onboard microprocessor by providing a schedule of when to do what tasks. The microprocessor then handles the timing and things like motion control for the axes and extruder. Klipper can control multiple microprocessors with no trouble and keeps them in synchronization, so you could have a processor for your extruder and one for each stepper, for example. You can use Klipper with a Cartesian machine, a delta, or a Core XY-style printer.

Continue reading “Fast 3D Printing With Raspberry Pi — But Not How You Think”

Sound Isolated Server Rack

Servers are most often found in climate controlled data centers. This means they aren’t exactly built for creature comforts like quiet operation. Quite the contrary — many server chassis include fans which absolutely scream when the machine is under load. [Whiskykilo] needed to set up a 12 U rack in his basement for working from home. He knew the sound would get on anyone’s nerves, but especially on those of his wife.

To solve this problem, he built a sound isolated rack. The build started with a standard 12 U metal rack frame. This is wrapped in 1/2″ MDF coated with automotive sound deadening material. An outer frame built of 1×4 lumber and another layer of 1/2″ MDF. Isolating the inner and outer boxes made the biggest contribution to quieting down the noisy servers.

Computers need to breathe, so the front and back doors of the rack enclosure include banks of intake and exhaust fans to keep air flowing through the servers. Two AC Infinity controllers keep the fans operating and monitor temperature. These machines do generate some heat – so 64 °F (18C) intake and 81 °F (27C) exhaust is not unheard of. The servers don’t seem to mind running at these temperatures. A Raspberry Pi 3 keeps an eye on UPS operation and displays the data on a 7″ HDMI LCD.

Interested in running a server at home? You don’t have to go to the lumberyard – check out this server made with Ikea components, or this server built from 96 MacBook Pros.

Monoprice Mini Laser Engraver Hack

There’s an old saying, that in theory there’s no difference between theory and practice, but in practice there is. That sentiment could easily be applied to refitting a 3D printer to hold a laser. There shouldn’t be much to it, rig up a laser module to turn on under computer control, mount it to your hot end carriage and off you go. In practice, though there are other considerations to account for. If you have a Monoprice Mini Select, you can start with instructions from [drodrii] for adding a laser to your printer.

Although [drodrii] mentions that you need a second 3D printer to make a bracket for the laser, we think you should be able to print it on the Mini as long as you do it before the first step of removing the hot end. However, since your laser module might not exactly match the one used in this project, you’d have to get it right the first time if you don’t have another 3D printer. Of course, you could remove the laser gear, remount the hot end, print a new bracket and start over, but that’d be a drag.

Continue reading “Monoprice Mini Laser Engraver Hack”