The (Unnecessary?) Art Of Connector Crimping

The “Completion Backwards Principle” is a method of reasoning through a problem by visualizing the end result and then working your way backwards from that point. The blog post that [Alan Hawse] has recently written about the intricacies of crimping wires for plug connectors is a perfect example of this principle. The end result of his work is the realization that you probably shouldn’t bother crimping your own connectors, but watching him work backwards from that point is still fascinating. It’s also the name of a rock album from the 80’s by The Tubes, but this is not a useful piece of information in regards to electrical wiring.
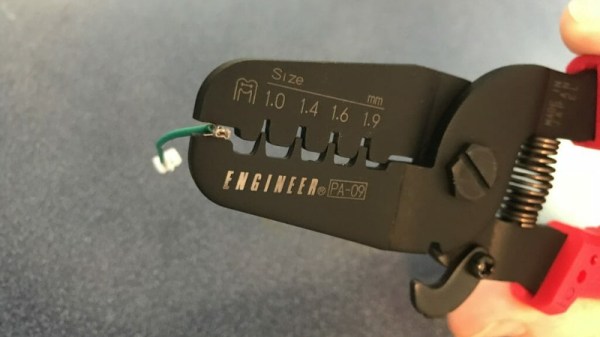
Of course, sometimes people do silly things. Even though there are pre-crimped wires available online for a pittance, you might still want to do your own. With this in mind, [Alan] has put together an exceptionally detailed and well-research post that gives you all the information you could possibly want to know about crimping what is often erroneously referred to as the “JST connector”.

He starts by showing off some common examples of this connector, which if you’ve ever opened a piece of consumer electronics will be like looking through a High School yearbook. You might not know their names without reading them, but you definitely remember what they look like.

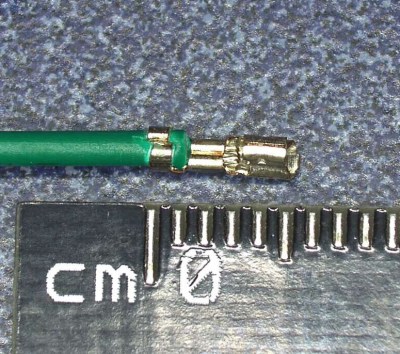
We’re then treated to an array of macro shots showing the scale of the pieces involved. If getting up close and personal with metal bits that are only a few millimeters long is your kind of thing, then you’re really going to love this part.

Finally, the post is wrapped up with a few words about the kind of crimping tools that are available on the market, and then a demonstration of his personal crimping method. While some tools would have you crimp both sets of “wings” at the same time, [Alan] tells us he finds taking them on individually leads to better results in his experience.

If this this little taste has left you hungry for a true feast of hyper-specialized knowledge, be sure to check out the Superconference talk by [Bradley Gawthrop].

Continue reading “The (Unnecessary?) Art Of Connector Crimping”

Nintendo Switch Gets Making With Labo

Over the years, Nintendo has had little trouble printing money with their various gaming systems. While they’ve had the odd misstep here and there since the original Nintendo Entertainment System was released in 1983, overall business has been good. But even for the company that essentially brought home video games to the mainstream, this last year has been pretty huge. The release of the Nintendo Switch has rocketed the Japanese gaming giant back into the limelight in a way they haven’t enjoyed in a number of years, and now they’re looking to keep that momentum going into 2018 with a killer new gaming accessory: a cardboard box.

Some of the contraptions feature surprisingly complex internal mechanisms.

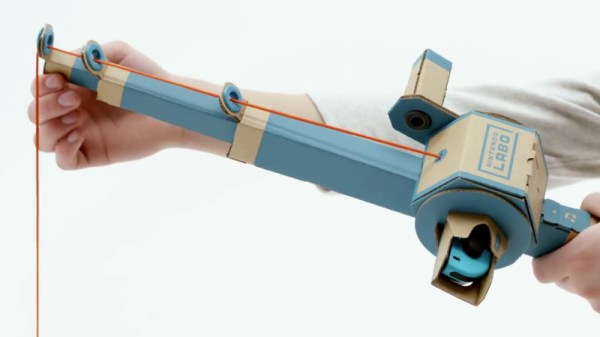
Well, it doesn’t have to be a box, necessarily. But no matter which way you fold it, it’s definitely a piece of cardboard. Maybe a few bits of string here and there. This is the world of “Nintendo Labo”, a recently announced program which promises to let Switch owners create physical objects which they can interact with via specially designed software for the console.

The Labo creations demonstrated in the bombastic announcement video make clever use of the very unique Switch hardware. The removable Joy-Con controllers are generally still used as input devices, albeit in less traditional ways. Twisting and tilting the cardboard creations, which take varied forms such as a fishing rod or motorcycle handlebars, relays input to the appropriate game thanks to the accelerometers and gyroscopes they contain.

Many of the more complex contraptions rely on a less-known feature of the controller: the IR depth camera. By pointing the controller’s camera inside of the devices, the motion of internal components, likely helped along by IR-reflective tape, can be tracked in three dimensions. In the video, the internal construction of some of the devices looks downright intimidating.

Which leads into the natural question: “Who exactly is this for?”

Clearly some of the gadgets, not to mention the folded cardboard construction, are aimed at children, an age group Nintendo has never been ashamed to appeal to. But some of the more advanced devices and overall concept seems like it would play better with creative teens and adults looking to push the Switch in new directions.

Will users be empowered to create their own hardware, and by extension, associated software? Will hackers and makers be able to 3D print new input devices for the Switch using this platform? This is definitely something we’ll be keeping a close eye on as it gets closer to release in April.

The popularity of the Switch has already given rise to a surprising amount of hacking given how new the console is. It will be interesting to see if the introduction of Labo has any effect on the impressive work already being done to bend the console to the owner’s will.

Continue reading “Nintendo Switch Gets Making With Labo”

Tricked-out Barbecue Will Make You Do A Spit Take

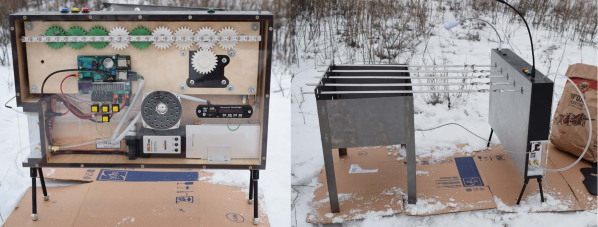
[Strn] and his friends love to barbecue no matter what it’s like outside. But something always seems to interrupt the fun: either it’s time to get up and turn the meat, or the music stops because somebody’s phone ran out of juice, or darkness falls and there aren’t enough flashlights or charged-up phones. He had the idea to build the Swiss Army knife of barbecues, a portable powerhouse that solves all of these problems and more (translated).

Most importantly, the E-Mangal rotates the skewers for even cooking. It does this with a 3D-printed worm gear system driven by the heater flap actuator from a car. After 25 minutes of slow rotation, a voice announces that it’s time to eat. [Strn] and friends will never hurt for music options between the pre-loaded tracks, Bluetooth audio, FM antenna, USB, and SD options running through a 3W amp. Two USB lights illuminate nighttime barbecuing, and the 10 Ah battery can do it all and keep everyone’s phone charged. For safety’s sake, [Strn] included a half-liter water tank to extinguish the coals via jet stream. Everything is run by a PIC18F, and it can be controlled at the box or through a simple web interface.

We love the look of this barbecue controller almost as much as the functionality. The sturdy stance of those short, angled legs give it a mid-century appliance feel, and seeing all the guts on display is always a plus. Grab a turkey leg and take the tour after the break.

The E-Mangal has a thermocouple in the coal box to measure the temperature, but there’s no direct control. If you’re more interested in temperature options than entertainment, here’s a project that micromanages everything on the grill.

Continue reading “Tricked-out Barbecue Will Make You Do A Spit Take”

Microsoft Gets Hacker Friendly

You don’t often hear hackers say a lot of good things about Microsoft. Sure, you might use Windows, especially if you have one of those embarrassing day jobs. But at night in a hacker’s secret lab, you are likely to find something that looks more like Unix, even if it has a penguin, a piece of fruit, or even a green robot on the label. But we’ll give Microsoft credit. Their new MakeCode site will be a great boon for educators, students, and anyone who wants to learn how to code. What’s more is they are joined by a lot of familiar hacker faces including AdaFruit, Sparkfun, and Seeed Studios.

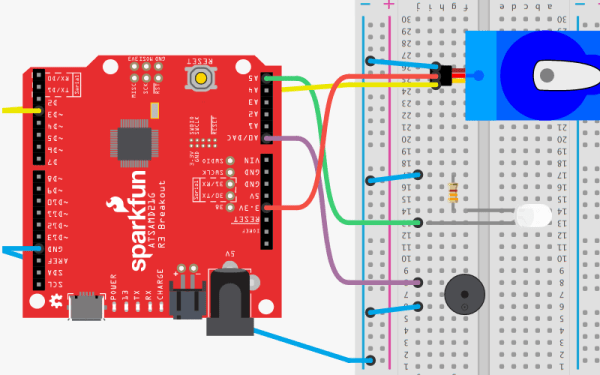
The idea is to have tutorials and if that was all there was to it, this would be a short post. But what is really entertaining about the site is that there are web-based emulators for all the hardware so you can actually do the projects in your browser with no extra hardware. You can also do your own projects from scratch.

Continue reading “Microsoft Gets Hacker Friendly”

Roll Your Own Raspberry Pi OS

Writing an operating system is no small task, but like everything else it is easier than it used to be. [JSandler] has a tutorial on how to create a simple operating system for the Raspberry Pi. One thing that makes it easier is the development environment used. QEMU emulates a Raspberry Pi so you can do the development on a desktop PC and test in the virtual environment. When you are ready, you can set up a bootable SD card and try your work on a real device.

The operating system isn’t very complex, but it does boot, organize memory, displays on the screen, handles interrupts, and manages processes. What else do you need?

Continue reading “Roll Your Own Raspberry Pi OS”

Getting To Know An 18th Century Hacker

Here at Hackaday we tend to stay pretty close to the bleeding edge in tech, not by any conscious effort, but simply because that’s what most hackers are interested in. Sure we see the occasional vintage computer rebuild, or reverse engineering of some component that was put into service before most of us were born; but on the whole you’re way more likely to see projects involving the latest and greatest microcontroller to hit AliExpress than ones involving the once ubiquitous vacuum tube.

Bill Maddox

But occasionally it’s nice to take a step back from the latest and greatest, to really look at what makes the hacker spirit without the all modern trappings of blinking LEDs and Wi-Fi connectivity. We make and explore because it’s something we are passionate about, and while today most of us are doing that with a soldering iron or a compiler, that hasn’t always been the case. In the video below, historic interpreter and woodworker [Bill Maddox] talks about what draws him to 18th century technology. His tools may look foreign to us, but the passion he shows while talking about his creations will be familiar to anyone who’s ever set foot in a hackerspace.

Even with a vastly different set of interests than the modern hacker, [Bill] runs into some very familiar problems. When the highly specialized tools he needed to work like an 18th century craftsman weren’t available, he decided to make his own. But to make his own tools he needed to learn how to forge, and after he forged his hand tools he moved on to forging chisels for the lathe he decided to build.

Whether or not we ever take a knife to a piece of wood and try to carve out a spoon, it’s impossible to watch [Bill] speak about his creations and not see him as a kindred spirit. Like many of us, he’s honed skills in a niche that the everyday person takes for granted. Makes you wonder what people from 300 years in the future would think of us if they could peer back through the centuries.

Continue reading “Getting To Know An 18th Century Hacker”

A Modern Take On The Crystal Radio

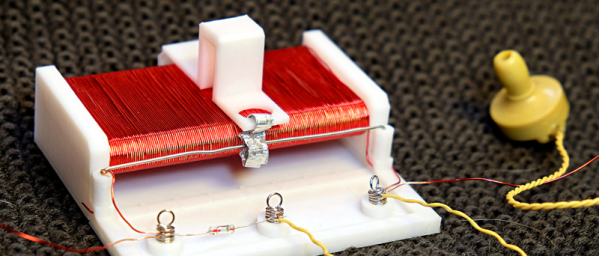
We’ll admit that [3DSage] has a pretty standard design for a crystal radio. What we liked, though, was the 3D printed chassis with solderless connections. Of course, the working pieces aren’t 3D printed — you need an earphone, a diode, and some wire too. You can see the build and the finished product in the video below.

Winding the coil is going to take awhile, and the tuning is done with the coil and capacitance built into the tuning arrangement so you won’t have to find a variable capacitor for this build. There is a picture of the radio using a razor blade point contact with a pencil lead, so if you want to really scrimp on the diode, that works too, and you can see how at the end of the video.

We did like the use of cord ends from a sewing and craft supply store to serve as solderless springs. This would be a great item to print off a few dozen copies and use it for a school or youth group activity. You might want to pair it with an AM transmitter, though so the kids won’t be dismayed at what is playing on AM in most markets. [3DSage] uses a sink for ground — literally a kitchen sink. However, if you try this, make sure all the pipes are metal or you won’t get a good ground and you probably won’t pick up any stations.

We’d like to get some of those springs and make some other kind of starter projects with them like the kits many of us had as kids. This reminded us of the old foxhole radios, found during World War II.

Continue reading “A Modern Take On The Crystal Radio”