Bradley Gawthrop: What You Need To Know About Wiring

Wiring — as in plugging wires together and crimping connectors, not the Arduino IDE thingy — is an incredibly deep subject. We all know the lineman’s splice is the best way to solder two wires together, and NASA’s guide to cables and connectors is required reading around these parts. However, there’s a lot that can be said about connectors and cabling, and one of the best people to explain it all is Bradley Gawthrop. He spent the last ten years building pipe organs, and with that comes tens of thousands of relays, solenoids, switches, and valves. All of these parts are connected by thousands of miles of wire, and are arguably as complex as an old-school telephone exchange. If there’s someone you need to talk to about connecting hundreds of thousands of parts together, Bradley is your guy.

Bradley starts his Hackaday Superconference talk with a discussion of the modern prototyping process. We’re pretty far away from dozens of chips sitting around a breadboard with data and address lines these days, and now any sort of prototype is basically a development board with a constellation of modules studded around the perimeter. The best solution for connectors is right angle headers, not only for the reason that the wires stay flat, but also because right angle connectors allow you to probe each and every wire coming out of a board.

Of course, when it comes to wiring, it’s helpful to talk about the wire itself. Instead of having an entire warehouse of wire in every color, gauge, and insulation material hanging above his workshop, Bradley only needs a few options. Right now, he’s only dealing with three gauges of wire — small, medium, and large, or 24, 18, and 12 AWG. That’s one wire for small signals, one wire for a bit of current, and one wire for supply amounts of current. Not only does this cut down on workshop inventory, it also means Bradley only needs three sizes of crimpers and connectors. When it comes to strand count, solid core wire is highly underrated. Not only is it easier to strip and crimp, it can also support its own weight. That’s important, because it means connectors don’t have to bear the weight of the entire cable run.

If you’re looking for the minimal required toolset for running cables and crimping connectors, Bradley has a great little shopping list on his website. The best strippers he’s ever found come from Wiha, but they’ve been EOL’d by the manufacturer. Knipex makes some good strippers, though. You don’t need to spend big money on ferrule crimpers, and some cheapies from BangGood are good enough. Bradley has standardized on Molex SL and Molex KK interconnects, and wire can be sourced easily if you have Amazon Prime.

While the subject matter for Bradley’s talk sounds easy to overlook, connecting parts together in an assembly is a critical skill in itself. We’re glad Bradley could share his experience with us at the Hackaday Superconference.

Dust Off Those AM Radios, There’s Something Good On!

If you are into vintage electronics or restoring antique radio equipment you may be very disappointed with the content offerings on AM broadcast radio these days. Fortunately there is a way to get around this: build your own short-range AM broadcast station and transmit curated content to your radios (and possibly your neighbors). There are several options for creating your own short-range AM broadcast station, and this gives you something fun to tune into with your vintage radio gear.

Continue reading “Dust Off Those AM Radios, There’s Something Good On!”

Printed PC Speakers Are Way Cooler Than Yours

On the off chance you’re reading these words on an actual desktop computer (rather than a phone, tablet, smart mirror, game console…), stop and look at the speakers you have on either side of your monitor. Are you back now? OK, now look at the PC speakers and amplifier [Kris Slyka] recently built and realize you’ve been bested. Don’t feel bad, she’s got us beat as well.

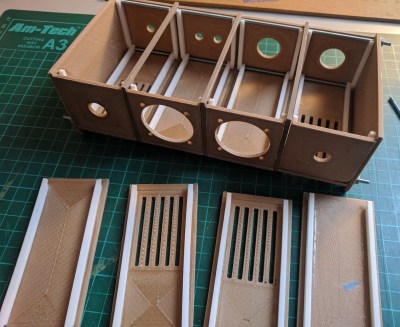
The speaker and amplifier enclosures were painstakingly printed and assembled over the course of three months, and each piece was designed to be small enough to fit onto the roughly 4 in x 4 in bed of her PrintrBot Play. While limited print volume made the design considerably trickier, it did force [Kris] to adopt a modular design approach with arguably made assembly (and potential future repairs or improvements) easier.

The amplifier is made up of rectangular “cells” which are connected to each other via 3 mm threaded rods. For now the amplifier only has 4 cells, but this could easily be expanded in the future without having to design and print a whole new case. Internally the amplifier is using two TDA8932 digital amplifier modules, and some VU meters scored off of eBay.

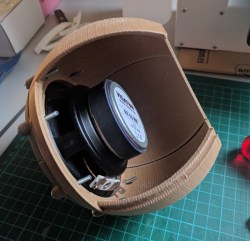
Each speaker enclosure is made up of 10 individual printed parts that are then glued and screwed together to make the final shape, which [Kris] mentions was inspired by an audio installation at the Los Angeles County Museum of Art. They house 4″ Visaton FR 10 HM drivers, and are stuffed with insulation.

It’s a bit difficult to nail down the style that [Kris] has gone for here. You see the chunky controls and analog VU meters and want to call it retro, but it’s also a brass cog and sprocket away from being Steampunk. On the other hand, the shape of the speakers combined with the bamboo-filled PLA used to print them almost gives it an organic look: as if there’s a tree somewhere that grows these things. That’s actually a kind of terrifying thought, but you get the idea.

If your computer speakers were assembled by mere mortals, never fear. We’ve covered a number of interesting hacks and mods for more run-of-the-mill desktop audio setups which should hold you over until it’s time to harvest the speaker trees.

[via /r/3Dprinting]

Software Design Patterns For Real Hardware

Here on Hackaday, we’re generally designers of hacks that live in the real world. Nevertheless, I’m convinced that some of the most interesting feats are at the mercy of what’s possible in software, not hardware. Without the right software, no 3D printer could print and no quadcopter could fly. The source code that drives these machines may take months of refinement to flesh out their structure. In a nutshell, these software packages are complicated, and they don’t happen overnight.

So how do they happen; better yet: how could we make that happen? How do we write software that’s flexible enough to coexist peacefully on all sorts of hardware variations?

What separates the big open-source software projects like ROS, LinuxCNC, and Multiwii from the occastional hackathon code are the underlying principles that govern how they’re written. In object-oriented programming, these principles are called design patterns. In the next couple posts, I’m going to crack the lid on a few of these. What’s more, I’ll package them into real-world examples so that we can see these patterns interact with real hardware. The next time you pop open the source code for a big open source hardware project, I hope you can tease out some of these patterns in the code. Better yet, I hope you carry these patterns into your next robot and machine project. Let’s get started.

For readability, all of the examples run in Python3. The snippets below are truncated for brevity, but the real examples in the repository will work if you’ve got a similar hardware setup.

Continue reading “Software Design Patterns For Real Hardware”

Apple Passwords: They All ‘Just Work’

When the Macintosh was released some thirty-odd years ago, to Steve Jobs’ triumphant return in the late 90s, there was one phrase to describe the simplicity of using a Mac. ‘It Just Works’. Whether this was a reference to the complete lack of games on the Mac (Marathon shoutout, tho) or a statement to the user-friendliness of the Mac, one thing is now apparent. Apple has improved the macOS to such a degree that all passwords just work. That is to say, security on the latest versions of macOS is abysmal, and every few weeks a new bug is reported.

The first such security vulnerability in macOS High Sierra was reported by [Lemi Ergin] on Twitter. Simply, anyone could login as root with an empty password after clicking the login button several times. The steps to reproduce were as simple as opening System Preferences, Clicking the lock to make changes, typing ‘root’ in the username field, and clicking the Unlock button. It should go without saying this is incredibly insecure, and although this is only a local exploit, it’s a mind-numbingly idiotic exploit. This issue was quickly fixed by Apple in the Security Update 2017-001

The most recent password flaw comes in the form of unlocking the App Store preferences that can be unlocked with any password. The steps to reproduce on macOS High Sierra are simply:

  • Click on System Preferences
  • Click on App Store
  • Click the padlock icon
  • Enter your username and any password
  • Click unlock

This issue has been fixed in the beta of macOS 10.13.3, which should be released within a month. The bug does not exist in macOS Sierra version 10.12.6 or earlier.

This is the second bug in macOS in as many months where passwords just work. Or don’t work, depending on how cheeky you want to be. While these bugs have been overshadowed with recent exploits of Intel’s ME and a million blog posts on Meltdown, these are very, very serious bugs that shouldn’t have happened in the first place. And, where there are two, there’s probably more.

We don’t know what’s up with the latest version of the macOS and the password problems, but we are eagerly awaiting the Medium post from a member of the macOS team going over these issues. We hope to see that in a decade or two.

Debouncing The Old-Fashioned Way

If you were given the task of designing a computer at a time when computers weren’t really even a thing, how would you start? How would you take a collection of vacuum tubes, passive components, and a precious few germanium diodes and engineer something to sell to customers looking for an “electronic brain”?

Where there’s a paycheck, there’s a way, and computer archeologist [Ken Shirriff] laid his hands on some old IBM hardware that tells us a lot about how engineers thought in the earliest days of the computer industry. The gear is a pluggable module from IBM, one of hundreds that once went into their Model 705 computer from the mid-1950s. The particular module [Ken] has is a 5-channel contact debouncer, or in Big Blue’s mid-century parlance, a “Contact-Operated Trigger.” It was used to debounce five of the many, many mechanical contacts in the machine, both buttons and relays, and used eight dual triode tubes to do it. Other modules with the exact same footprint formed the flip-flops, inverters, buffers and clocks needed to build a computer.

[Ken]’s analysis of the debouncer is a fascinating look at what was possible with the technology of the day, and the fact that it led to a standardized framework for generic modules that were actually hot-swappable with what essentially was a zero insertion force plug was quite a feat of engineering. And as a bonus, [Ken] and friends actually got the module up in running in the video after the break.

Jonesing for more retro-computer pluggable goodness? Check out this reproduction IBM flip-flop module from the 1940s.

Continue reading “Debouncing The Old-Fashioned Way”

ESP32 Makes Not-So-Smart Lights Smart

Long taken for granted – lights are a basic necessity of modern life. From the time of the first light bulb, we’ve been able to navigate the dark without the use of fire. With the advent of the Internet of Things, it has become somewhat of a requirement to bring a little intelligence to lights before labeling yourself as a hardware hacker. There are many ways to do this; one of the most common being making use of an ESP32. [Luca Dentella] is somewhat of an ESP32 expert, and has written a fantastic tutorial on how to use the chip. The tutorial builds up to making a set of lights controllable from a smartphone web browser as well a light intensity sensor.

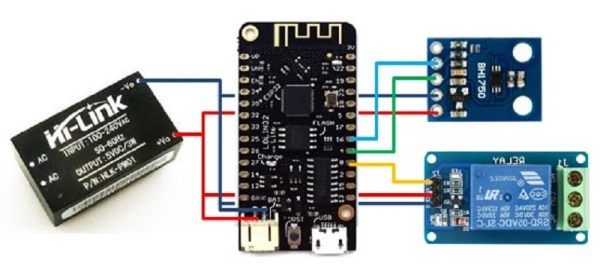
Now before you brush this off as simple n0Ob stuff – consider the following. He’s using a Lolin32 lite dev board, a BH1750 light intensity sensor and a relay to interface with mains for the lights. He wrote his own firmware and gets into the gritty details of developing the HTTP interface and flashing code to the correct memory.

We’ve seen a lot of ESP32 projects here at Hackaday, including this most interesting clock. Be sure to check out the video below to see the smart lights in action.

Continue reading “ESP32 Makes Not-So-Smart Lights Smart”