Business On The Outside, Electronics Workstation On The Inside

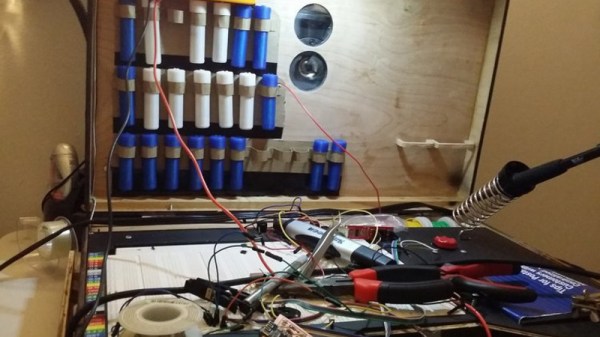
As an electrical engineering student, [Brandon Rice] had the full suite of electronics tools you’d expect. Cramming them all into a dorm room was doable — but cramped — a labour to square everything away from his desk’s top when he had to work on something else. To make it easier on himself, he built himself a portable electronics workstation inside the dimensions of a briefcase.

Built from scratch, the workstation includes a list of features that should have you salivating by the end. Instead of messing with a bunch of cables, on-board power is supplied by a dismantled 24V, 6A power brick, using a buck converter and ATmega to regulate and display the voltage, with power running directly to  12V and 5V lines of a breadboard in the middle of the workstation. A wealth of components are stored in two dozen 3d printed 1″ capsules setting them in loops pinned to the lid.

If all this was not already enough, there’s more!

Continue reading “Business On The Outside, Electronics Workstation On The Inside”

Ground-Effect Lighting For Your Bed.

If you’ve ever disturbed your partner by getting up during the night and flicking on the bathroom light — or tripping over something and startling them awake completely in the ensuing catastrophe — [Kristjan Berce]’s idea to install motion-activated ground-effect lighting on his girlfriend’s bed might hold your attention.

[Berce] is using an Arduino Nano for the project’s brain, a PIR sensor from Adafruit, and an L7805 voltage regulator to handle load spikes.  He doesn’t specify the type of LED strip he’s using, but Neopixels might be a safe bet here. Soldering issues over with, he mounted his protoboard in a 3D printed project box. Instead of reinventing the LED, [Berce] copied the code from Adafruit’s PIR tutorial before sticking the project to the side of the bed with adhesive strips so the on/off switch within handy reach to flick before meeting Mr. Sandman. Check out the build video after the break!

Continue reading “Ground-Effect Lighting For Your Bed.”

DIY Perpetual Flip Calendar

Flip calendars are a neat little piece of history. Sold as tourist trinkets, they sit on your desk and show the current day of the month and, depending on the particular calendar, month and year. Each day, you rotate it and it shows you the current date. At the end of February, you rotate it a bunch of times to get from February 28th (or 29th) to March 1st. [measuredworkshop] always had fun flipping the dates on his parents’ flip calendar, so decided to build his own wooden one.

The calendars consist of a series of tiles with the dates on them inside an enclosure. Rotating the enclosure allows a new tile to slide down in front of the old one. Once you know how many tiles you are going to use, you put a different date on the back side of each tile. In [measuredworkshop]’s case, there were 15 tiles to hold 30 dates (he created one with 30/31 on it for the end of the month) so the 1 has a 16 on the back, the 2 a 17, and so on. Tiles of different colored wood were cut and sanded and then the numbers drawn on by hand.

The enclosure was cut using a Morso Guillotine, a machine which uses sharp blades to do precise mitre cuts in wood. One side of the enclosure was covered by wood, the other by clear acrylic, so that you can see how the mechanism works as it is rotated. Finally, a stand was cut from wood as well and the final product assembled.

As you can see in the video below this is a great showpiece, and because of the design gives a view into how flip-calendars work. At the end of his write-up, [measuredworkshop] shares a link he found to a 3d printed flip-calendar on Thingiverse. Check out some of the more techie calendars posted at Hackaday, like this e-ink calendar, or this Raspberry Pi wall calendar.

Continue reading “DIY Perpetual Flip Calendar”

Building A Plate Reverb On The Cheap

For those who don’t spend their free time creating music with experimental audio effects, a plate reverb is essentially a speaker. It just happens to be, by design, a rather poor one. Rather than using a paper cone for a diaphragm like a traditional speaker, the plate reverb uses as you might guess, a metal plate. As the plate vibrates along with the source audio, a set of piezoelectric pickups convert that to an output. The end result is that audio fed into the plate reverb comes out with a nice echo effect.

But despite their relative simplicity, a plate reverb costs thousands of dollars. They’re so expensive that the majority of people just emulate the effect in software. But it doesn’t have to be that way. [Sammartino] and an audio engineer friend recently came up with a detailed guide for building a plate reverb that cost about 10% of commercially available models.

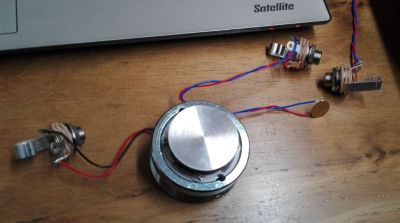
The construction is fairly simple. A wooden frame is built, and eight hooks are installed around the edges. The plate is suspended between these hooks using guitar strings, which holds it tight but with enough give to vibrate along with the tunes. Another board is attached across the center of the frame to support the electronics: a transducer to vibrate the plate, and two piezo pickups to convert that to an audio signal, and a couple jacks and some wiring to tie it all together.

For a different take on the DIY plate reverb, check out this one we covered all the way back in 2013. If you’re in the market for something a bit larger, we’ve got you covered there as well.

We’re Making It Rain Achievements This Year

We just dished out the first round of achievements to a bunch of hardware projects and there’s a lot more to come.

You may have missed it in all the fanfare last week, so today we take a closer look. Achievements are the newest edition to the Hackaday Prize and we’re really excited about them! With so much creativity in the projects we see entered, these achievements recognize a range of different aspects from serious to lighthearted, and even the downright absurd. There can be only 20 finalists in each challenge of the Prize, but there can be dozens of projects that unlock each achievement.

Today we’re taking a look at three of the achievements: Voltron, Pickle Rick, and the League of Extraordinary Cyborgs. You can also pursue the current list of achievements for an idea of what they’re all about.

Voltron Achievement

The five projects that have unlocked the Voltron Achievement aren’t about defending the universe (but if that’s what you’re doing, cool!). What we’re looking for is many things coming together to be greater than the whole. Two great examples are the Hexabitz project which is an edge-soldered modular PCB system, and a project that envisions swarm robotics for construction, inspection, and maintenance.

Pickle Rick Achievement

Does this need explaining? If your brain skips a cycle and your lips utter a halting “What?!” then you’ve unlocked the Pickle Rick Achievement. These are the out-of-the-ordinary hacks borne of the because-I-can mentality and we love them. The first two projects in this group are a neon 7-segment display (complete with bulky toggle switches and mechanical relays) and a robot snake that transforms into a robot car. What?!

League of Extraordinary Cyborgs Achievement

It’s dangerous to go alone. OK, maybe it’s not, but you can get a lot more done as a close-knit team! We’re looking for team entries, which is how you unlock the League of Extraordinary Cyborgs Achievement.

Unlocks and the Achievements We Forgot

These achievements are easy to unlock. Your project needs to be a Hackaday Prize entry, and meet the achievement criteria. They don’t come with a cash prize (and don’t affect your chances of winning one). Achievements are a tip of the hat to the hackers who are passionate about the hardware they’re building.

We’ll be digging through entries, awarding these as we go, but of course we would love your help. When you see projects perfect for an achievement, leave a comment on that page with your support. You can also send a Hackaday.io message to Stephen Tranovich, Technical Community Leader at Hackaday.io and the person most on the lookout for awarding achievements, requesting an achievement unlock.

The currently displayed list doesn’t include all of the achievements. Some of them are secret (we’ll tell you when we start awarding those). We will be adding more along the way. If an idea for an interesting achievement pops into your mind, let us know in the comments below and we might add it!

Hackaday Visits World’s Oldest Computer Festival: TCF 43

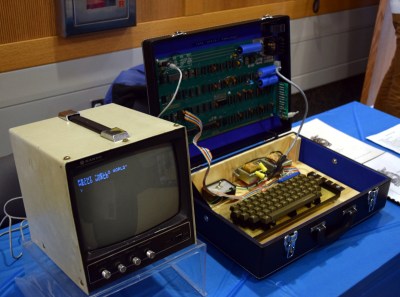
I was fortunate enough to visit the Trenton Computer Festival last weekend. The show struck a very interesting mix of new and old, commercial and educational. Attendees were writing programs in BASIC on an Apple I (courtesy of the Vintage Computer Federation) not more than five feet from where students were demonstrating their FIRST robot.

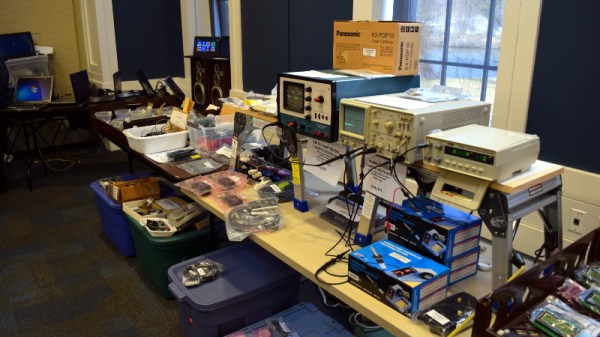
The one-day event featured over fifty demonstrations, talks, and workshops on topics ranging from a crash course in lock picking to the latest advancements in quantum computing. In the vendor room you could buy a refurbished laptop while just down the hall talks were being given on heady topics such as using neural networks and genetic algorithms for day trading on the stock market.

Recent years have seen a widening of the content presented, but TCF’s longevity means there is a distinct “vintage” vibe to the show and the culture surrounding it. Many of the attendees, and even some of the presenters, can proudly say they’ve been attending since the very first show in 1976.

There was simply too much going on to see everything. At any given time, there were eleven talks happening simultaneously, and that doesn’t include the demonstrations and workshops which ran all day. I documented as many highlights from this year’s TCF as I could for those who haven’t had a chance to visit what might be the most low-key, and certainly oldest, celebration of computing technology on the planet. Join me after the break for the whirlwind tour.

Continue reading “Hackaday Visits World’s Oldest Computer Festival: TCF 43”

Servos Do The Plucking In This MIDI Music Box

It started with a cheap, punch-card programmable manual music box. Thirty-one hobby servos later, it ended as an automated MIDI music box, with a short pit stop as a keyboard-driven MIDI device.

If you think you’ve seen the music box in [Mitxela]’s video below before, you’re right. [Martin], musician, inventor, and father of the marvelous marble music machine, took an interest in these music boxes and their programming a while back. Like [Martin], [Mitxela] started his music box project with punch card programming, but he quickly grew tired of the bothersome process, even after automating production with a laser cutter. He decided to do away with the punch cards completely and devised a method to pluck all 30 notes using a few large handfuls of hobby servos. One servo, converted to continuous rotation, spins the drum, with the rest linked to small laser-cut acrylic plectrums via stiff brass wire. The fingers imitate the punched holes passing over the drum and pluck the notes according to MIDI messages. The whole thing can draw quite a bit of current, so in addition to a beefy power supply, [Mitxela] optimized the code to minimize power requirements. This had the happy consequence of reducing the latency enough to allow the music box to be played from a MIDI keyboard in real time.

A lot of work went into this one, but [Mitxela] isn’t resting on his laurels; he has a full slate of improvements that he wants to tackle, not least of which is SD card support for MIDI files to turn this into a jukebox. We’re looking forward to the updates.

Continue reading “Servos Do The Plucking In This MIDI Music Box”