Rescuing K-9

Fans of the long-running and ever-fantastic British TV show Dr. Who will no doubt hold a soft spot in their hearts for the Doctor’s little robot companion. No, not one of his many human sidekicks, we’re talking about K-9, the angular dog-like android that burst onto British screens back in 1977.

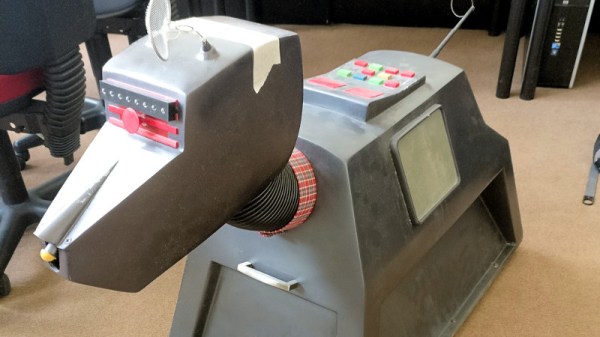
There were a number of original [K-9] props made by the BBC, and these were eventually sold by the corporation. One found its way to Abertay University, and it was there that [Gary Taylor], a computer science student found it. Sadly the years had not been kind to the robotic mutt, in particular water from a roof leak had damaged its internals beyond repair. With little more than the fibreglass shell to work with, he set out to rebuild K-9 and make the task the subject of his dissertation.

The original robo-dog was little more than a 1970s remote-controlled car, but its upgrades bring it firmly into the 21st century. At its heart is the inevitable Raspberry Pi 3, coupled with an Arduino mega 2560 that handles motor control and interfacing to an array of ultrasonic sensors. The Pi’s Bluetooth radio talks to an app on an Android phone, that serves as the K-9’s controller. All of which makes for an impressive upgrade, but we hope has disturbed as little of the original prop work as possible

Not everyone is lucky enough to find an original K-9, but for those destined for classic BBC prop disappointment there is always the possibility that you could build your own.

Hair-Raising Tales Of Electrostatic Generators

We tend to think of electricity as part of the modern world. However, Thales of Mietus recorded information about static electricity around 585 BC.  This Greek philosopher found that rubbing amber with fur would cause the amber to attract lightweight objects like feathers. Interestingly enough, a few hundred years later, the aeolipile — a crude steam engine sometimes called Hero’s engine — appeared. If the ancients had put the two ideas together, they could have invented the topic of this post: electrostatic generators. As far as we know, they didn’t.

It would be 1663 before Otto von Guericke experimented with a sulfur globe rubbed by hand. This led to Isaac Newton suggesting glass globes and a host of other improvements from other contributors ranging from a woolen pad to a collector electrode. By 1746, William Watson had a machine consisting of multiple glass globes, a sword, and a gun barrel. Continue reading “Hair-Raising Tales Of Electrostatic Generators”

Unlocking Animal Crossing’s Debug Mode

Originally released on the Nintendo 64 in 2001, Animal Crossing was the first entry into what has become a massively successful franchise. But while the game has appeared on more modern Nintendo consoles, most recently Android and iOS, the version released on the GameCube holds a special place in many fan’s hearts. The GameCube version was the first time those outside of Japan got a taste of the unique community simulation offered by Animal Crossing, and maintains a following nearly 20 years after its release.

[James Chambers] has recently been investigating creating mods for the GameCube version of Animal Crossing, and in the process uncovered some interesting references to a debug mode. That launched a deep dive into the game’s assembly code in an attempt to find what the debug functions did and if they could be enabled without having to patch the game ROM. In the end, he was able to find a push button code that enables debug mode on the retail copy of the game.

[James] starts by using the debugger provided by the Dolphin GameCube emulator to poke around and figure out exactly what flags need to be modified to activate the debug mode. This leads to a few interesting finds, such as being able to pop up a performance monitor graph and some build info. Eventually he finds the proper incantation to bring up a functional debug display in the game, but there was still the mystery of how you do it on the real hardware with a retail copy of the game.

It wouldn’t be unreasonable to think that some special dongle or development version of the GameCube would be required to kick the game into debug mode. But through careful examination of the code path, [James] was able to figure out that hitting a specific combination of buttons on the controller was all that was required to use the debug mode on the stock game. Once the debug mode is started, a controller plugged into the second port allows the user to navigate through options and perform tasks. Not everything is currently understood, but some progress has been made, such as figuring out how to add items to your inventory.

It’s hardly Nintendo’s most popular console, but there’s still a healthy interest in GameCube hacking as the machine approaches its 20th anniversary. We recently saw some impressive work being done to reverse engineer the system’s wireless controllers, though some people are more interested in just cutting the thing in half.

[Thanks to Tim Trzepacz for the tip.]

Chromebook Trades Camera For WiFi Freedom

There are a number of companies now providing turn-key computers that meet the Free Software Foundation’s criteria for their “Respects Your Freedom” certification. This means, in a general sense, that the computer is guaranteed not to spy on you or otherwise do anything else you didn’t explicitly ask it to. Unfortunately these machines often have a hefty premium tacked on, making it an unpleasant decision between privacy and performance.

Freedom-loving hacker [SolidHal] writes in to tell us about his quest to create a FSF-compliant laptop without breaking the bank. Based on a cheap Asus C201 Chromebook, his custom machine checks off all the appropriate boxes. The operating system was easy enough with an install of Debian, and the bootloader was rid of any Intel Management Engine shenanigans with a healthy dose of Libreboot. But there was one problem: the permanently installed WiFi hardware that required proprietary firmware. To remedy the issue, he decided to install an internal USB Wi-Fi adapter that has the FSF seal of approval.

As the Chromebook obviously doesn’t have an internal USB port, this was easier said than done. But as [SolidHal] is not the kind of guy who would want his laptop taking pictures of him in the first place, he had the idea to take the internal USB connection used by the integrated webcam and use that. He pulled the webcam out, studied the wiring, and determined which wires corresponded to the normal USB pinout.

The FSF approved ThinkPenguin Wi-Fi adapter he chose is exceptionally small, so it was easy enough to tuck it inside some empty space inside of the Chromebook. [SolidHal] just needed to solder it to the old webcam connection, and wrap it up in Kapton tape to prevent any possible shorts. The signal probably isn’t great considering the antenna is stuck inside the machine with all the noisy components, but it’s a trade-off for having a fully free and open source driver. But as already established, sometimes these are the kind of tough choices you have to make when walking in the righteous footsteps of Saint Ignucius.

Internal laptop modifications like this one remind us of the Ye Olden Days of Hackaday, when Eee PC modifications were all the rage and we still ran black and white pictures “taped” to the screen. Ah, the memories.