Hackaday Belgrade 2018 Is Sold Out: We Can’t Wait For Saturday

Greetings from beautiful Belgrade! With the Hackaday crew arriving over the last couple of days, preparations are in full swing, and the excitement is building for Hackaday Belgrade 2018 on Saturday. Here’s all the news you need to know.

If you haven’t gotten tickets yet, you can’t say we didn’t warn you! We’ve sold out. But don’t despair: there’s a waitlist, so get your name in now if you still want to get in.
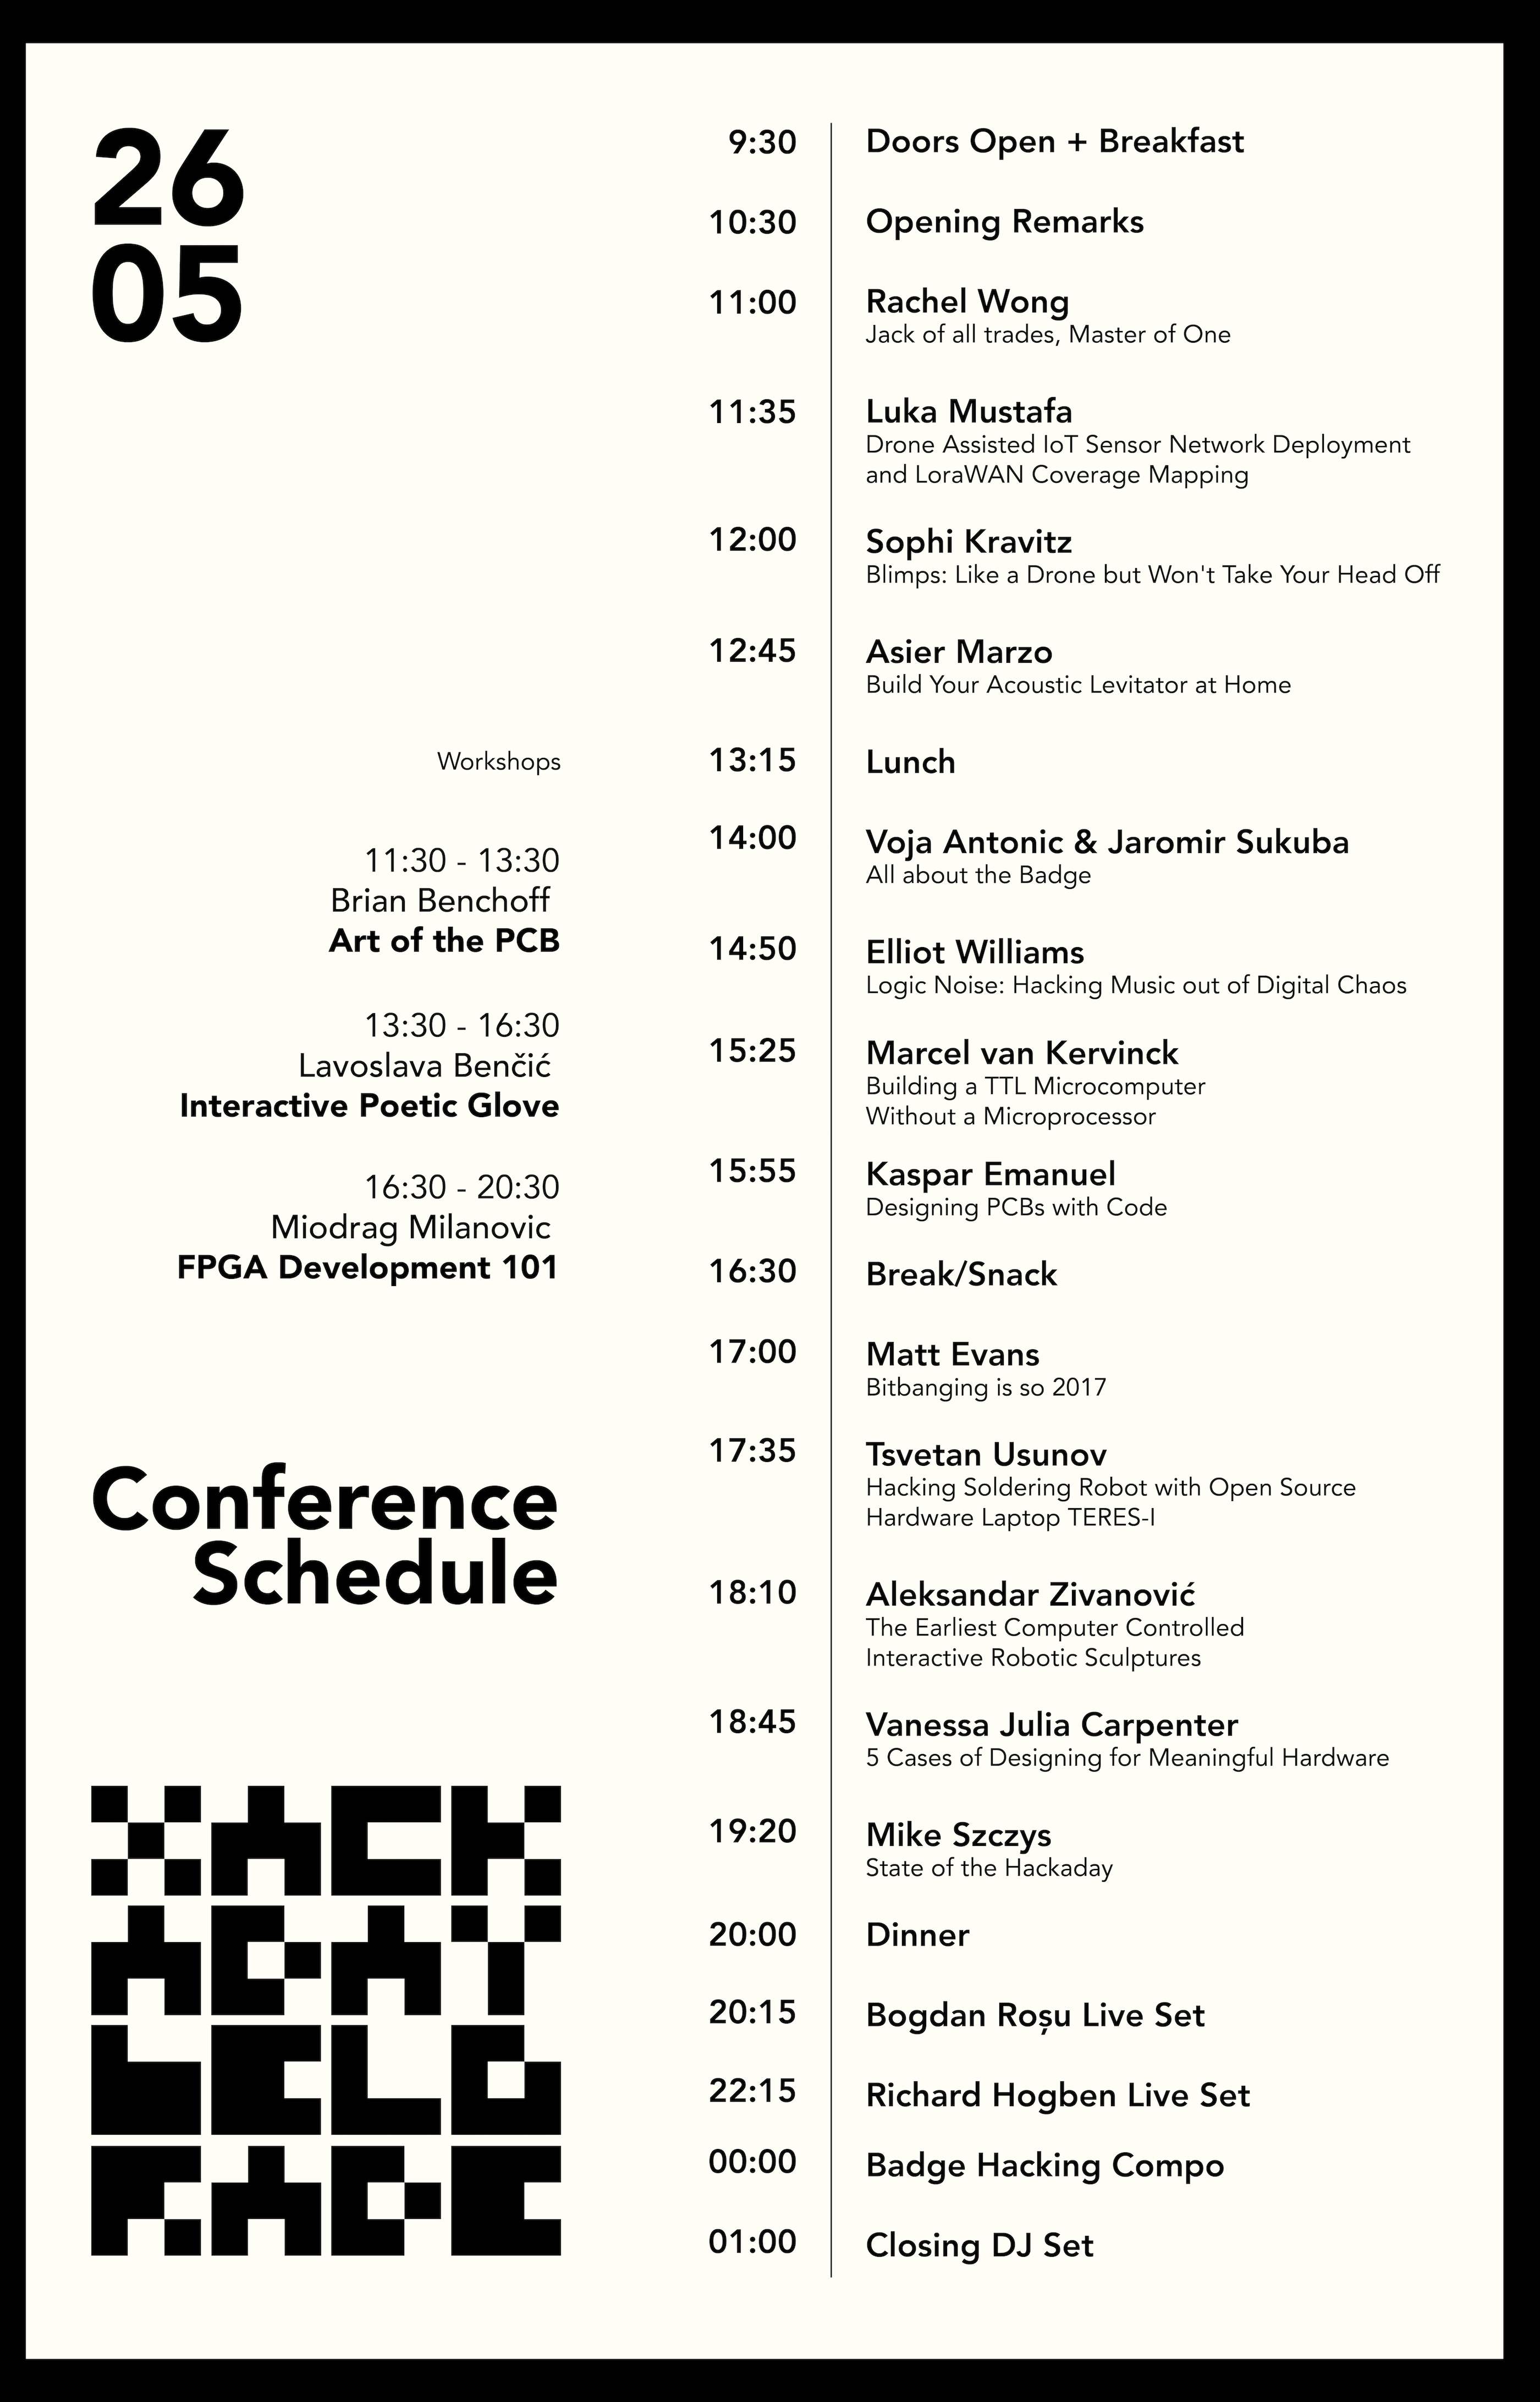
If you’re looking for something to do in town this weekend, don’t miss [Brian Benchoff]’s Ode to Belgrade and especially some great local info in the comments. From which taxis to take, to finding a hardware store, to touring monuments of brutalist architecture, this post has it all.

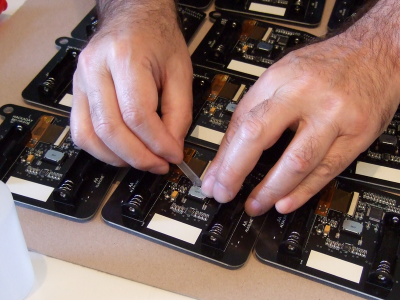
And last but not least, the badges are in the final stages of production.  [Voja] and [Mike] are temporarily distracted by watching themselves on N1, the Serbian CNN affiliate, for which they were interviewed this morning about hacker culture, and about building badge hardware and writing the firmware for it. They’ll get back to epoxying speakers and writing code any time now.

In short, Hackaday Belgrade is a sold-out, unstoppable force of nature. We’re so excited to be here and can’t wait to see you all on Saturday!


A Smarter PSU Converter Leaves The Magic Smoke Inside

Over the years, computers have become faster, but at the same time, more power hungry as well. Way back around the 386 era, most PCs were using the AT standard for power supplies. Since then, the world moved on to the now ubiquitous ATX standard. Hobbyists working on older machines will typically use these readily available supplies with basic adapters to run old machines, but [Samuel] built a better one.

Most AT to ATX adapters are basic passive units, routing the various power lines where they need to go and tying the right pin high to switch the ATX supply on. However, using these with older machines can be fraught with danger. Modern supplies are designed to deliver huge currents, over 20 A in some cases, to run modern hardware. Conversely, a motherboard from the early 90s might only need 2 or 3A. In the case of a short circuit, caused by damage or a failed component, the modern supply will deliver huge current, often damaging the board, due to the overcurrent limit being set so high.

[Samuel]’s solution is to lean on modern electronics to build an ATX to AT adapter with programmable current protection. This allows the current limit to be set far lower in order to protect delicate boards. The board can be set up in both a “fast blow” and a “slow blow” mode to suit various working conditions, and [Samuel] reports that with alternative cabling, it can also be used to power up other old hardware such as Macintosh or Amiga boards. The board is even packed with extra useful features like circuitry to generate the sometimes-needed -5V rail. It’s all programmed through DIP switches and even has an OLED display for feedback.

It’s an adapter that could save some rare old hardware that’s simply irreplaceable, and for that reason alone, we think it’s a highly important build. We’ve talked about appropriate fusing and current limiting before, too – namely, with LED strips. 


Ask Hackaday: How Do You DIY A Top-Octave Generator?

One of the great joys of Hackaday are the truly oddball requests that we sometimes get over the tip line. Case in point: [DC Darsen] wrote in with a busted 1970s organ in need of a new top-octave generator, and wondered if we could help. He had found a complicated but promising circuit online, and was wondering if there was anything simpler. I replied “I should be able to get that done with a single Arduino” and proceeded to prove myself entirely wrong in short order.

So we’re passing the buck on to you, dear Hackaday reader. Can you help [DC Darsen] repair his organ with a minimum amount of expenditure and hassle? All we need to do is produce twelve, or maybe thirteen, differently pitched square waves simultaneously.

Continue reading “Ask Hackaday: How Do You DIY A Top-Octave Generator?”

How Hertha Ayrton Enabled The Titanic To Call SOS

[Kathy] recently posted an interesting video about the connection of an electronics pioneer named [Hertha Ayrton] to the arc transmitter. The story starts with the observation of the arc lamp — which we learned was a typo of arch lamp.

[Hertha] was born into poverty, but — very odd for the day — obtained a science education. That’s probably a whole story in of itself. During her schooling, she fell in love with her professor [William Ayrton] and they wed.

Continue reading “How Hertha Ayrton Enabled The Titanic To Call SOS”

Modern Wizard Summons Familiar Spirit

In European medieval folklore, a practitioner of magic may call for assistance from a familiar spirit who takes an animal form disguise. [Alex Glow] is our modern-day Merlin who invoked the magical incantations of 3D printing, Arduino, and Raspberry Pi to summon her familiar Archimedes: The AI Robot Owl.

The key attraction in this build is Google’s AIY Vision kit. Specifically the vision processing unit that tremendously accelerates image classification tasks running on an attached Raspberry Pi Zero W. It no longer consumes several seconds to analyze each image, classification can now run several times per second, all performed locally. No connection to Google cloud required. (See our earlier coverage for more technical details.) The default demo application of a Google AIY Vision kit is a “joy detector” that looks for faces and attempts to determine if a face is happy or sad. We’ve previously seen this functionality mounted on a robot dog.

[Alex] aimed to go beyond the default app (and default box) to create Archimedes, who was to reward happy people with a sticker. As a moving robotic owl, Archimedes had far more crowd appeal than the vision kit’s default cardboard box. All the kit components have been integrated into Archimedes’ head. One eye is the expected Pi camera, the other eye is actually the kit’s piezo buzzer. The vision kit’s LED-illuminated button now tops the dapper owl’s hat.

Archimedes was created to join in Google’s promotion efforts. Their presence at this Maker Faire consisted of two tents: one introductory “Learn to Solder” tent where people can create a blinky LED badge, and the other tent is focused on their line of AIY kits like this vision kit. Filled with demos of what the kits can do aside from really cool robot owls.

Hopefully these promotional efforts helped many AIY kits find new homes in the hands of creative makers. It’s pretty exciting that such a powerful and inexpensive neural net processor is now widely available, and we look forward to many more AI-powered hacks to come.

Continue reading “Modern Wizard Summons Familiar Spirit”

ESP32 Boards With Displays: An Overview

The ESP8266 has become practically the 555 chip of WiFi connected microcontrollers. Traditionally, you’d buy one on a little breakout board with some pins and a few connectors, and then wire up anything else you need. The ESP8266’s big brother, the ESP32, hasn’t quite taken over from the ESP8266, but it has a lot more power and many more options. [Andreas] has a new video that shows seven new ESP32 boards that have integral displays. These boards can simplify a lot of applications where you need both WiFi and a user interface.

Of the boards examined, six of them have OLED displays, but one has an E-paper display. To summarize results, [Andreas] summarized his findings on these seven along with others in an online spreadsheet.

Continue reading “ESP32 Boards With Displays: An Overview”

Train object recognizer for cards

Using TensorFlow To Recognize Your Own Objects

When the time comes to add an object recognizer to your hack, all you need do is choose from many of the available ones and retrain it for your particular objects of interest. To help with that, [Edje Electronics] has put together a step-by-step guide to using TensorFlow to retrain Google’s Inception object recognizer. He does it for Windows 10 since there’s already plenty of documentation out there for Linux OSes.

You’re not limited to just Inception though. Inception is one of a few which are very accurate but it can take a few seconds to process each image and so is more suited to a fast laptop or desktop machine. MobileNet is an example of one which is less accurate but recognizes faster and so is better for a Raspberry Pi or mobile phone.

Collage of images for card dataset
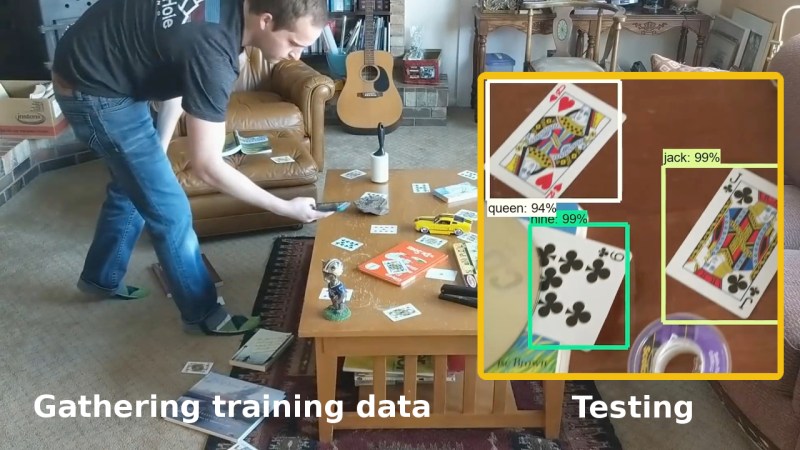
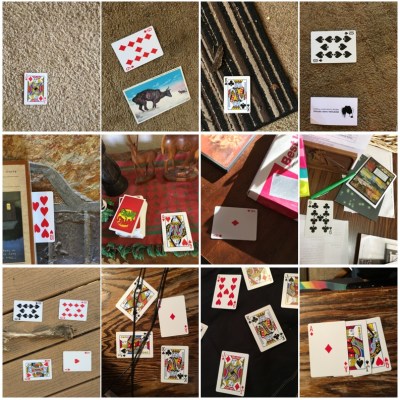
You’ll need a few hundred images of your objects. These can either be scraped from an online source like Google’s images or you get take your own photos. If you use the latter approach, make sure to shoot from various angles, rotations, and with different lighting conditions. Fill your background with various other things and even have some things partially obscuring your objects. This may sound like a long, tedious task, but it can be done efficiently. [Edje Electronics] is working on recognizing playing cards so he first sprinkled them around his living room, added some clutter, and walked around, taking pictures using his phone. Once uploaded, some easy-to-use software helped him to label them all in around an hour. Note that he trained on 24 different objects, which are the number of different cards you get in a pinochle deck.

You’ll need to install a lot of software and do some configuration, but he walks you through that too. Ideally, you’d use a computer with a GPU but that’s optional, the difference being between three or twenty-four hours of training. Be sure to both watch his video below and follow the steps on his Github page. The Github page is kept most up-to-date but his video does a more thorough job of walking you through using the software, such as how to use the image labeling program.

Why is he training an object recognizer on playing cards? This is just one more step in making a blackjack playing robot. Previously he’d done an impressive job using OpenCV, even though the algorithm handled non-overlapping cards only. Google’s Inception, however, recognizes partially obscured cards. This is a very interesting project, one which we’ll be keeping an eye on. If you have any ideas for him, leave them in the comments below.

Continue reading “Using TensorFlow To Recognize Your Own Objects”