Open Source Intel Helps Reveal US Spy Sat Capabilities

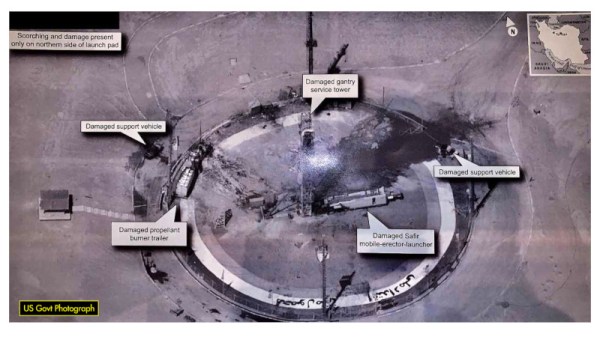
On the 30th August 2019, the President of the United States tweeted an image of an Iranian spaceport, making note of the recent failed Safir launch at the site. The release of such an image prompted raised eyebrows, given the high resolution of the image, and that it appeared to be a smartphone photo taken of a classified intelligence document.

Inquisitive minds quickly leapt on the photo, seeking to determine the source of the image. While some speculated that it may have been taken from a surveillance aircraft or drone, analysis by the satellite tracking community disagreed.

A comparison of the actual image, top, and a simulation of what a shot from USA 224 would look like. Ignore the shadows, which are from an image taken at a different time of day. Note the very similar orientation of the features of the launchpad.

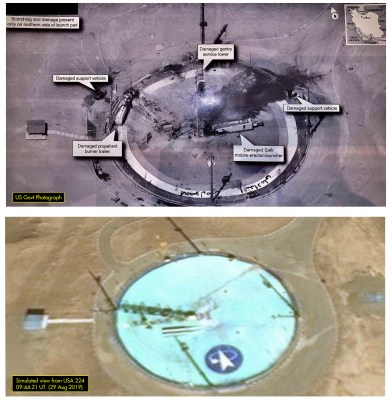
The angle of shadows in the image was used to determine the approximate time that the image was taken. Additionally, through careful comparison with existing satellite images from Google Maps, it was possible to infer the azimuth and elevation of the camera. Positions of military satellites aren’t made public, but amateur tracking networks had data placing satellite USA 224 at a similar azimuth and elevation around the time the image was taken.

With both the timing and positioning pointing to USA 224, evidence seems conclusive that this KH-11 satellite was responsible for taking the image. The last confirmed public leak of a Keyhole surveillance image was in 1984, making this an especially rare occurrence. Such leaks are often frowned upon in the intelligence community, as nation states prefer to keep surveillance capabilities close to their chest. The Safir images suggest that USA 224 has a resolution of 10cm per pixel or better – information that could prove useful to other intelligence organisations.

It’s not the first time we’ve covered formerly classified information, either – this teardown of a Soviet missile seeker bore many secrets.

Kinetic Lamp Sheds Light On Scientific Principles

This thing right here might be the coolest desk toy since Newton’s Cradle. It’s [Stephen Co]’s latest installment in a line of mesmerizing, zodiac-themed art lamps that started with the water-dancing Aquarius.  All at once, it demonstrates standing waves, persistence of vision, and the stroboscopic effect. And the best part? You can stick your finger in it.

This intriguing lamp is designed to illustrate Pisces, that mythological pair of fish bound by string that represent Aphrodite and her son Eros’ escape from the clutches of Typhon. Here’s what is happening: two 5V DC motors, one running in reverse, are rotating a string at high speeds. The strobing LEDs turn the string into an array of optical illusions depending on the strobing rate, which is controlled with a potentiometer. A second pot sweeps through eleven preset patterns that vary the colors and visual effect. And of course, poking the string will cause interesting interruptions.

The stroboscopic effect hinges on the choice of LED. Those old standby 2812s don’t have a high enough max refresh rate, so [Stephen] sprung for APA102Cs, aka DotStars. Everything is controlled with an Arduino Nano clone. [Stephen] has an active Kickstarter campaign going for Pisces, and one of the rewards is the code and STL files. On the IO page for Pisces, [Stephen] walks us through the cost vs. consumer pricing breakdown.

We love all kinds of lamps around here, from the super-useful to the super-animated.

A Teeny Tiny 3D Printed Macro Extension Tube

When you hear the term “extension tube”, you probably think of something fairly long, right? But when [Loudifier] needed an extension tube to do extreme close-ups with a wide-angle lens on a Canon EF-M camera, it needed to be small…really small. The final 3D printed extension provides an adjustable length between 0 and 10 millimeters.

But it’s not just an extension tube, that would be too easy. According to [Loudifier], the ideal extension distance would be somewhere around 3 mm, but unfortunately the mounting bayonet for an EF-M lens is a little over 5 mm. To get around this, the extension tube also adapts to an EF/EF-S lens, which has a shorter mount and allows bringing it in closer than would be physically possible under otherwise.

[Loudifier] says the addition of electrical connections between the camera and the lens (for functions like auto focus) would be ideal, but the logistics of pulling that off are a bit daunting. For now, the most reasonable upgrades on the horizon are the addition of some colored dots on the outside to help align the camera, adapter, and lens. As the STLs and Fusion design file are released under the Creative Commons, perhaps the community will even take on the challenge of adapting it to other lens types.

For the polar opposite of this project, check out the 300 mm long 3D printed extension tube we covered a few weeks back that inspired [Loudifier] to send this project our way.

TinyGo Brings Go To Arduino

Go — a modern programming language with roots at Google — is one of the new generation languages that would like to unseat C (and C++) for what we think of as traditional programming. It is only for PCs, though, right? Not so fast! TinyGo provides a compiler that — in their words — is for small places. How small? They can target code for the Arduino Uno or the BBC micro:bit. It can also produce code for x86 or ARM Linux (both 32- and 64-bit) as well as WebAssembly. They claim that a recent project to add ESP8266 and EPS32 support to LLVM will eventually enable TinyGo to target those platforms, too.

As you would expect, there are some subtle differences between TinyGo and the full-blown version. The compiler handles the entire program at once which is slower but offers more for optimization. Certain optimizations for interface methods are not used in TinyGo, and global variable handling changes to accommodate moving data from flash to RAM efficiently. TinyGo passes parameters in registers.

Continue reading “TinyGo Brings Go To Arduino”

Eagle Reborn: F-15 Simulator From A Wreck

This story started all the way back in September 12, 1981, when an F-15C aircraft’s landing attempt at Soesterberg Airbase during an airshow went completely FUBAR and the airframe was scrapped. The forward fuselage section was sold and eventually ended up with [Gene Buckle] who began work on creating a fully accurate F-15C simulator using these parts. He has blogged about his progress since 2009 over at the project website.

The F-15C was number 80-0007, which at the time of the crash had flown only 9.5 hours total, making it a very early retirement for an incredible fighter jet. But now the Eagle is back, or at least part of it: [Gene] managed to get the whole system into a state where the instrumentation and controls work again, using the original computer systems and instruments where they were still usable. You can find the YouTube video embedded after the break as well.

Detailed technical information on the F-15 series and this simulator build can be found on the project site, which is awesome both for F-15 fans and those who are into really accurate simulators.

Continue reading “Eagle Reborn: F-15 Simulator From A Wreck”

Mechpen: SCARA Drawbot For The Big Picture

It’s not uncommon to find us doodling on paper as an aid to thinking, for recreation, or simply because we’re bored. But, this kind of manual labor is so last century. It’s 2019, and we should have robots to fill our notebooks with cross-hatched illustrations. Well, [Alex Weber] is way ahead of us on this account: the outstanding SCARA drawbot he created can be unleashed to draw all manner of things at his command.

The robot, named Mechpen, and pronounced “McPen”, is of a SCARA (Selective Compliance Assembly Robot Arm) design, with two parallel axes controlling the x-y movement of the arm. Robot design is always a series of trade-offs; in this case, [Alex] has sacrificed some accuracy to achieve a long reach. Two NEMA 23 stepper motors reside in the base, along with all the electronics. This makes the base a heavy 15 kg, which is good as it helps stabilize the arm during movement. The arm uses a mix of off-the-shelf and custom hardware, most of which is dotted with holes drilled to reduce the mass of the moving parts. Two 700 mm sections of the arm made from carbon fiber tubes give the drawbot a 140 cm reach — long enough to fill an A0 paper with its beautiful mechanical doodling.

The brains behind the arm are two-tiered. An Einsy RAMBo board, designed for 3D printers, controls the stepper motors. Above that, a Raspberry Pi runs Octoprint to control the ‘bot. This choice turned out to be very convenient for working around a mechanical issue: the elbow flexes too far in the Z-axis. The difference in pen height between the elbow at 90 vs 180 degrees was 20-25 mm; too much to fix with just a spring-loaded pen. The solution: use a bed-leveling algorithm designed for 3D printers. A VL6180X distance sensor measures the distance to the paper over a number of grid points, then the software moves the servo up and down accordingly while drawing to keep the pen on the paper.

Some custom-written software converts SVG graphic files to gcode suitable for printing, allows selection of different stroke and fill types, and separation of different colors into individual gcode files to be plotted with different pens.

Definitely check out the video of Mechpen in action, after the break.

Continue reading “Mechpen: SCARA Drawbot For The Big Picture”

Open Source Smart Smoker Brings The Heat (Slowly)

Conceptually, cooking on a grill is simple enough: just crank up the flames and leave the food on long enough for it to cook through, but not so long that it turns into an inedible ember. But when smoking, the goal is actually to prevent flames entirely; the food is cooked by the circulation of hot gasses generated by smoldering wood. If you want a well-cooked and flavorful meal, you’ll need the patience and dedication to manually keep the fuel and air balanced inside the smoker for hours on end.

Or in the case of the Smokey Mc Smokerson, you just let the electronics handle all the hard stuff while you go watch TV. Powered by the Raspberry Pi Zero and a custom control board, this open source smoker offers high-end capabilities on a DIY budget. Granted you’ll still need to add the fuel of your choice the old fashioned way, but with automatic air flow control and temperature monitoring, it greatly reduces the amount of fiddly work required to get that perfect smoke.

[HackersHub] has been working on Smokey Mc Smokerson for a few months now, and are getting very close to building the first complete prototype. The initial version of the software is complete, and the classy black PCBs have recently arrived. Some simulations have been performed to get an idea of how the smoke will circulate inside of the smoker itself, built from a 55 gallon drum, but technically the controller is a stand-alone device. If you’re willing to makes the tweaks necessary, the controller could certainly be retrofitted to  commercially available smoker instead.

Ultimately, this project boils down to tossing a bunch of temperature sensors at the problem. The software developed by [HackersHub] takes the data collected by the five MAX6675 thermocouples and uses it to determine when to inject more air into the chamber using a PWM-controlled fan at the bottom of the smoker. As an added bonus, all those temperature sensors give the user plenty of pretty data points to look at in the companion smartphone application.

We’ve actually seen a fair number of technologically-augmented grills over the years. From this automotive-inspired “turbocharged” beast to a robotic steak flipper built out of PVC pipes, we can confidently say that not all hackers are living on a diet of microwaved ramen.