PCIe Multiplier Expands Raspberry Pi 4 Possibilities

It probably goes without saying that hardware hackers were excited when the Raspberry Pi 4 was announced, but it wasn’t just because there was a new entry into everyone’s favorite line of Linux SBCs. The new Pi offered a number of compelling hardware upgrades, including an onboard PCI-Express interface. The only problem was that the PCIe interface was dedicated to the USB 3.0 controller; but that’s nothing a hot-air rework station couldn’t fix.

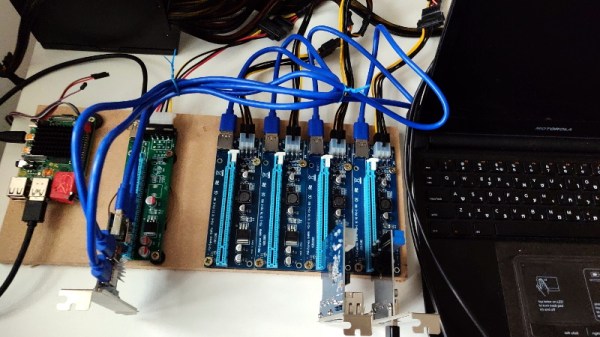
We’ve previously seen steady-handed hackers remove the USB 3.0 controller on the Pi 4 to connect various PCIe devices with somewhat mixed results, but [Colin Riley] has raised the bar by successfully getting a PCIe multiplier board working with the diminutive Linux computer. While there are still some software kinks to work out, the results are very promising and he already has  a few devices working.

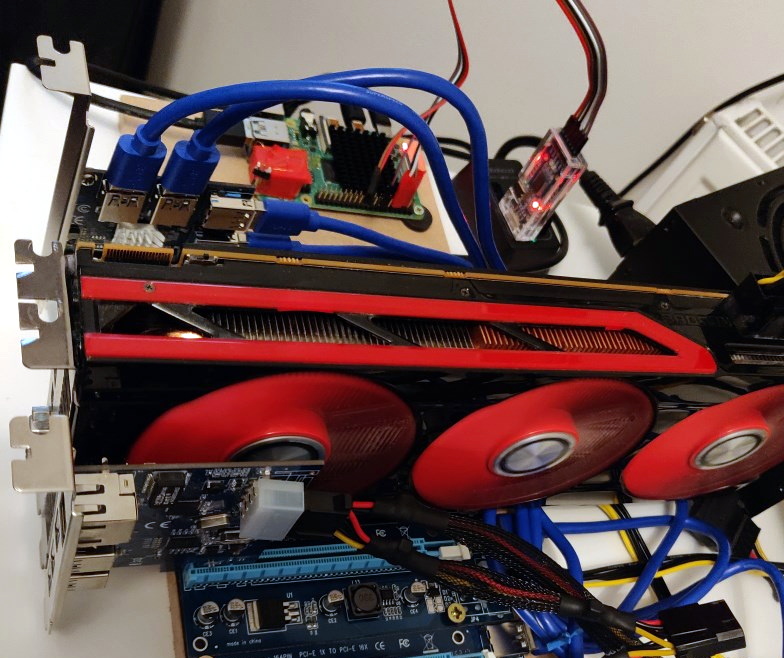
Getting that first PCIe port added to the Pi 4 is already fairly well understood, so [Colin] just had to follow the example set by hackers such as [Tomasz Mloduchowski]. Sure enough, when he plugged the port multiplier board in (after a bit of what he refers to as “professional wiggling”), the appropriate entry showed up in lspci.

But there was a problem. While the port multiplier board was recognized by the kernel, nothing he plugged into it showed up. Checking the kernel logs, he found messages relating to bus conflicts, and one that seemed especially important: “devices behind bridge are unusable because [bus 02] cannot be assigned for them“. To make a long story short, it turns out that the Raspbian kernel is specifically configured to only allow a single PCI bus.

Fortunately, it’s an easy fix once you know what the problem is. Using the “Device Tree Compiler” tool, [Colin] was able to edit the Raspbian Device Tree file and change the PCI “bus-range” variable from <0x0 0x1> to <0x0 0xff>. From there, it was just a matter of plugging in different devices and seeing what works. Simple things such as USB controllers were no problem, but getting ARM Linux support for the NVIDIA GTX 1060 he tried will have to be a topic for another day.

[Thanks to Paulie for the tip.]

Ham Radio Company Wins Big

It is sort of the American dream: start a company in your garage and have it get crazy big. After all, Steve Jobs, Bill Gates, and even Bill Hewlett and Dave Packard did it. Seems hard to do these days, though. However, one ham radio company that has been pushing the edge of software defined radio appears to be well on the way to becoming more than its roots. FlexRadio has teamed with Raytheon to undertake a major project for the United States Air Force.

The Air Force has given Raytheon and FlexRadio $36 million to develop an HF radio based on the existing SmartSDR/Flex-6000. ARRL news reports quote FlexRadio’s CEO as saying that the investment in the military radios will pay dividends to the firm’s ham radio customers.

Continue reading “Ham Radio Company Wins Big”

Handmade LED Cube Is A Work Of Art

We see all kinds of projects come across the news desk at Hackaday. Sometimes it’s a bodge, neatly executed, that makes us laugh out loud at its simple ingenuity. Other times, it’s a case of great skill and attention to detail, brought to bear to craft something of great beauty. [Greg Davill]’s LED cube is firmly the latter.

The matte black finish makes the artwork really pop. Note the matrix of tiny pads for the LEDs on the backside.

The build starts with custom four layer PCBs, in matte black with gold-plated pads. It’s a classic color scheme, and sets the bar for the rest of the project. Rather than proceeding to hook up some commodity microcontrollers to off-the-shelf panels, [Greg] goes his own way. Each PCB gets a 24×24 raw LED matrix, directly soldered on the back side. By producing a “dumb” matrix, there are large savings in current draw to be had over the now-popular smart strings.

The panels are then loaded into a tidy 3D printed cube, with space inside for the FPGA running the show and a power supply. Five panels are held in with double sided-tape and screws, with the last being installed with magnets to allow access to the inside. Neatly folded flat-flex cables are pressed into service to connect everything up.

It’s a build that shows there is value in doing things your own way, and that the new methods don’t always beat out the old. With careful consideration of aesthetics from the start to the end of the project, [Greg] has built an LED cube both astounding in its simplicity, and beautiful in its execution. We’ve seen [Greg]’s work before, too – it’s not too often hand soldered BGAs cross these pages. Video after the break.

Continue reading “Handmade LED Cube Is A Work Of Art”

Print A Drill Press For Your Printed Circuit Boards

If you make printed circuit boards the old fashioned way by etching them yourself, you may need to drill a lot of holes; even surface-mount converts still need header pins on occasion. But, drilling these holes by hand often leads to broken drill bits, which always seems to happen with one un-drilled hole and no spare bits left. [Daumemo] came up with a solution: a 3D printed drill press for a Dremel or similar rotary tool.

While you can buy commercial presses designed to fit these tools, there’s a certain satisfaction to building your own, and if you have a well-stocked parts bin you might even finish it before a mail-ordered version could arrive. Certainly you could do it at lower cost. The design is straightforward, and uses printed parts augmented with “reprap vitamins” (i.e. the non-printable, typically metal, components). If you’ve ever built — or repaired — a 3D printer, you may have these pieces already: a couple of LM8UU bearings, some 8 mm steel rod, and a pair of springs seem like the most esoteric parts required, although even these could probably be substituted without much trouble.

Only a few pieces need to be printed: a base is outfitted with a removable table for holding the workpiece, while a lever actuates the frame holding the tool. [Daumemo] chose to print the design in ABS, but found that it flexes a little too much, occasionally requiring some care during use — a stiffer filament such as PLA might yield better results. Overall, though, this seems like a great project for that 3D printer you haven’t used in a while.

Be sure to check out the video of the press in action, after the break.

Continue reading “Print A Drill Press For Your Printed Circuit Boards”

Hack Your Brain To Stop Overeating

Sometimes the easiest advice can be the hardest to follow. For example: if you want to lose weight, you must eat right and exercise. You can avoid both and still lose weight by simply eating less, but that takes willpower.

Losing weight is one of the hardest things a person can do, because we have to eat to survive. That leaves the problem of stopping when we’re full. Here in the united states of high-fat foods and huge portions, that can be really, really difficult, as evidenced by the obesity statistics. But no matter where you live, it’s easy to ignore the ‘stomach full’ signal. It’s kind of slow, anyway. So how do you get yourself tuned into the signal? All it takes is a little classical conditioning.

Slim Band is simple, but effective. Basically, it’s a pack of breath-freshening strips strapped to a timer PCB and set into a watchband. Set the five-minute timer when you start eating, and when it goes off, take out a strip and mintify your mouth. By the time the minty-ness wears off, you should feel full enough to push your plate away. The convenience factor is a big plus—there’s no getting the phone out to set an alarm, or digging for mints in your pocket or purse.

Though the idea began as a personal improvement project, [Chaz] would like to see it widely adopted as a way of fighting obesity and evening out the world’s food distribution in the longer term. We would, too.

3D Printering: The Search For Better Search

There’s no question that a desktop 3D printer is at its most useful when it’s producing parts of your own design. After all, if you’ve got a machine that can produce physical objects to your exacting specifications, why not give it some? But even the most diligent CAD maven will occasionally defer to an existing design, as there’s no sense spending the time and effort creating their own model if a perfectly serviceable one is already available under an open source license.

But there’s a problem: finding these open source models is often more difficult than it should be. The fact of the matter is, the ecosystem for sharing 3D printable models is in a very sorry state. Thingiverse, the community’s de facto model repository, is antiquated and plagued with technical issues. Competitors such as Pinshape and YouMagine are certainly improvements on a technical level, but without the sheer number of models and designers that Thingiverse has, they’ve been unable to earn much mindshare. When people are looking to download 3D models, it stands to reason that the site with the most models will be the most popular.

It’s a situation that the community is going to have to address eventually. As it stands, it’s something of a minor miracle that Thingiverse still exists. Owned and operated by Makerbot, the company that once defined the desktop 3D printer but is today all but completely unknown in a market dominated by low-cost printers from the likes of Monoprice and Creality, it seems only a matter of time before the site finally goes dark. They say it’s unwise to put all of your eggs in one basket, and doubly so if the basket happens to be on fire.

So what will it take to get people to consider alternatives to Thingiverse before it’s too late? Obviously, snazzy modern web design isn’t enough to do it. Not if the underlying service operates on the same formula. To really make a dent in this space, you need a killer feature. Something that measurably improves the user experience of finding the 3D model you need in a sea of hundreds of thousands. You need to solve the search problem.

Continue reading “3D Printering: The Search For Better Search”

This LED Cube Is One Heck Of An ICEBreaker

Like the tastes of the makers that build them, LED cubes come in all shapes and sizes. From the simplest 3x3x3 microcontroller test, to fancier bespoke installations, they’re a great way to learn a bunch of useful embedded techniques and show off at the same time. [kbob] has done exactly that in spades, with a glittering cube build of his own and published a repository with all the files.

Just like a horde of orcs from Mordor, [kbob]’s cube is all about strength in numbers. Measuring 136 mm on each side, it’s constructed out of 64 x 64 P2 panels, packing 4096 LEDs per side, or 24,576 total. A Raspberry Pi is used to run the show, allowing a variety of animations to be run. Unfortunately, it lacks the raw horsepower to run this many LEDs at a decent frame rate. Instead, it’s teamed up with an ICEBreaker FPGA, which can churn out the required HUB75 signals for the panels without breaking a sweat.

Thanks to the high density of tiny LEDs, and the smooth framerate of the animations, the final effect is rather gorgeous. [kbob] notes that there’s actually a lot of people working on similar projects with ICEBreaker muscle; a recent video from [Piotr] is particularly impressive.

The LED cube will likely remain a staple for sometime, and we can’t wait to see what comes out next from the community. You can even throw in some OpenGL if you wanna get fancy. Video after the break.

Continue reading “This LED Cube Is One Heck Of An ICEBreaker”