Hackaday Podcast 018: Faxploitation! Ikea RFID Hacking, Space Ads, Hydrogen Dones, And Blinkies

Hackaday Editors Elliot Williams and Mike Szczys gather round the microphone to spin tales from a week of hacks. All the rage are fax-machine-based malware, a hydrogen fuel cell drone, and bringing color to the monochrome world of the original Super Mario Land. There are at least three really cool LED hacks this week, plus Tom’s been exploring space advertising, Maya’s debunking solder myths, and Elliot goes ga-ga for a deep Ikea electronics hack. Closing out the show is an interview with Bart Dring about his exquisitely-engineered string art robot.

Take a look at the links below if you want to follow along, and as always, tell us what you think about this episode in the comments!

Take a look at the links below if you want to follow along, and as always, tell us what you think about this episode in the comments!

Direct download (60 MB or so.)

Continue reading “Hackaday Podcast 018: Faxploitation! Ikea RFID Hacking, Space Ads, Hydrogen Dones, And Blinkies”

It’s Never Too Early To Prepare For Halloween: With Flamethrowers

Using a legitimate flamethrower is on the bucket list for a lot of us. Even Elon Musk got into the action with his Not-A-Flamethrower flamethrower. For the rest of us non-billionaires though, we have to come up with clever reasons to build our own like “Halloween is only six months away”. [HandsomeRyan] took this approach six months ago to great effect, and recently released the files on Thingiverse for us all to enjoy.

The cover for building this project was making a Jack-o-Lantern shoot flames out of its face on-demand. The build is based around a car door locking solenoid, which has plenty of kick for applications like this. [HandsomeRyan] upgraded his old wood design with fancy 3D-printed parts which, with the help of the solenoid, deliver a blast of flammable material across a candle inside the Jack-o-Lantern via an aerosol can hidden in the pumpkin.

Part of the elegance of this project is that a car door locking solenoid is typically controlled by remote, meaning that if you want this to be remote-controlled the work has already been done for you. If you need a more timely excuse for building one of these, the Fourth of July is a little bit closer, which should work in a pinch as an excuse to build something crazy even if you’re not American.

Continue reading “It’s Never Too Early To Prepare For Halloween: With Flamethrowers”

Hacking The Ionosphere, For Science

Imagine what it must have been like for the first human to witness an aurora. It took a while for our species to migrate from its equatorial birthplace to latitudes where auroras are common, so it was a fairly recent event geologically speaking. Still, that first time seeing the shimmers and ribbons playing across a sky yet to be marred by light pollution must have been terrifying and thrilling, and like other displays of nature’s power, it probably fueled stories of gods and demons. The myths and legends born from ignorance of what an aurora actually represents seem quaint to most of us, but it was as good a model as our ancestors needed to explain the world around them.

Our understanding of auroras needs to be a lot deeper, though, because we now know that they are not only a beautiful atmospheric phenomenon but also a critical component in the colossal electromagnetic system formed by our planet and our star. Understanding how it works is key to everything from long-distance communication to keeping satellites in orbit to long-term weather predictions.

But how exactly does one study an aurora? Something that’s so out of reach and so evanescent seems like it would be hard to study. While it’s not exactly easy science to do, it is possible to directly study auroras, and it involves some interesting technology that actually changes them, somehow making the nocturnal light show even more beautiful.

Continue reading “Hacking The Ionosphere, For Science”

Python And Pi Provide Heads Up Display For Your Experimental Airplane

You shouldn’t be looking at screens when you’re driving, but what about a heads-up display? A screen that could put relevant information in your field of vision would be great, even more so if it used a Raspberry Pi. That’s exactly what [John] did, only he did it with an airplane.

First up, the legality of this build. [John]’s plane is registered as experimental, which, provided you know what you’re doing, is pretty close to ‘anything goes’ as you would want in a manned aircraft. [John] has a sufficient number of hours in his log book, and he’s built a Zenith 701.

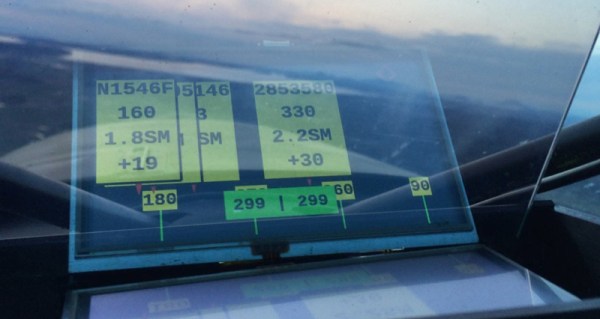
For hardware, the hard part of this build is constructing a heads-up display. Fortunately, aftermarket HUDs exist, and [John] is using a Kivic projector, a $200 piece of equipment that’s readily available on Amazon. If you need a HUD for your car, there you go. The software is another thing entirely, with the goal of having the software decoupled from the display and data sources. This is somewhat easy to accomplish with a Raspberry Pi; the display is actually just some minimal text-based blocky graphics built in PyGame. This build is also decoupled from the data sources by building this as a user interface for Stratux, an independent Raspberry Pi-based ADS-B receiver for pilots.

There are several views available with this HUD, with the AHRS + ADS-B providing information on the aircraft’s attitude and altitude, along with a few indicators of the nearest planes. The traffic view expands on the ADS-B data, showing the nearest eight or so aircraft in the air, with a range, bearing, and difference in altitude. There’s a diagnostic window, and since [John]’s plane is a backcountry STOL thingamado that can hover in a strong wind, there’s also a digital version of a norden bombsight. It’s for dropping bags of flour onto a grass strip. You can check out [John]’s entire AirVenture presentation of the build below, with all the code available here.

Continue reading “Python And Pi Provide Heads Up Display For Your Experimental Airplane”

Barn Door Tracker Needs No Special Tools

If you want to take a long exposure photograph, you need a tripod to hold your camera steady. But a tripod won’t help when the ground it’s standing on is moving. That’s exactly the problem [Emvilza] ran into when he wanted to take minutes or hours long photographs of the night sky. His solution was to build a barn door tracker, which he carefully documented in both English and Spanish.

Barn door trackers, also known as scotch mounts have been used by photographers for many years to cancel out the rotation of the earth. This causes stars to appear frozen in the sky and allows for photographs of very dim celestial objects. These trackers range from simple hand-cranked affairs to complex mechanical creations. [Emvilza] decided to have a go at designing and building his own tracker, using only basic tools, as he didn’t have access to a CNC or 3D printer.

The tracker itself is built from wood, with metal hardware. [Emvilza] spent a ton of time designing the tracker using SketchUp. The carefully drawn plans ensured everything would fit together and operate correctly.

One of the toughest parts was accurately bending a threaded rod enough to make it work with the tracker, but not bind the drive system. The mount’s motion comes from a threaded rod. The rod is driven by a stepper motor.  Control and sensing is handled by an ATmega328 programmed using the Arduino toolchain. [Emvilza] learned Eagle and designed a PCB. Rather than etch a board, he simply built the circuit on perfboard, following his layout and traces.

The end result is a tracker that looks and performs great — just check out the images on [Emvilza’s] site to see some examples. Not only that, [Emvilza’s] well written documentation will help anyone looking to build a tracker in the future!

Old Nixie Display Rides Again As 3D-Printer Filament Meter

We’re not sure about the name of this Nixie tube filament meter that [Scott M. Baker] built. He calls it a “filadometer”, perhaps a portmanteau of “filament” and “odometer”, in which case it makes sense. It may not flow trippingly from the tongue and we can’t come up with anything better, but whatever moniker you use it’s actually a pretty cool build.

The filadometer started life as something completely different and utterly typical for Nixie tube projects – a temperature and humidity gauge. [Scott] decided to recycle the eight-tube display to keep track of his Prusa, and in doing so he reveals a pretty remarkable degree of forethought in his design process. The original Nixie display has all the usual trappings – the driver chips, the shift registers, and the high voltage power supply. What stands out is the modularity of his design: the tube sockets and drivers live on a backplane PCB, with a Raspberry Pi and a separate HV supply board plugging into it. The original display had a Model B Pi, so there was plenty of room for a new Zero W. A new printed case and a little programming to capture the filament use from Octoprint is all it took to put this nifty little build back in action. The video below shows the details.

We’re always excited to see new videos from [Scott] because we learn so much from looking over his virtual shoulder. If you haven’t checked out his stuff, take a look at his homage to the 8″ floppy or his dual-port memory hack for retro gaming.

Continue reading “Old Nixie Display Rides Again As 3D-Printer Filament Meter”

Stator Library Makes Your Arduino Code Easier To Read

The readability of your code can make the difference between your project being a joy to work on, or an absolute headache. This goes double when collaborating with others. Having easily parsed code reduces your cognitive load and makes solving problems easier. To try and help with this, [PTS93] developed the Stator library to make certain common tasks simpler to read.

The aim of the library is to get rid of piles of state tracking variables and endless if/else statements – hence the name. It’s designed primarily for the Arduino IDE but doesn’t have any dependencies on the API, so can be used in other C++ environments. It comes with a variety of neat tools for common jobs, such as reading an analog sensor with hysteresis around a trigger point, as well as easy ways to track state changes across multiple variables. By using basic English terms instead of condition checks and mathematical operators, it can make things more readable and easier to follow.

The power of the Arduino platform has always been in its easy to use libraries that make everything easier, from interfacing LCDs to working with Amazon Dash buttons.