The Comforting Blue Glow Of Old Time Radio

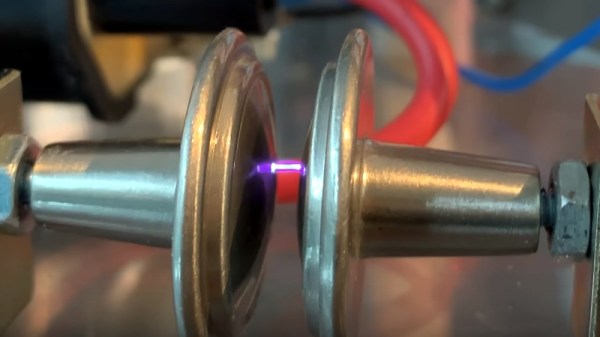
When you think of an old radio it’s possible you imagine a wooden-cased tube radio receiver as clustered around by a 1940s family anxious for news from the front, or maybe even a hefty 19-inch rack casing for a “boat anchor” ham radio transmitter. But neither of those are really old radios, for that we must go back another few decades to the first radios. Radio as demonstrated by Giulielmo Marconi didn’t use tubes and it certainly didn’t use transistors, instead it used an induction coil and a spark gap. It’s a subject examined in depth by [The Plasma Channel] and [Blueprint], as they come together to build and test a pair of spark gap transmitters.

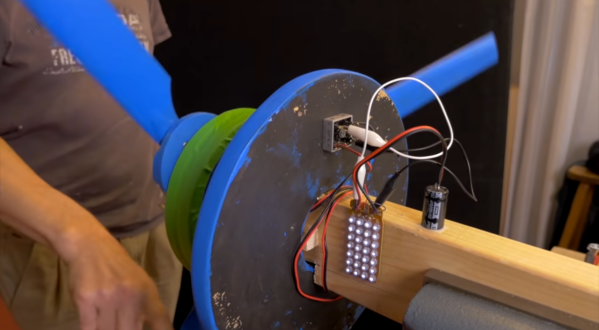
This is a collaboration between two YouTube channels, so we’ve put videos from both below the break.They both build simple spark gap transmitters and explain the history behind them, as well as running some tests in RF-shielded locations. The transmitters are fairly crude affairs in that while they both use electronic drives for their induction coils they don’t have the resonant tank circuitry that a typical early-20th-century transmitter would have had to improve its efficiency.

They are at pains to remind the viewer that spark gap transmitters have been illegal for nearly a century due to their wideband interference so this is definitely one of those “Don’t do this at home” projects even if it hasn’t stopped others from trying. But it’s still a fascinating introduction to this forgotten technology, and both videos are definitely worth a watch.

Continue reading “The Comforting Blue Glow Of Old Time Radio”

Blisteringly Fast Machine Learning On An Arduino Uno

Even though machine learning AKA ‘deep learning’ / ‘artificial intelligence’ has been around for several decades now, it’s only recently that computing power has become fast enough to do anything useful with the science.

However, to fully understand how a neural network (NN) works, [Dimitris Tassopoulos] has stripped the concept down to pretty much the simplest example possible – a 3 input, 1 output network – and run inference on a number of MCUs, including the humble Arduino Uno. Miraculously, the Uno processed the network in an impressively fast prediction time of 114.4 μsec!

Whilst we did not test the code on an MCU, we just happened to have Jupyter Notebook installed so ran the same code on a Raspberry Pi directly from [Dimitris’s] bitbucket repo.

He explains in the project pages that now that the hype about AI has died down a bit that it’s the right time for engineers to get into the nitty-gritty of the theory and start using some of the ‘tools’ such as Keras, which have now matured into something fairly useful.

In part 2 of the project, we get to see the guts of a more complicated NN with 3-inputs, a hidden layer with 32 nodes and 1-output, which runs on an Uno at a much slower speed of 5600 μsec.

This exploration of ML in the embedded world is NOT ‘high level’ research stuff that tends to be inaccessible and hard to understand. We have covered Machine Learning On Tiny Platforms Like Raspberry Pi And Arduino before, but not with such an easy and thoroughly practical example.

Hackaday Links Column Banner

Hackaday Links: June 30, 2019

In our continuing series of, ‘point and laugh at this guy’, I present a Kickstarter for the, “World’s First Patented Unhackable Computer Ever”.  It’s also a real web site and there’s even a patent (US 10,061,923, not showing up on Google Patents for some reason), and a real product: you can get an unhackable laptop, and you can get it in either space gray or gold finish. This gets fun when you actually dig into the patent; it appears this guy invented protected memory, with one section of memory dedicated to the OS, and another dedicated to the browser. This is a valid, live patent, by the way.

The 2019 New York Maker Faire is off. Yeah, it says it’s still going to happen on the website, but trust me, it’s off, and you can call the New York Hall of Science to confirm that for yourself. Maker Media died recently, and there will be no more ‘Flagship’ Maker Faires. That doesn’t mean the ‘mini’ and ‘featured’ Maker Faires are dead, though: the ‘Maker Faire’ trademark is simply licensed out to those organizers. In the next few weeks, there is going to be a (mini) Maker Faire in Coeur d’Alene, Idaho, Gilroy, California, Edmonton, Alberta, Kingsport Tennessee, and a big ‘ol one in Detroit. This raises an interesting question: where is the money for the licensing going? I’m sure some Mini Maker Faire organizers are reading this; have your checks been cashed? What is the communication with Maker Media like?

Just because you can, doesn’t mean you should. It’s valuable words of wisdom like that and can apply to many things. Commenting on blog posts, for example. Yes, you can throw sticks at a wasp’s nest, that doesn’t mean you should. Yes, you can 3D print Heely adapters for your shoes, but it doesn’t mean you should. It does look dope, though and you’re automatically a thousand times cooler than everyone else.

The C64 Mini is a pocket-sized Linux device with an HDMI port meant to play C64 games.   There were high hopes when the C64 Mini was announced, but it turned out the keyboard isn’t actually a mini keyboard. Now someone had the good sense to combine one of these ‘smartphone chips running an emulator in a retro case’ products with a full-sized keyboard. The C64 will be around by Christmas, and yeah, it has a full working keyboard.

Extracting Power From USB Type C

For the last decade or so, we’ve been powering and charging our portable devices with USB. It’s a system that works; you charge batteries with DC, and you don’t want to have a wall wart for every device, so just grab a USB hub and charge your phone and you headphones or what have you. Now, though, we have USB Type C, with Power Delivery. Theoretically, we can pull 100 W over a USB cable. What if we could tap into that with screw terminals?

That’s the idea behind [Jakob]’s entry to the Hackaday Prize. It’s a USB 3.1 Type C to Type A adapter, but it also has the neat little bonus of adding screw terminals. Think of it as jumper cables for your laptop or phone, but don’t actually do that.

[Jakob]’s board consists of a USB Type C receptacle on one end, and a Type A plug on the other, while in between those two sockets is an STM32G0 microcontroller that handles the power negotiation and PD protocol. This gives the USB Type C port dual role port (DRP) capability, so the power connection can go both ways. Add in a screw terminal, and you can theoretically get 20 V at 5 A through a pair of wires. Have fun with that.

Right now, [Jakob] has all the files in a Gitlab with the schematic and layout available here. It’s an interesting project that has tons of applications of USB hackery, and more than enough power to do some really fun stuff.

Make The Product By Hacking The Catalogue

We’ve all had that moment of seeing a product that’s an object of desire, only to realize that it’s a little beyond our means. Many of us in this community resolve to build our own, indeed these pages are full of projects that began in this way. But few of us have the audacity of [vcch], who was so taken with the QLockTwo expensive designer word clock that they built their own using the facsimile of its face on the front of QLock’s own catalogue. The claim is that this isn’t an unauthorized copy as such because no clock has been copied — as far as we’re aware there’s nothing against taking the scissors to a piece of promotional literature, and it certainly differs from the usual word clocks we’ve seen.

So how has this masterpiece of knock-off engineering been performed? The catalog cover has a high-quality cut-out rendition of the clock face, and the pages behind are thick enough to conceal an addressable LED. By cutting slots through the pages enough space is created for strips of LEDs, which are then hooked up to a Wemos D1 that runs the show. The software is provided, et voila! A faithful facsimile of the original QLockTwo, in part produced by QLock themselves. We applaud the ingenuity involved, but like [vcch] we’d say that if you like the QLockTwo then perhaps you’d like to consider buying one.

Build Your Own Selfie Drone With Computer Vision

In late 2013 and early 2014, in the heady days of the drone revolution, there was one killer app — the selfie drone. Selfie sticks themselves had already become a joke, but a selfie drone injected a breath of fresh air into the world of tech. Fidget spinners had yet to be invented, so this is really all we had. It wasn’t quite time for the age of the selfie drone, though, and the Lily camera drone — in spite of $40 Million in preorders — became the subject of lawsuits, and not fines from the FAA.

Technology marches ever forward, and now you can build your own selfie drone. That’s exactly what [geaxgx] did, although this build uses a an off-the-shelf drone with custom software instead of building everything from scratch.

For hardware, this is a Ryze Tello, a small, $100 quadcopter with a front-facing camera. With the right libraries, you can stream images to a computer and send flight commands back to the drone. Yes, all the processing for the selfie drone happens on a non-flying computer, because computer vision takes processing power and battery life.

The software comes from CMU’s OpenPose library, a real-time solution for detecting a body, face, or hands. With this, [geaxgx] was able to hover the drone and keep his face in the middle of the camera’s frame. While there’s no movement of the drone involved — the drone is just hovering and rotating to the left and right — it is a flying selfie stick without the stick. You can check out the video below and check out all the code on [geaxgx]’s GitHub here.

Continue reading “Build Your Own Selfie Drone With Computer Vision”

Turn A Ceiling Fan Into A Wind Turbine… Almost

It’s not uncommon to drive around the neighborhood on trash day and see one or two ceiling fans haphazardly strewn onto a pile of garbage bags, ready to be carted off to the town dump. It’s a shame to see something like this go to waste, and [Giesbert Nijhuis] decided he would see what he could do with one. After some painstaking work, he was able to turn a ceiling fan into a wind turbine (of sorts).

While it’s true that some generators and motors can be used interchangeably by reversing the flow of electricity (motors can be used as generators and vice-versa) this isn’t true of ceiling fans. These motors are a type called induction motors which, as a cost saving measure, have no permanent magnets and therefore can’t simply be used as a generator. If you make some modifications to them, though, like rewiring some of the windings and adding permanent magnets around them, you can get around this downside of induction motors.

[Giesbert] does note that this project isn’t a great way to build a generator. Even after making all of the changes needed to get it working, the motor just isn’t as efficient as one that was built with its own set of magnets. For all the work that went into it, it’s not that great of a time investment for a low-quality generator. However, it’s interesting to see the theory behind something like this work at all, even if the end result wasn’t a complete wind turbine. Perhaps if you have an old ceiling fan lying around, you can put it to better use.

Continue reading “Turn A Ceiling Fan Into A Wind Turbine… Almost”