Robot Joints Go Modular With This Actuator Project

[John Lauer] has been hard at work re-thinking robot arms. His project to create modular, open source actuators that can be connected to one another to form an arm is inspiring, and boasts an impressively low parts cost as well. The actuators are each self-contained, with an ESP32 and a design that takes advantage of the form factors of inexpensive modules and parts from vendors like Aliexpress.

Flex spline in action, for reducing backlash

Each module has 3D printed gears (with an anti-backlash flex spline), an RGB LED for feedback, integrated homing, active cooling, a slip ring made from copper tape, and a touch sensor dial on the back for jogging and training input. The result is a low backlash, low cost actuator that keeps external wiring to an absolute minimum.

Originally inspired by a design named WE-R2.4, [John] has added his own twist in numerous ways, which are best summarized in the video embedded below. That video is number three in a series, and covers the most interesting developments and design changes while giving an excellent overview of the parts and operation (the video for part one is a basic overview and part two shows the prototyping process, during which [John] 3D printed the structural parts and gears and mills out a custom PCB.)

Continue reading “Robot Joints Go Modular With This Actuator Project”

A Spectrum Analyzer For The Smart Response XE

Remember the Girl Tech IM-me? It was a hot-pink clearance rack toy that suddenly became one of the hottest commodities in the hacking world when it was discovered they could be used for all sorts of radio frequency shenanigans. Now they go for triple digits on eBay, if you can even find one. Well, we’re probably about to see the same thing happen to the Smart Response XE.

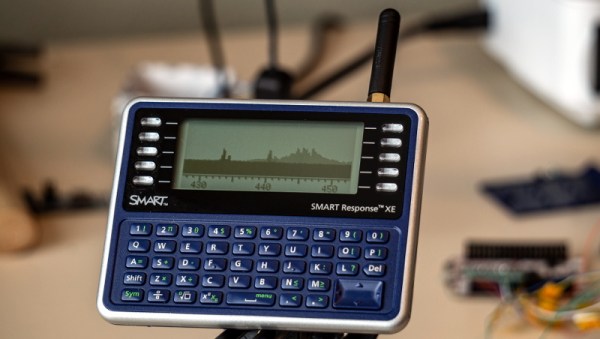
Thanks to the work of a hacker named [ea], this cheap educational gadget is finally starting to live up to the potential we saw in it back when a teardown revealed it was powered by an Arduino-compatible ATmega128RF chip. With a big screen, a decent QWERTY keyboard, and integrated wireless hardware, it seemed obvious that the Smart Response XE was poised to be the next must-have repurposed piece of kit.

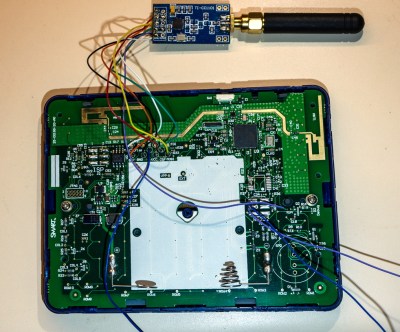
Though as it turns out, [ea] isn’t using the device’s built-in wireless hardware. Step one in this exceptionally well documented and photographed project is to tack a CC1101 transceiver module to the SPI pins on the ATmega128RF. Then with the appropriate firmware loaded up, that nice big screen will show you what’s happening on the 300 MHz, 400 Mhz and 900 MHz bands.

But the fun doesn’t stop there. With the CC1101-modified Smart Response XE, there’s a whole new world of radio hacks you can pull off. As a proof of concept, [ea] has also included a POCSAG pager decoder. Granted the RTL-SDR has already made pulling pager messages out of the air pretty easy, but there’s something to be said for being able to do it on something so small and unassuming.

If you can’t tell, we’re exceptionally interested in seeing what the community can do with the Smart Response XE. At the time of this writing, the going rate on eBay for a good condition unit looks to be about $10 USD, plus the $3 or so for the CC1101 module. But the prices went through the roof when we first posted about it, so get them cheap while you still can.

[Thanks to bburky for the tip.]

Vintage Transistor Radio Gets Internet Transplant

The invention of the transistor revolutionized radio, allowing receivers to be made far more compact and portable than ever before. In the middle of the 20th century, the devices exploded in popularity, and pocket transistor radios took the market by storm. [MisterM] had fond memories of such times, and when he found a 1970s Flirt radio at a car boot sale, it led to a cute little build.

The radio was stripped of its original hardware, with [MisterM] preferring internet radio to the terrestrial variety. In its place, a Raspberry Pi Zero was installed. This was fitted with a cavalcade of off-the-shelf modules to make it fit for pumping out the tunes. A Speaker PHAT was used for audio, while an Adafruit Micro Lipo board handled battery charging and a Pimoroni Lipo Shim served as the power supply. All this was bundled up inside the original casing.

The radio’s controls are a neat hack. The original volume and tuning dials were removed, sliced up, and glued onto two lever microswitches. This allows them to act as buttons instead. A new power switch was installed behind the original, and the Speaker PHAT’s LEDs were placed behind the tuning dial to act as a rudimentary display.

It’s a tidy build that repurposes an attractive vintage artefact into a device of the internet age, while remaining externally the same. [MisterM] has form in this space, with his vintage radio console build and video doorbell being particular highlights. Video after the break.

Continue reading “Vintage Transistor Radio Gets Internet Transplant”

An Algorithm For De-Biasing AI Systems

A fundamental truth about AI systems is that training the system with biased data creates biased results. This can be especially dangerous when the systems are being used to predict crime or select sentences for criminals, since they can hinge on unrelated traits such as race or gender to make determinations.

A group of researchers from the Massachusetts Institute of Technology (MIT) CSAIL is working on a solution to “de-bias” data by resampling it to be more balanced. The paper published by PhD students [Alexander Amini] and [Ava Soleimany] describes an algorithm that can learn a specific task – such as facial recognition – as well as the structure of the training data, which allows it to identify and minimize any hidden biases.

Testing showed that the algorithm minimized “categorical bias” by over 60% compared against other widely cited facial detection models, all while maintaining the same precision of detection. This figure was maintained when the team evaluated a facial-image dataset from the Algorithmic Justice League, a spin-off group from the MIT Media Lab.

The team says that their algorithm would be particularly relevant for large datasets that can’t easily be vetted by a human, and can potentially rectify algorithms used in security, law enforcement, and other domains beyond facial detection.

Build Yourself A Set Of Glowing Wings

Humans didn’t come with wings from the factory, and most efforts to fit them after the fact have been at least as far as flight is concerned, largely fruitless. That doesn’t mean you can’t cut a devastatingly sharp aesthetic though, and [Natalina’s] fiber optic wings are a great way to do just that. 

The wings are a leathercraft project, consisting of a harness worn around the torso. This serves as the mounting point for the fiber optics, as well as the RGB Critter flashlight used to drive the lightshow. Leather parts are lasercut to the right shape, making it easy to create the delicate feather shapes in the design. The pieces are then dyed appropriately and sewn together into the final shape. Bundles of optical fibers are then wound through the harness, sprouting from either shoulder of the wearer. EVA foam is used to help create the right shape for the wings, allowing the different layers to remain separated to create more visual depth.
It’s a build that looks absolutely striking at night, and unlike some other wing-based cosplays, doesn’t have as many drawbacks as far as crowds and transportation. It would make a killer look if you’re going as a Hacker Angel for Halloween this.

Makers certainly know how to craft some cutting-edge wearables. Got your own sweet build? Throw it at the tips line!

An Optocoupler Doorbell Notifier

Over the years we’ve seen several attempts at adding Internet connectivity to the lowly wired doorbell. Generally, these projects aim to piggyback on the existing wiring, bells, and buttons rather than replace them entirely. Which invariably means at some point the AC wiring is going to need to interface with a DC microcontroller. This is often where things get interesting, as it seems everyone has a different idea on how best to bridge these two systems.

That’s the point where [Ben Brooks] found himself not so long ago. While researching the best way to tap into the 20 VAC pumping through his doorbells, he found a forum post where somebody was experimenting with optocouplers. As is unfortunately so often the case, the forum thread never really had a conclusion, and it wasn’t clear if the original poster ever figured it out.

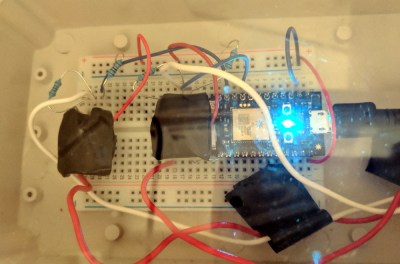
DIY optocouplers wrapped in electrical tape

[Ben] liked the idea though, so he thought he would give it a shot. But before investing in real optocouplers, he created his own DIY versions to use as a proof of concept. He put a standard LED and photoresistor together with a bit of black tape, and connected the LED to the doorbell line with a resistor. Running the LED on 60 Hz AC meant it was flickering rapidly, but for the purposes of detecting if there was voltage on the line, it worked perfectly.

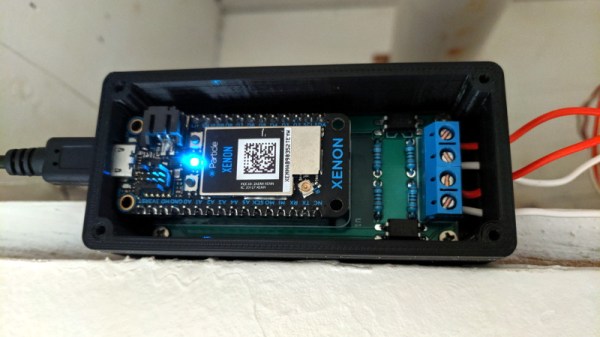
Wanting something slightly more professional for the final product, [Ben] eventually evolved his proof of concept to include a pair of 4N35s, a custom PCB, and a 3D printed enclosure. Powered by a Particle Xenon, the device uses IFTTT to fire off smartphone notifications and blink the lights in the house whenever somebody pushes the bell.

If you’re still wondering why it’s so tricky to connect a microcontroller up to your door bell, a quick look at some of the similar projects we’ve covered should give you a pretty good idea of how annoying these systems can be to modernize.

A DIY Retrocomputer Programmed In Pure Rust

Can you generate VGA and handle a PS/2 keyboard with a Cortex-M4 in Rust? That’s precisely what [theJPster] wanted to find out with Monotron, a 1980s style home computer programmed in pure Rust.

In order to run embedded Rust without a working operating system, some tools are necessary: an LLVM back-end for generating machine code, a target file for specifying memory sizes and other configs, and a pre-compiled libcore as a substitute for a compiler when running an operating system. Rust takes the place of C running on top of the board support package (BSP) and hardware abstraction layer (HAL), and peripheral access crates (PACs) that specify the hardware and allow the code to be portable across different chips.

The implementation generates a 800 x 600 VGA video signal at 60 Hz, displays text on a 48 character by 36 line display, displays color graphics using color lookup (stored in flash memory), and runs applications that take less than 24 KiB for all data. Monotron also generates 8-bit audio with PWM and sports a synthesizer that uses a three-channel wavetable allowing it to make sounds with square waves, sine waves, sawtooth waves, and create white noise.

So far, the Monotron has been able to work with an Atari joystick, a PS/2 keyboard, and has outputs to VGA, MIDI, SD card, and audio. Next up for the Monotron: writing a programming language (tentatively named Monotronian), adding support for Sega Megadrive pads, displaying sprites, and many more exciting developments.

Continue reading “A DIY Retrocomputer Programmed In Pure Rust”