A Car That Runs On Homemade Chemical Reactions

The race for chemical engineering is quite literally on. Every year, the American Institute of Chemical Engineers (AlChE) brings together hundreds of university students to face-off to design the fastest car using techniques they’ve learned from chemical engineering courses.

The Chem-E-Car competition races cars which are only powered by chemical reactions. The goal is to come up with an elegant solution – you can’t simply jettison matter out the back as the method of locomotion. In particular, the rules don’t allow the use of liquid or obnoxious odor discharge, commercial batteries, brakes, or electrical/mechanical timing devices. However, this doesn’t mean that electronics are absent from these designs. Many teams must gather data in order to design a control system to improve the performance of their car.

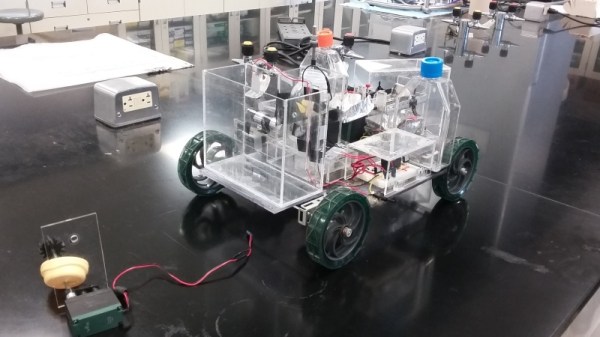
Students have to build a power system, stopping mechanism, circuitry, and mechanical assembly for the body of the car, all to fit in a size constraint not much bigger than a shoebox. The competition primarily judges the accuracy of the chemical reaction for stopping the car more so than speed or power. Given that the load the car must carry is typically unknown until the day of the competition, this is a significant challenge, allowing teams to find a way to design a flexible reaction that can accommodate a range of loads and distances.

For example, this 2015 entry from the Rice University team (PDF) uses a fuel cell for locomotion and an iodine clock reaction as a timer for braking. The fuel cell powers an Arduino which monitors a light-dependent resistor. In between the LED and that LDR, the clock reaction turns opaque at a predictable time and triggers the motors to stop turning.

While many schools choose not to disclose their designs in order to gain a competitive edge, we applaud the teams who have shared the story of their builds. Kudos to the Rice team mentioned above, to the 2014 Rutger’s team whose white paper outlines the construction of aluminum air batteries worthy of Walter White, to the car from the Universitas Negeri Semarang, Indonesia powered by a thermoelectric generator (PDF), the UC Berkeley team for outlining numerous approaches to developing their power system, and the two Ohio State team’s entries seen winning the regional competition in the video below.

If you were on a team that compete the the Chem-E-Car, we want to hear about it!

Continue reading “A Car That Runs On Homemade Chemical Reactions”

Finishing FDM Prints With SLS Resin

[Thomas Sanladerer] has a filament-based 3D printer and a resin one. Can the two types of raw material combine to make something better? [Thomas] did some experiments using some magnets to suspend the parts and a hot air soldering gun to heat things up.

The trick turns out to be cutting the resin with alcohol. Of course, you also need to use a UV light for curing.

The parts looked pretty good, although he did get different results depending on a few factors. To see how it would work on a practical part, he took a very large printed alien egg. The problem is, the egg won’t fit in the curing station. A few minutes with a heat sink, a drill press, and an LED module was all it took to build a handheld UV curing light.

The good news is you don’t need a resin printer to take advantage of the process — just the resin. He also points out that if you had parts which needed to maintain their dimensions because they mate with something else, you could easily mask the part to keep the resin away from those areas.

If this video (and the results it shows) has you interested, then you’ll love the in-depth account that [Donald Papp] wrote up last year about his own attempts to smooth 3D printed parts with UV resin.

Continue reading “Finishing FDM Prints With SLS Resin”

Chuck peddle father of 6502

Honoring Chuck Peddle; Father Of The 6502 And The Chips That Went With It

Chuck Peddle, the patriarch of the 6502 microprocessor, died recently. Most people don’t know the effect that he and his team of engineers had on their lives. We often take the world of microprocessor for granted as a commonplace component in computation device, yet there was a time when there were just processors, and they were the size of whole printed circuit boards.

Chuck had the wild idea while working at Motorola that they could shrink the expensive processor board down to an integrated circuit, a chip, and that it would cost much less, tens of dollars instead of ten thousand plus. To hear Chuck talk about it, he got a cease-and-desist letter from the part of Motorola that made their living selling $14,000 processor boards and to knock off all of the noise about a $25 alternative.

In Chuck’s mind this was permission to take his idea, and the engineering team, elsewhere. Chuck and his team started MOS Technologies in the 1970’s in Norristown PA, and re-purposed their work on the Motorola 6800 to become the MOS 6502. Lawsuits followed.

Continue reading “Honoring Chuck Peddle; Father Of The 6502 And The Chips That Went With It”

Need Hackable Melodies? Here’s The TETRIS Theme And More

[Robson Couto] started to get interested in musical projects and as a side effect created downloadable code with simple notation for a good variety of themes, songs, and melodies. They are all for the Arduino and use only the built-in tone() function, but don’t let that distract you. If you look past that, you’ll see that each sketch is a melody that consists of single notes and durations; easily adapted to other purposes or simply used as-is. After all, [Robson] wanted the source of each tune to be easily understood, easily modified, and to have no external dependencies.

All that may sound a bit like MIDI, but MIDI has much more in common with hardware events than music notation because it includes (among other things) note starts and note ends as separate elements. Converting MIDI into a more usable format was a big part of a project that fed Bach music to a neural network and got surprisingly good results.

When doing music projects, sometimes having a recognizable melody represented very simply as notes and durations with only one note at a time can be an awfully handy resource, and you can find them on GitHub. There’s a brief video of the Tetris theme (actual name: Korobeiniki) being played after the break.

Continue reading “Need Hackable Melodies? Here’s The TETRIS Theme And More”

Team Scores Big Points With Pinball Final Project

For their final project in [Bruce Land]’s class on designing with PIC32 microcontrollers, [Sujith], [Julia] and [Andrew] wanted to do something fun. And what could be more fun than bending to the electromechanical siren song of the pinball machine?

This machine looks great, and as you can see in the demo video after the break, it plays and sounds great, too. We particularly like the boomerang obstacle and the game state-driven LED strip. The more points you score, the brighter they go. We also like that this machine combines traditional scoring methods with a few really clever ones, like the boomerang target near the top and the scoring triggers made from copper tape.

The team started by designing the heart of any pinball machine, the flippers. Though we have seen car door lock actuators used in homebrew machines, the team went with traditional solenoids to drive them. Unfortunately the solenoids caused a lot of interference, but the team got around it with filter capacitors and aluminium foil Faraday cages around the wires.

If all this pinball talk has your circuits lit up, why not try making your own machine? Continue reading “Team Scores Big Points With Pinball Final Project”

Arduino Polygraph Shows How It’s Done

Sometimes, a project comes along that makes a good reference design for anyone doing similar work. In this particular case, it’s a DIY USB polygraph-like machine by [Juangg] using an Arduino and sensors on the hardware side, and a Python front end for data visualization. It’s even complete with 3D printed enclosure and sensor elements.

[Juangg] designed it to use three sensors: a pulse sensor, a breath sensor, and one to measure Galvanic Skin Response (GSR). The pulse sensor uses a piezo element pressed against a fingertip to detect changes in pressure resulting from blood flow. It can be picky about placement, but finding sweet spot can yield remarkably good readings. The breath sensor works on a similar principle but uses a 3D printed fixture to hold the sensor between a strap and the subject’s chest, so that breathing in and out can be detected. The GSR sensor is a voltage divider used to measure small changes in skin conductivity. How well does it all work? That depends on what one is looking to get out of it, but the documentation and design files are available from the project page and the GitHub repository if anyone wants a reference for similar work.

The polygraph may have a mixed reputation, but it makes a good project that demonstrates just how messy biometrics can be from an engineering perspective. And in case you missed it, here’s a reminder that Wonder Woman and the polygraph have much more in common than you might realize.

Laser Welding With A Tattoo Removal Gun

Dating as far back as the early 1960’s, researchers were zapping tattoo inks with laser light was an effective way to remove the markings from human skin. At the time it was prohibitively expensive. But the desire to have an undo-button for badge choices is strong, and thus the tattoo removal gun was born.

These days you can pick up one of these zappy, burn-y wonders for far less than a flagship cellphone put their high-power-output to alternative use. [Andrew] recently discovered that these devices can be readily repurposed into a laser welding tool with just a bit of work under the hood.

He first came across the technology via videos from [styropyro], whose work we’ve featured before. The tattoo removal gun features a YAG laser, which is pulsed to create a high power density. In initial testing, the pulses were too short and of too high intensity to effectively weld with; instead, the pulses simply cratered the metal.

After delving in further, [Andrew] discovered that by removing the Q-switch optical component, the pulses from the laser could be lengthened. This reduces the power density, and allows the tool to weld various materials even on its lower power settings. Success was found welding steel, titanium, and other materials, though attempts to weld copper and silver faced little success. Test pieces included razor blades and small screws, which could easily be welded with the tool. Results of the razor blade welding is spectacular, with a high-quality welding bead achieved by taping the laser to a CNC mill for precise movement.

It could prove to be a useful tool for those experimenting with complex projects involving bonding metals at very fine scales. If you’re pursuing something exotic yourself, we want to hear about it!