Crate EV Motor Hits Market: The Swindon Powertrain

Last year brought some exciting news from the unlikely quarter of an unexciting industrial estate in the British town of Swindon, the company Swindon Powertrain announced that they’d be marketing an all-in-one electric motor and transmission. Essentially this would be a crate engine for EV conversions, and since it’s pretty small it would be able to be shoehorned into almost any car. So often these announcements later prove to be vapourware, but not in this case, because Swindon Powertrain have announced that you can now order the HPD as they call it, for delivery in August. It’s not entirely cheap at £6400 ($7846) exclusive of British VAT sales tax, but when its integrated transmission and differential is taken into consideration it starts to seem more attractive when compared to engineering a random motor onto an internal combustion engine transmission.

They provide a product page with links to a load of data, installation information, and even a CAD model, as well as an ordering page in their webshop from which you can pay the deposit with the rest presumably payable in August before delivery. There is also a range of optional extras including matched inverters, drive shafts, a limited slip differential, and a coolant pump, which makes the whole ever more attractive as a package. 80kW should be enough to lend sprightly performance to all but the largest of cars, so we’ll expect to see this motor ever more often in years to come.

There is already a thriving home-made EV scene which we don’t expect this unit to displace. Instead it will find a niche at the professional and semi-professional conversion level, and we wouldn’t be surprised to see an aftermarket springing up offering ready made subframes to fit it to popular cars. If it is a success there will inevitably be copies and probably at a lower price, so it could be the start of a wave of very interesting conversion options. We hope that Swindon Powertrain will do well with it, and will manage to stay one step ahead of the upstarts. You can read our coverage of its announcement and their electric Mini prototype here.

Thanks [Carl Pickering] for the tip.

Bust Your Own Ghosts With A PKE Meter

You know, we wouldn’t be that surprised if aliens or ghosts show up for real before this year is out. If paranormal becomes part of the new normal, it might be nice to have a PKE meter that can detect spirits and help get a head start on figuring out what they want from us.

Yes, that’s right — instead of just lighting up whenever ghosts are near, [starscream205]’s meter goes the extra yard and translates spiritual energy into English words that scroll across the LED matrix. Inside is a Raspberry Pi 3B+ and a sense HAT, which takes spatial and environmental readings and assigns different words based on the results.

Now [starscream205] can go fearlessly into the night, guided by the night vision camera on the end, and watch for ghosts on the screen. Instead of a typical Pi-compatible screen, this is from a car back-up camera system and has been modified to work with the Pi.

We’ve seen a few PKE meters around here before, but they usually do things such as detect radiation. It’s nice to see one that’s faithful to the original purpose.

Smart Home Meets Dumb Terminal

Most smart home products are designed to be controlled from a mobile device, which makes sense since that’s what the average consumer spends most of their day poking around on these days. But you aren’t the average consumer, are you? If you’re looking for a somewhat more tactile experience, then why not put your smart home dashboard on a vintage serial terminal as [Daniel Karpantschof] did?

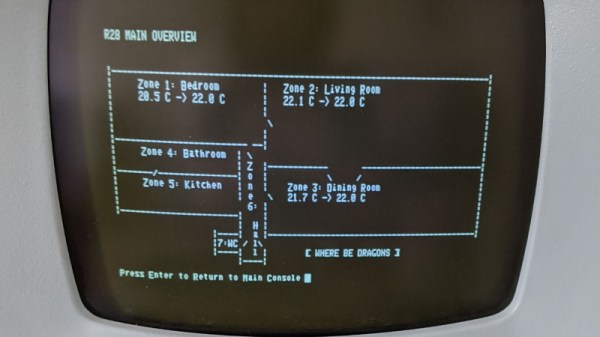
So how do you get the latest and greatest in home automation talking to a serial terminal built before the Internet as we know it? With Python, of course. [Daniel] has some code running on a Linux server that’s actually taking to his various smart home gadgets, which then spits out a simple ASCII user interface that his circa 1976 ADM-3A terminal can handle; complete with a floor plan view of the house that shows the temperature in different rooms.

Naturally, that’s only half the battle. You still need to get that interface onto the terminal. For that, [Daniel] is using the “Simulant Retro WiFi Modem” that we’ve covered in the past. An ESP8266 connects to the network and shuffles data over to the target device over serial. It’s all transparent to the terminal itself, so this project could be reproduced with whatever vintage machine holds a special place in your heart.

64-bit And A Display: Minecraft Computers 10 Years Later

Some people build their own computer to play games, while others play games to build their own computer. Minecraft is the prime candidate for the latter, and while you can certainly arrange the blocks to make them look like a computer, we’re of course talking about replicating the actual functionality of a CPU or parts thereof, and/or external components within the game. Many such creations have spawned in the decade since the first Minecraft-built ALU surfaced, and [Rockfarmor] built a 64-bit specimen to add to that list — and made a video to showcase it.

Instead of emulating a common architecture, [Rockfarmor] went for a more home-made approach, and re-used the architecture from an old school assignment (in Swedish) as basis. The result is a simple yet fully functional 64-bit CPU with 32 registers, 32kB main memory and a separate 16kB stack. The instruction set mostly contains ALU and branching operations, but also a few special opcodes to control an additional 64×64 pixel blocks, 64-color display — including drawing circles, lines, and color fills.

More details on the architecture can be found in its documentation and in an older video (with subpar audio circumstances unfortunately). An additional time-lapse video of the initial build is also available, and you will find all of them after break. To simplify development, [Rockfarmor] also wrote a desktop app to program the computer in assembly and upload it straight to the Minecraft version.

As with all computers built in Minecraft, the driving force is redstone, which essentially allows circuit design within the game, and [Rockfarmor]’s is no difference here. He also uses command blocks to avoid the laboriously and slow “wiring” required otherwise, turning it more into a “wireless redstone” circuit.

No doubt, purists will consider this cheating, but another angle would be to see it as Moore’s Law applied to Minecraft computers, considering the computer’s size and speed compared to the first Minecraft ALU. Or maybe as the equivalent of microcode in real-world CPUs? Or then, maybe we should just accept and embrace different options and preferences.

Continue reading “64-bit And A Display: Minecraft Computers 10 Years Later”

Testing Hardware With ASCII Waveforms

Testing software is — sometimes — easier than testing hardware. After all, you can always create test files and even fake user input before monitoring outputs using common tools. Hardware though, is a bit different. Sometimes it is hard to visualize exactly what’s happening. [Andrew Ray’s] answer? Produce simulated waveforms using ASCII text.

The process uses some custom tools written in OCaml, but the code is available for you on GitHub. The tool, called Hardcaml, allows you to write test benches for hardware — not a new idea for FPGA developers. The output, however, is an ASCII text waveform and common software development tools can check that waveform against the expected output.

Continue reading “Testing Hardware With ASCII Waveforms”

A DIY Electronic Load With A Twist

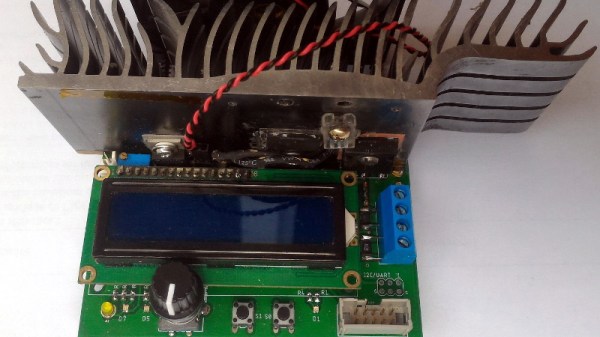
If you’re testing a power supply or battery pack, an electronic load is a nice tool to have. By watching the voltage as you crank up the resistance, you can verify the unit’s real-world capabilities quickly and easily. But [Xavier Bourlot] wanted a bit more information than is generally afforded by these devices, so he came up with his own scratch built load that can measure the voltage at multiple points in the circuit.

Now at first glance, it might not be obvious why you’d want such a capability. But [Xavier] is looking to do something very specific with this device: analyze the efficiency of DC-DC converters. The idea is that if the electronic load can measure the voltage on both sides of the converter, it can calculate what kind of losses are being incurred.

Could you do this with a multimeter and a traditional electronic load? Sure. But if it’s the kind of thing you’ll be doing a lot of, it’s not hard to see why this method would be preferable.

But even if you ignore the converter analysis capabilities, this looks to be a very useful device to have around the lab. [Xavier] says it can sink more than 5 amps, and handle an input voltage as high as 100 volts. Powered by an ATmega328P, the load is also fully programmable and even features an I2C expansion port that you can use to hang additional hardware or sensors on. The stock firmware is already quite capable, and the list of future enhancements has some very interesting entries such as the ability to log data over serial or to a SD card.

We’ve seen a number of programmable electronic load projects over the years, ranging from Arduino shields to VFD equipped units that would be the pride of any hacker’s bench.

Cheap Party Light Gets Arduino Upgrade

If you’ve got a party coming up and are looking to add a little bit of excitement, you might be interested in this recent project from [Gav Lewis]. The build is based on a commercially available party light, but with some upgraded components the final product is brighter and more dynamic than it was stock.

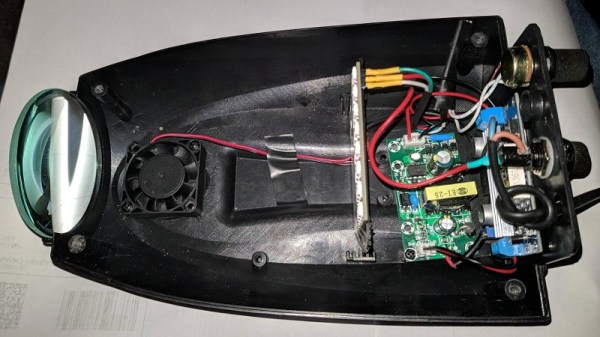
Realistically, [Gav] has changed out almost every component of this light except for the enclosure and the front lens. The original 5 mm LED array was replaced with a new 8×8 WS2812B panel, and the electronics completely replaced with an Arduino Nano. He’s still using the light’s original power supply, but as it only puts out around 4.2 V, he’s added a boost converter to provide a stable 5 V for the new hardware. He also added a small 12 V cooling fan, which he says is basically silent since it’s only getting half its rated voltage.

[Gav] has developed a number of lighting patterns with FastLED that do a good job of emulating what you might see from a much more expensive laser scanner. In the video after the break, you can see how multiple colored beams of light exit the housing at once, projecting patterns on the opposite wall. He says he’s like to restore the device’s original sound activation mode, but as of yet hasn’t gotten the code sorted out.

This project uses a off-the-shelf 8×8 matrix of WS2812B LEDs, but if you ever find yourself needing to piece together your own array from individual LEDs, we recently covered a great tip for making it a bit easier.

Continue reading “Cheap Party Light Gets Arduino Upgrade”