Nerfnet Tunnels TCP/IP Over NRF24L01 Radios

There’s an excellent chance you’ve already worked with the nRF24L01. These little modules are an easy and cheap way to shuffle data across a 2.4 GHz radio link at a respectable rate, making them great for remote control projects. But after seeing that others had experimenting with using these radios to transmit digital audio, [Andrew Rossignol] got to wondering if some software trickery could push the envelope even further.

The result isĀ nerfnet, a Linux program that allows you to tunnel TCP/IP over a pair of nRF24L01 modules. The link appears as a virtual interface, meaning everything happens transparently as far as other programs are concerned. Anything that uses TCP/IP to communicate on Linux can take advantage of this low-cost link, albeit at speeds that most of us haven’t had to deal with in decades.

Though it’s not quite as bad as you might think. Latency is around 50 ms, and after some tweaks, [Andrew] has been able to squeeze almost 300 Kbps out of the link. That’s more than enough for terminal work, and some light audio and video streaming isn’t out of the question.

In terms of range, he was able to maintain a fairly reliable connection at a distance of up to 60 meters (200 feet) outdoors. It might not sound like much, but again, you’ve got to take the cost of these radios into account. If you’re looking to SSH into a Raspberry Pi weather station you’ve got in the backyard, a pair of these could get the job done for just a couple of bucks.

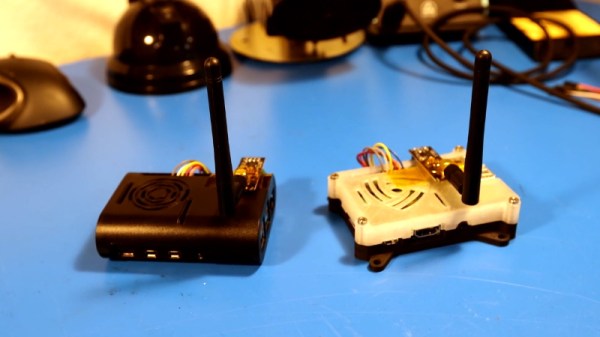
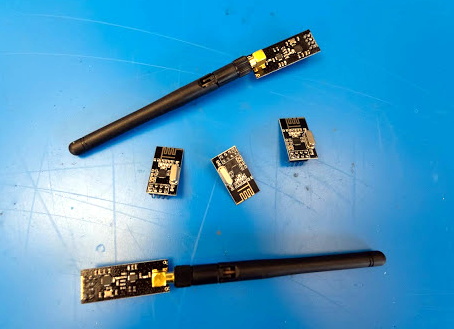
The blog post [Andrew] has put together explains the software in fantastic detail if you’re interested in the nuts and bolts of it all. But if you just want to play around with the idea, you just need to connect some nRF24L01 modules to a pair of Raspberry Pis with short SPI wires to cut down any interference, and follow the instructions. Ideally the radios would have external antennas, but it’s not strictly required.

We’ve seen these modules pushed into service as impromptu Bluetooth Low Energy transmitters in the past, but nothing quite like this. While the latency and bandwidth offered by this technique might seem antiquated to modern eyes, it could be the perfect dedicated communication channel for your sensors, smart devices, or home automation projects.

Continue reading “Nerfnet Tunnels TCP/IP Over NRF24L01 Radios”

Incredible Discrete MOSFET Rover Has Maximum Blink

What do you get when you stick 1738 MOSFETs together? If your answer was a ‘4-bit CPU’, you would be totally correct. Available as a product over at Marutsu as the ‘CPU1738’, it seems to target beginners to computer theory, with build instructions that explain how the CPU is built up from individual MOSFETs that are combined into logic gates.

A CPU1738 NAND PCB.

While decidedly more compact in its SMD format than it would have been with pure through-hole parts, the use of countless small PCBs on top of the larger PCBs make for a pretty hefty package. Board after board build up the CPU, and the assembly continues with the addition of sensors, motors, and wheels. In the end, a robot emerges, albeit a somewhat wobbly-looking one.

Check out the video linked after the break, though before starting one up, note the 50,000 Yen (approximately $500) price tag for the CPU block alone. On the other hand, in addition to the 1738 MOSFETs, there are also 1070 LEDs, so you get what you pay for in blinkies.

Continue reading “Incredible Discrete MOSFET Rover Has Maximum Blink”

Hardware Keymapper Routes Through Raspberry Pi

There are a lot of keyboards to choose from, and a quick trip through some of the forums will quickly show you how fanatical some people can be about very specific styles or switches. [Crdotson] doesn’t seem to be too far down the rabbit hole in that regard, but he does have a keyboard that he really likes despite one small quirk: it’s built for Mac, and some of the modifier keys aren’t laid out correctly for Windows. Since Windows has limited (and poor) options for software keymapping, he took an alternative route and built a keymapper in hardware instead.

The build uses a Raspberry Pi as a go-between from the keyboard to his computer. The Pi watches the USB bus using usbmon, which allows inspection of the packets and can see which keys have been pressed. It then passes those keypresses through to the computer. His only modification to the keyboard mapping is to swap the Alt and Super (Windows) keys for his keyboard of choice, although using this software would allow any other changes to be made as well. Latency is only on the order of a few microseconds, which is not noticeable for normal use cases.

While we have seen plenty of other builds around that can map keyboards in plenty of custom ways, if you don’t have the required hardware for a bespoke solution it’s much more likely that there’s a Raspberry Pi laying around that can do the job instead. There are a few issues with the build that [crdotson] is planning to tackle, though, such as unplugging the device while a key is being pressed, which perpetually sends that keystroke to the computer without stopping. But for now it’s a workable solution for his problem.

FTDI VCP Chips With Custom PIDs Not Working On MacOS 11 Big Sur

An anonymous reader pinged us about an issue that affects people who jumped onto the latest-and-greatest OS from the Apple gardens: USB devices that stop working due to the FTDI-based USB solution. At its core appears to be that the built-in FTDI driver provided by Apple (AppleUSBFTDI.dext) only supports FTDI chips which provide the standard FTDI vendor and product ID (e.g. 0x0403 and 0x6001 respectively for the FT232R). Many products however set a custom product ID (PID) to differentiate their device, though in the thread some mention that there are driver issues even with the default VID/PID combination.

Over the past years, Apple has been restricting and changing the way kernel extensions (KExt) and driver extensions (DExt) are handled. As these FTDI chips are often used for virtual com port (VCP) purposes, such as with Arduino boards and USB-TTL adapters, this is a rather cumbersome issue that would affect anyone using Big Sur in combination with such a hardware device.

So far only the FTDI team has been somewhat responsive based on the support forum thread, with Apple seemingly rather silent on the issue.

PinePhone Gets 3D Printed Mechanical Keyboard

Do you remember when smartphones had real physical keyboards? Working the command line on some remote machine over SSH was a breeze, and you could even knock out a few lines of code if you were so inclined. But these days you’ve either got to lug around an external keyboard, or suffer through pecking out a few words per minute on a piece of glass. Doesn’t sound much like progress to us.

By the looks of it, [James Williams] doesn’t think so either. He’s designed a physical keyboard add-on that snaps onto the back of the PinePhone to deliver a proper, albeit condensed, typing experience. This is no repurposed BlackBerry board either; he’s created a custom mechanical keyboard that manages to fold into an incredibly small size thanks to resin printed keycaps and Kailh low profile switches. Other than the hand-drawn legends, it’s probably not a stretch to say this is a better keyboard than what many people have on their actual computers.

In addition to the 3D printed frame and Kailh switches, there’s also an Arduino Pro Micro onboard to communicate with the phone. Rather than use USB, the keyboard is wired to the I2C accessory port on the rear of the PinePhone. It sounds like [James] needs a little more time to polish his QMK build before its ready to release, so you might want to wait a bit before you start printing off your own copy of the parts.

Those following along with the development of the PinePhone know there’s supposedly an official keyboard accessory in the works, but who wants to wait when we’re so close to mobile Linux nirvana? Besides, we doubt it will be nearly as pleasant to type on as the board [James] has put together.

NSF Releases Video Of Arecibo’s Final Moments

Today the National Science Foundation released a pair of videos that document the collapse of the Arecibo Observatory with incredible detail. A wide shot, apparently taken from the Visitors Center, shows the 900 ton instrument platform breaking free and swinging on the remaining support cables until it smashes into the edge of the dish. The second clip, recorded by an airborne drone, is focused directly on the cables as they failed. Both can be seen in the video embedded below.

Together, they produce an invaluable visual record of what finally brought the iconic radio telescope down. As was predicted by engineers earlier in the month, the failure of another support cable on tower 4 triggered a chain reaction that brought the entire platform crashing down onto the 305 meter reflector. Footage from a drone observing the top of tower 4 shows that the entire sequence, from the first visual wire break to the remaining cables being torn from their mounts, only took five seconds. While some initially doubted the NSF’s determination that it was too dangerous to repair Arecibo, this footage seems to prove just how tenuous the structural integrity of the Observatory really was.

A drone captured the critical cable failure.

These videos will hopefully help investigators who still need to determine why the cables failed in the first place. The cable in August didn’t snap, it simply pulled lose from its mount. It was suspected that the cable may have been incorrectly installed, but as it was only a backup, the situation was not seen as critical. But when the second cable failed in November it was found to have snapped at just 60% of its minimum breaking strength.

This immediately called into question the condition of the remaining cables, and ultimately lead to the decision by the NSF to proceed with a controlled demolition of the Observatory that would preserve as much of the scientific equipment as possible. Unfortunately, the remaining cables didn’t last long enough to put that plan into action.

Continue reading “NSF Releases Video Of Arecibo’s Final Moments”

Underwater Drone Faces Trial By Water

Underwater Remote Operated Vehicles, or ROVs as they’re typically known, generally operate by tether. This is due to the poor propagation of radio waves underwater. [Simon] wanted to build such a drone, but elected to go for an alternative design with less strings attached, so to speak. Thus far, there have been challenges along the way. (Video, embedded below.)

The underwater drone uses a 3D printed chassis, replete with googly eyes that go a long way to anthropomorphizing the build. Four motors are used for control, with two for thrust in the horizontal plane and two mounted in the vertical plane for attitude control. This allows the drone to be set up at neutral buoyancy, and moved through the water column with thrust rather than complicated ballast mechanisms. The build aims to eschew tethers, instead using a shorter cable to link to a floating unit which uses radio to communicate with the operator on the shore.

The major struggle facing the build has been sealing the chassis against water ingress. This is where the layered nature of 3D printing is a drawback. Even with several treatments of paint and sealant, [Simon] has been unable to stop water getting inside the drone. Further problems concern the excess amount of ballast required to counteract the drone’s natural buoyancy due to displacement.

Regardless of the struggles, we look forward to seeing the next revision rectify some of the shortcomings of the current build. We’re sure [Simon’s] experience building an electric surfboard will come in handy. Video after the break.

Continue reading “Underwater Drone Faces Trial By Water”