Cool WS2811 Trick Makes LED Art Installation Smooth

Normally, when a project calls for addressable LEDs, we just throw a strip of WS2812s and an Arduino together, cobble together some code from the examples in the FastLED library, and call it a day. We don’t put much thought into what’s going on under the hood, unless and until we run into an LED project that’s a little more challenging.

Inventor [Leo Fernekes] found himself in such a situation recently, when he pitched in on an LED art installation. The project called for rings of LED bars around the trunks of trees on a private estate. The physical size of the project and the aesthetic requirements created significant challenges, though. One of these was finding a way to control the LED bars, each of which draws about 100 mA and needs to be very smoothly dimmed. [Leo] looked at the WS2811 LED driver, but found that the low drive current and the 8-bit PWM output failed to tick either of those boxes.

[Leo] solved both problems by using two of the three PWM channels on the chip in concert — one to control the current and one to PWM the LED. The circuit he came up with is deceptively simple — just four transistors, a Schottky diode, and a bunch of passives. The other clever bit is the data interface between LED bars, which can be configured as either single-ended or differential. This allows the same interface to be used for the short distance between bars on a tree, and the longer runs between trees.

As usual, [Leo] does a great job of explaining his design and how it works, which we find very instructional. He did something similar when he managed to dim a non-dimmable LED fixture.

Continue reading “Cool WS2811 Trick Makes LED Art Installation Smooth”

Hands-On Review: TCam-Mini WiFi Thermal Imager

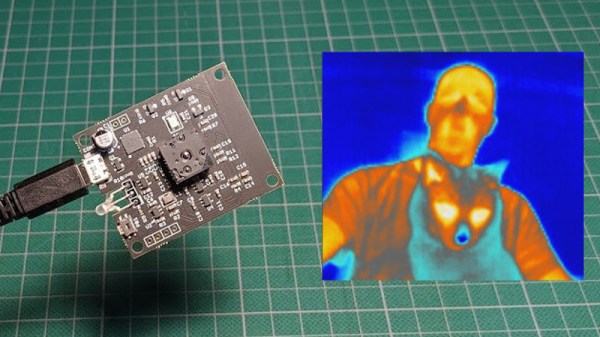
A thermal camera is a tool I have been wanting to add to my workbench for quite a while, so when I learned about the tCam-Mini, a wireless thermal camera by Dan Julio, I placed an order. A thermal imager is a camera whose images represent temperatures, making it easy to see things like hot and cold spots, or read the temperature of any point within the camera’s view. The main (and most expensive) component of the tCam-Mini is the Lepton 3.5 sensor, which sits in a socket in the middle of the board. The sensor is sold separately, but the campaign made it available as an add-on.

Want to see how evenly a 3D printer’s heat bed is warming up, or check whether a hot plate is actually reflowing PCBs at the optimal temperature? How about just seeing how weird your pets would look if you had heat vision instead of normal eyes? A thermal imager like the tCam-mini is the tool for that, but it’s important to understand exactly how the tCam-mini works. While it may look like a webcam, it does not work like one.

Continue reading “Hands-On Review: TCam-Mini WiFi Thermal Imager”

Classroom Surplus Becomes Linux Powerhouse

The SMART Response XE is a handheld computer that was originally sold for use in the classroom as a terminal for pupils taking tests. It’s now cheap enough on the surplus market to have become a target for experimenters, and we’ve seen them with a variety of cool hacks. We particularly like what [chmod775] has done with it, putting a VT100 terminal emulator on the device and hiding a NanoPi Neo Air single board computer in the battery bay. Powered from a USB battery bank, it gives a fully-featured Linux terminal in the palm of the hand. We see it running an Ubuntu LTS  version, and it’s clear that it’s a functional and usable device.

This raises a more abstract question though: We’d guess comparatively few of us write software through an old-style dumb terminal, instead we’re more likely to get our terminal experience at a much more accomplished command line with all the conveniences of a modern desktop surrounding it. How many of us could comfortably return to the limited confines of a VT100 emulator on an odd-sized LCD display? We’d be interested to hear [chmod755]’s experiences using it, because if it retains usability it’s a device we wouldn’t mind having ourselves.

Hungry for more SMART Response XE hacks? Take a look at the BASIC computer, or the spectrum analyser.

Vintage Monochromator Makes Monochromatic Light, Mechanically

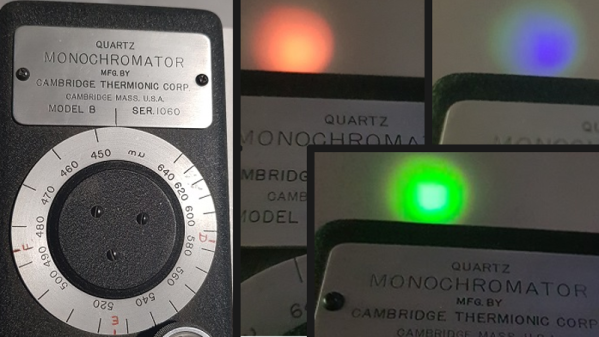
A monochromator is an optical instrument that permits only a narrow selection of wavelengths to be transmitted from a source, and the particular model [Doug] obtained renders visual light monochromatic by way of a mechanically-adjusted system of mirrors and diffraction gratings that allows only the selected wavelength to pass. The big dial is how the operator selects the desired wavelength, and is labeled in ‘mu’ (or milli-micro), but [Doug] helpfully points out the more modern term for that is nanometers.

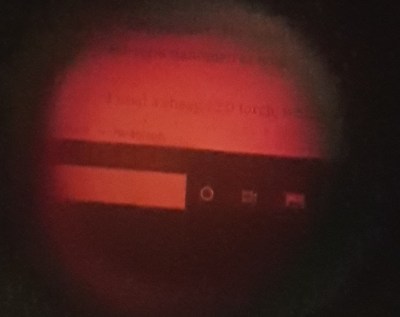
LCD monitor viewed through a monochromator set to pass red wavelength only, showing that images remain intact.

How does it work? Light enters the device via an opening at the base, and only the selected wavelength exits from the top. The dial’s range is from 450 nm to 640 nm (representing violet-blue to red), which [Doug] demonstrates by shining a white LED flashlight into the unit and showing how only green, red, or blue will exit from the top depending on the setting of the dial.

An interesting side note is that with this particular device, images can be rendered monochromatic but otherwise remain intact. [Doug] demonstrates this by viewing a small section of his LCD monitor through the device, as shown in the photo he managed to capture.

It’s an interesting piece of vintage equipment that shows what is possible with passive optical components and a clever mechanical design. These devices are therefore entirely manually-operated tools (at least until someone sticks a stepper motor to the adjustment dial to create an automated scanner, that is.)