Wearable soft robot grippers

Soft Robotics Hack Chat

Join us on Wednesday, October 27 at noon Pacific for the Soft Robotics Hack Chat with Ali Shtarbanov!

By this point in technological history, we’ve all been pretty well trained in how to think about robots. Designs vary wildly, but to achieve their goals, most robots have one thing in common: they’re rigid. Whether it’s a robot arm slinging a spot welder on an assembly line or a robot dog on patrol, they’re largely made of stiff, strong, materials that, more often than not, are powered by electric motors of some sort.

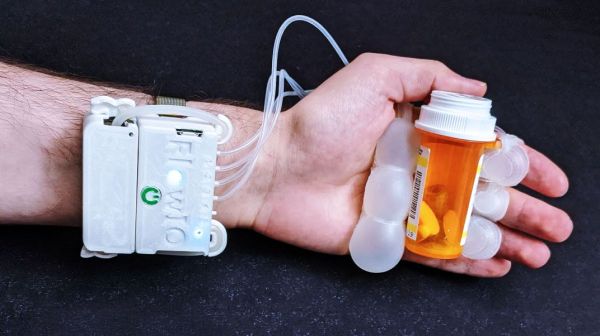
But just because that’s the general design palette for robotics doesn’t mean there aren’t other ways. Robots, especially those that are intended to be used in close association with humans, can often benefit from being a little more flexible. And that’s where the field of soft robotics shines. Rather than a skeleton of machined aluminum and powerful electric actuators, these robots tend more toward silicone rubber construction with pneumatic activation. Some soft robots are even compliant and safe enough to be wearable, giving humans the ability to do things they never could before, or perhaps restoring functions that have been lost to the ravages of entropy.

Soft robotics is a fascinating field with the potential to really revolutionize things like wearables and collaborative robotics. To help us understand a little more about what’s going on in this space, we’re pleased to welcome Ali Shtarbanov to the Hack Chat. Ali is a Ph.D. student at MIT’s famed Media Lab, where he studies Human-Computer Interaction. He’s particularly interested in making soft robotics as fast and easy to prototype as traditional robotics have become, and to this end, he invented FlowIO, an open-source platform for pneumatic control. We’ll use this as a jumping-off point to discuss the whole field of soft robotics, especially where it is now and where Ali sees it going in the future.

join-hack-chatOur Hack Chats are live community events in the Hackaday.io Hack Chat group messaging. This week we’ll be sitting down on Wednesday, October 27 at 12:00 PM Pacific time. If time zones have you tied up, we have a handy time zone converter.

The Longest Ever Flight Was Over 64 Days In A Cessna 172

Often, when we think of long-endurance flights, our first thoughts jump to military operations. Big planes with highly-trained crew will fly for long periods, using air-to-air refuelling to stay aloft for extended periods.

However, many of the longest duration flights have been undertaken as entirely civilian operations. The longest of all happened to be undertaken by that most humble of aircraft, the Cessna 172. From December 1958 to February 1959, Bob Timm and John Cook set out to make history. The duo remained aloft for a full 64 days, 22 hours and 19 minutes, setting a record that stands to this day.

A Test of Endurance

One might expect that such an effort was undertaken to push the envelope or to strike new ground in the world of aerospace engineering. However, the real truth is that Bob Timm was a slot machine mechanic and former bomber pilot who worked at the Hacienda casino in Las Vegas. Proprietor Doc Bailey was always on the hunt for promotional ideas, and Timm pitched his boss that a record attempt in a plane bearing the casino’s branding would be a good way to go. Bailey agreed, and committed $100,000 to the effort. 

Modifications to prepare the aircraft for the stunt took the best part of a year. The pint-sized Cessna was fitted with a 95-gallon belly tank, paired with a electric pump that could transfer fuel to the main wing tanks as needed. Special plumbing was also added that would allow the engine oil and filters to be changed while the engine was still running.

Continue reading “The Longest Ever Flight Was Over 64 Days In A Cessna 172”

Fail Of The Week: Alternator Powered Electric Go-Kart Doesn’t Go

What do you give a six-year-old who loves going fast but doesn’t like loud noises? Convert a gas go-kart to electric of course! (Video, embedded below.) That goal started [Robert Dunn] of Aging Wheels down a long path toward a go-kart that almost, but doesn’t quite… work.

If you’ve watched any of [Robert’s] videos, you know he doesn’t take the easy path. The man owns a Trabant and Reliant Robin after all. Rather than buy a battery pack, he built his own 5S24P pack from individual LiFePO4 cells. Those cells generally are spot welded, so [Robert] built an Arduino-controlled heirloom-quality spot welder. Now while the welder could handle thin nickel strips, it wasn’t up the task of welding high current nickel-plated copper. When attempts at a solution failed, [Robert] built a system of clamped copper bus bars to handle the high current connections for the batteries.

If batteries weren’t hard enough, [Robert] also decided he wasn’t going to use an off-the-shelf motor for this project. He converted a car alternator to operate as a brushless motor. We’ve covered projects using this sort of conversion before. Our own [Jenny List] even wrote a tutorial on it. [Robert] unfortunately has had no end of trouble with his build.

Continue reading “Fail Of The Week: Alternator Powered Electric Go-Kart Doesn’t Go”

Tackle The Monkey: Raspberry Pi Gets Round Screen

You could argue that the project to add a round screen to a Raspberry Pi from [YamS1] isn’t strictly necessary. After all, you could use a square display with a mask around it, giving up some screen real estate for aesthetics. However, you’d still have a square shape around the screen and there’s something eye-catching about a small round screen for a watch, an indicator, or — as in this project — a talking head.

The inspiration for the project was a quote from a Google quote about teaching a monkey to recite Shakespeare. A 3D printed monkey with a video head would be hard to do well with a rectangular screen, you have to admit. Possible with a little artistry, we are sure, but the round head effect is hard to beat. Honestly, it looks more like an ape to us, but we aren’t primate experts and we think most people would get the idea.

Continue reading “Tackle The Monkey: Raspberry Pi Gets Round Screen”

mechanical seven segment display

Mesmerizing Mechanical Seven-Segment Display

Seven-segment displays are ubiquitous. From where I’m writing this, I can see several without even having to swivel my chair. We’re all familiar with their classic visage; slightly italicized numbers that are brought to life by LEDs. There are a boatload of variants available– you can get displays with a decimal point, ones with multiple numbers, and even versions in just about any color you desire, but at the core they’re all basically the same thing- an array of LEDs sitting behind a faceplate. Except for those ones that have some gears inside.

Wait, what?

You read that right– a seven-segment display that contains gears, along with a handful of cams for good measure. Artist [Kango Suzuki] created this stunning all-mechanical seven-segment display that sequentially counts up from zero to nine when a thumbwheel is spun. All of the components are cut from wood and mesh together beautifully, complete with a satisfying click when the display rolls into a new digit, which you can hear in the video at the above link. You may recognize [Kango]’s style from this incredible mechanical clock he made a few years back. Unlike his earlier work, the seven-segment display is tiny, relatively speaking. Maybe we’ll see it integrated into a larger project some day, like a mechanical-digital clock.

We just love when somebody uses intricate mechanisms to artfully emulate some piece of existing tech. This isn’t even the first time we’ve seen a mechanical seven-segment display; [Peter Lehnér] built one back in 2019, and judging by [Kango]’s twitter feed, it appears to have inspired his design. There have even been a few other 3D printed ones over the years, but as far as we know this is the first wooden one– and, in true [Kango] fashion, its beautiful.

Thanks to [J. Peterson] for the tip!

Continue reading “Mesmerizing Mechanical Seven-Segment Display”