Get Your Raspberry Pi Jamming With MuPiBox

Over the years we’ve seen a lot of Raspberry Pi boards pushed into service as media players. In fact, second to emulating old game consoles, that’s probably the Pi’s most common vocation when it comes to DIY builds. But despite the popularity of this particular use case, it seems like each one has had to reinvent the wheel.

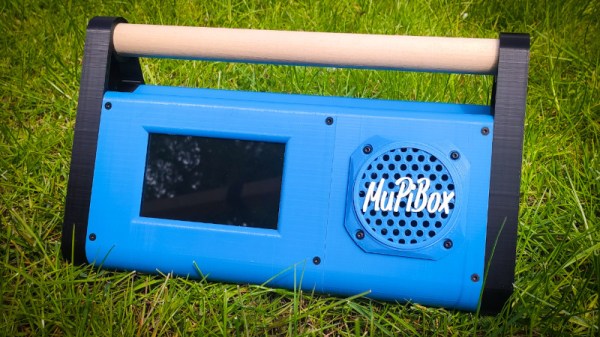
Perhaps there’s where MuPiBox fits in. Developed by [Eric Gerhardt] and [Olaf Split] with the assistance of [Andreas Lippmann] and [Andrew Frericks], this project aims to turn everyone’s favorite Linux single-board computer into everyone’s favorite music player. MuPiBox provides not only the software to run your new high-tech boom box, but it even standardizes the hardware design and provides a 3D printable enclosure — though naturally there’s still room for interpretation if you don’t want yours to look exactly like all the others.

Your MuPiBox can look like whatever you want.

At the very minimum you’ll need a Raspberry Pi, a HifiBerry MiniAmp, and a speaker, though the instructions also recommend you invest in a Pimoroni OnOff SHIM (or wire up something comparable) to facilitate more graceful shutdowns. For the best experience you’ll also want a five inch Waveshare touch screen display and a USB power bank so your beats can go mobile.

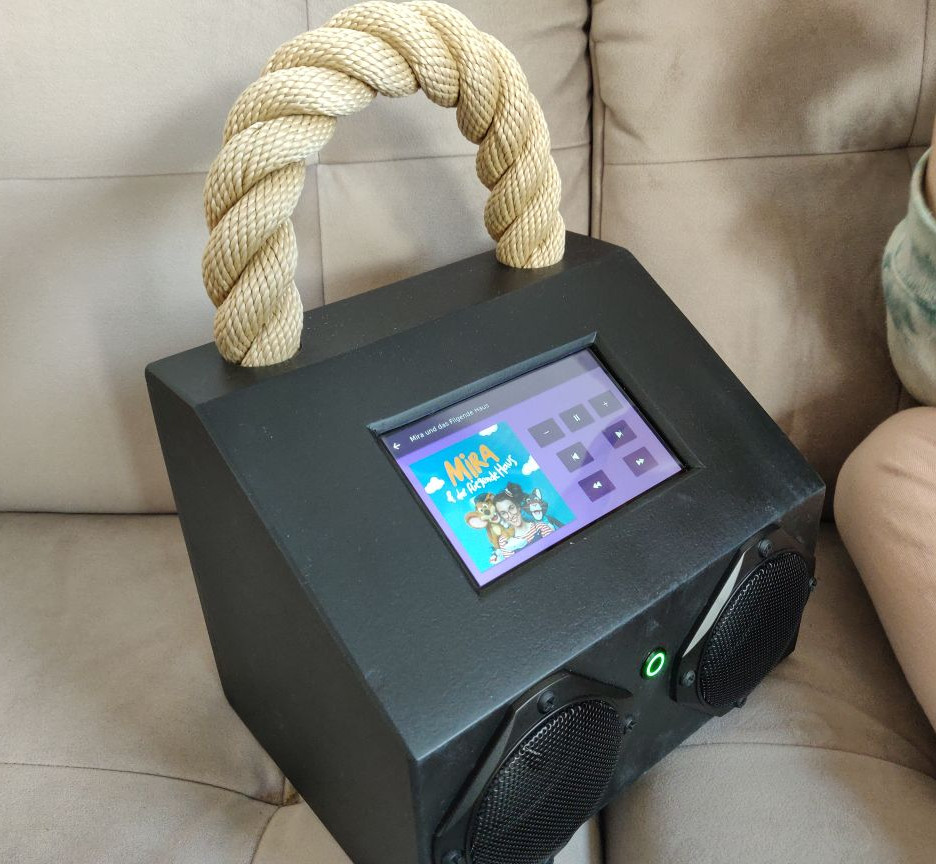
The video below shows off the polished stock GUI, which is simple enough that even children should be able to navigate around and find their favorite tracks. Which is good, especially since it’s in German. The video also shows off some advanced setup features so you don’t have to pull the SD card out of the Pi just to change the WiFi network it’s attached to. There’s also a web interface that you can access from other devices on the network.

It’s a slick project, and we really like the aesthetics of the 3D printable enclosure. But even if you don’t want to replicate the project exactly, there’s certainly components here which could be utilized in your own Pi media center build.

Continue reading “Get Your Raspberry Pi Jamming With MuPiBox”

2022 Hackaday Supercon Tickets On Sale Now

Did I tell you about the time that [Spetku] turned the schwag bottle into a Jacob’s Ladder?
Supercon Tickets go on sale right now! And the true-believer tickets usually sell out fast, so if you’re as excited about the thought of a real-life Supercon as we are, get yours now for a healthy discount.

We might be biased, but Supercon is our favorite conference of the year. Smaller than most and hardware-focused, you really can’t beat the signal/noise ratio of the crowd in attendance and the talks on the stage. People bring their projects, their great ideas, and their big dreams with them. And we have a cool badge to boot. It’s Hackaday, but in real life. And you should join us!

The conference starts on Friday Nov. 4th with registration, a mellow afternoon of badge-hacking, and a party to kick things off right. Saturday and Sunday are the main show, with a hacker village in the alley, workshops aplenty, and of course all of the talks. It’s only a weekend, but it’s one you’ll keep going back to in your mind for the whole year.

The Nitty Gritty Details

One hundred (100) True-believer Tickets are on sale now for $128 apiece, or until Aug. 29th. We call them True-believer Tickets because we haven’t even finished the call for proposals yet, much less selected the talks, but trust us, it’s going to be a good slate. (In past years, the True-believer tickets have sold out in as little as a day, so don’t sleep on this!) After that, regular admission is $256.

Of course, there’s always a back door if you want to sneak in for free. In our opinion, the coolest way to attend a conference is to give a talk, and you’ll get a complimentary ticket to boot! And even if you don’t get selected, we’ll give everyone who submits a serious talk proposal a ticket at the discounted price, so don’t hesitate. Volunteers also get in free, and we’ll be putting out the call on Aug 29th.

No matter how you get yourself a ticket, get one, and get to Supercon. We’re excited to see you in person again!

Steam Power Hack Chat

Join us on Wednesday, August 17 at noon Pacific for the Steam Power Hack Chat with Quinn Dunki!

The steam power age may be behind us now, but that doesn’t mean that the engineering that went into steam engines isn’t worth exploring. In a lot of ways, the steam age is what made modern engineering what we know it as today. Where wind- and water-powered devices could often work well enough with a couple of inches of tolerance, steam engines required parts measured to the hundredth or even thousandth of an inch. Optimizing steam engines required a deep understanding of thermodynamics, too, which unveiled more about the way the universe works than had ever been realized before. And the need for parts strong enough to withstand steam pressure and the lubricants needed to keep the wheels turning paved the way for advances in materials science and chemical engineering that are still paying dividends today.

Celebrating the achievements of steam power may seem anachronistic, but in light of everything steam has done for us, it makes a lot of sense. And that’s not to mention the cool aesthetics of steam engines, with beefy castings and brass parts sliding back and forth, complicated linkages doing who-knows-what to make the engine work on nothing more than a little bit of boiling water. There’s the attraction of danger, too; improperly built boilers can be a disaster, so building one that’s safe to use can be quite a challenge.

join-hack-chatAll this and more is what the steam hobby is all about, an area that Quinn Dunki has been exploring for a while now. Over on her YouTube channel, Quinn has documented the process of turning raw metal into a working steam engine and boiler, and is currently working on a bigger, more powerful engine. We’ve invited her on the Hack Chat to talk about all things steam — where to get started in the hobby, what kinds of things you can learn by building your own steam engines, and how her current builds are going. If you’ve ever wanted to explore steam power, here’s your chance to ask a real steam aficionado.

Our Hack Chats are live community events in the Hackaday.io Hack Chat group messaging. This week we’ll be sitting down on Wednesday, August 17 at 12:00 PM Pacific time. If time zones have you tied up, we have a handy time zone converter.

Sputtering Daguerreotypes, Batman!

The Daguerreotype was among the earliest photographic processes, long before glass plates or film, that relied on sensitizing a thin layer of silver on top of a copper plate. The earliest Daguerreotype plates were made physically, by rolling a copper-silver plate thinner and thinner until the silver layer was just right. Good luck finding a source of Daguerreotype plates made this way in 2022. (There are electroplating methods, but they all end up with chemically contaminated silver.)

On the other hand, magnetron sputtering is a process of depositing pure metal in thin layers using plasma, high voltages, and serious magnets, and [Koji Tokura] is making his own sputtered Daguerreotype plates this way, giving him the best of both worlds: the surreal almost-holographic quality of the Daguerreotype with the most difficult film preparation procedure imaginable.

The star of the show is [Koji]’s sputtering rig, which consists of a Tupperware glass sandwich box as a vacuum chamber and a microwave oven transformer as the high voltage source. In use, he pumps the chamber down, introduces a small amount of argon, and then lights up the plasma. The high voltage accelerates the plasma ions into a sheet of silver, and the silver particles that get knocked free coat the copper plate. A strong magnet creates a local plasma, which accelerates the coating procedure, but since [Koji] only had a relatively small magnet, he scans the plate with the magnet, using a scavenged 2D pen plotter mechanism.

Check out his video on the Hackaday.io page, and his Daguerreotype gallery as well. (We don’t think that they were all made with this procedure.)

The result is a chemically pure Daguerreotype plate produced in a seriously modern way, and we’d love to see the images in person. In these days of disposable images made by the AIs in your cell phone, it’s nice to see some people taking photography in strange directions. For instance, maybe you’d like to make your own ultra-large collodion plates. Or something else? If you do, show us!

DIY LED Bulb Lacks Correct Lugs, So M3 Bolts To The Rescue

[Damo] has an interesting LED bulb project with a neat twist: he converted some outdoor lighting to 12 V LED lighting with some self-designed bulb replacements and decided to reuse the existing GU10 sockets and wiring. That meant putting GU10 lugs onto his custom PCBs, but he ran into a snag.

These GU10 bulb lugs are tough to buy in small quantities. Luckily, M3 socket head bolts are a near-perfect match.

Those distinctive lugs that twist into GU10 sockets? [Damo] simply couldn’t find anywhere offering to sell them in small quantities. So he did what any enterprising hacker would do and found a substitute that was both accessible and economical: M3 bolts. Apparently, socket-headed M3 bolts are pretty much identical in size to GU10 lugs. Who’d have thought?

[Damo]’s retrofit worked great, and thanks to M3 bolts he was able to re-use the existing weatherproof wiring and sockets in his yard. His design files are here on GitHub.

We do love using things for other than their intended purpose, but as [Damo] points out, GU10 sockets are normally connected to mains power. So if you decide to use his design (or use GU10 sockets for your own purposes), be aware that you’ll have hardware that looks interchangeable with other (mains-connected) sockets, but isn’t. Be mindful of that, and take appropriate precautions. Avoiding electrical oopsies is always worth putting effort into, after all.

Mac Mini Mini

The Mac Mini has been roughly the same size and shape for 12 years, as the current design was released in June 2010. However, despite being the same general form factor, the internals has shrunk over the years. [Snazzy Labs] took advantage of this to make a miniaturized Mac Mini.

With a donor Mac in hand, they cracked it open and found an oversized power supply, a diminutive logic board, and a good bit of space. Unfortunately, the logic board attaches to a wide IO shield. He removed that, and the fan attached to the heatsink (checking to ensure it still booted). Relocating the WiFi antennas was the trickiest part of the whole build. Given that he wanted to shrink the power supply and the Mac Mini accepts just 12 volts, he devised a clever solution to use MagSafe as a connector. However, Magsafe negotiates over a complex protocol when attached. So, rather than smarten his port up, he dumbed the charger down by replacing it with a Microsoft Surface power supply spliced into the MagSafe connector.

With his mini Mac Mini board ready to go, he began designing a case to fit what was now a single-board computer. A fan of the channel offered a design reminiscent of the 2019 Mac Pro. Unfortunately, FDM printing struggled with the cheese-grater pattern, so [Snazzy Labs] printed it in resin with some mica powder. As a result, the mini mini looks fantastic while taking up just 28% of the volume of the original.

They’ve posted the STL files online with detailed instructions and a parts list if you want to recreate it at home. Perhaps with the smaller motherboard, it might be worth revisiting the Mac Mini inside a PowerBook hack from a few years ago. Video after the break.
Continue reading “Mac Mini Mini”

A Simple Streaming Radio Receiver

For those interested in a career in broadcast radio there aren’t many routes into the business. Student radio, pirate radio, and hospital radio usually feature somewhere near the start of any DJ’s resumé. Hospital radio stations often don’t have a transmission license and have historically relied on wired systems, but since those can’t reach everywhere they are now more likely to look to the Internet. [AllanGallop] has created the Mini Web Radio for the hospital station in the British city of Milton Keynes, a compact battery-powered single station streaming radio receiver that can pick up those tunes anywhere with a wireless network connection.

Inside the neatly designed 3D printed box the hardware is quite straightforward, a WeMos ESP32 board and a MAX98357A I2S digital amplifier module all powered by an 18650 cell. There’s a volume control and headphone socket, which is all that’s needed for the user interface. The software has code for both Arduino and Platform.io and is configured as you might expect through a web interface. Everything can be found in a handy GitHub repository should you wish to build one yourself. Meanwhile, it’s particularly pleasing as a Hackaday scribe to feature a project with roots in one’s own hackerspace, in this case, Milton Keynes Makerspace.

Thanks [Cid] for the tip!