men working on screw conveyor stem

Ingenious Indigenous Artful Screw Conveyor

Many of us have heard the name Archimedes’ screw — but not everyone knows the term screw conveyor.  These folks (sadly, the videographer at [Breeze Media] doesn’t tell us their names, or the company name) has the process of building screw conveyors down to a fine art.

Screw conveyors are useful, but many folks shy away from them because they look hard to make. In this video, we see how it’s done. The crew in this video are doing it in metal for large equipment, but the same methods could be used in plastic sheet or paper on a small scale.

It starts with cutting washers and slitting radially. When they’re distorted into the final shape the hole will close up, so the hole is a bit larger than the pipe that forms the center. They’re then given a slight spiral (think a lock washer) by walloping with a sledgehammer. It works. The slit edges are welded together to make a ‘compressed’ spiral, and the end is welded to the pipe

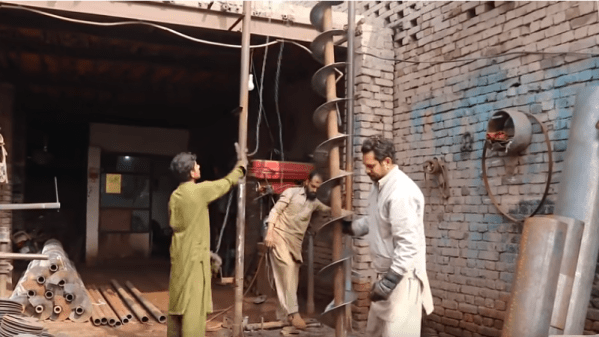
Now for the ingenious bit. They have a tall gantry, just a couple of pipe poles with a crossbar, set up in the factory yard. Below it, they’ve drilled a well. The free end of the pipe goes down the well. The bottom of the spiral is clamped to a baseplate around the well. Next, the pipe is hoisted up to form the final shape. Finally, everything is welded in place.

In the video after the break, they’re making a screw feeder. It needs a lower pitch for the section under the hopper. So they clamp several turns, pull the main section out, weld it, then move the clamp and make the feeder section.

Hacks are partially art, and screws are visually interesting. This piggy bank has one. Put one in your next hack!

Continue reading “Ingenious Indigenous Artful Screw Conveyor”

DIY Keyboard Can’t Get Much Smaller

The PiPi Mherkin really, really can’t get much smaller. The diminutive keyboard design mounts directly to the Pi Pico responsible for driving it, has a similar footprint, and is only about 9 mm thick. It can’t get much smaller since it’s already about as small as the Pi Pico itself.

Running on the Pi Pico is the PRK firmware, a keyboard framework that makes the device appear as a USB peripheral, checking the “just works” box nicely. The buttons here look a little sunken, but the switches used are available in taller formats, so it’s just a matter of preference.

We have to admit the thing has a very clean look, but at such a small size we agree it is perhaps more of a compact macropad than an actual, functional keyboard. Still, it might find a place in the right project. Design files are online, if you’re interested.

If you like small, compact keyboards but would prefer normal-sized keys, check out the PiPi Mherkin’s big brother, the PiPi Gherkin which gets clever with dual-function tap/hold keys to provide full functionality from only 30 keys, with minimal hassle.

Keyboards are important, after all, and deserve serious attention, as our own [Kristina Panos] knows perfectly well.

Someone setting down an arUco tag

Make Your Own Virtual Set

An old adage says out of cheap, fast, and good, choose two. So if you’re like [Philip Moss] and trying to make a comedy series on a limited budget rapidly, you will have to take some shortcuts to have it still be good. One shortcut [Philip] took was to do away with the set and make it all virtual.

If you’ve heard about the production of a certain western-style space cowboy that uses a virtual set, you probably know what [Philip] did. But for those who haven’t been following, the idea is to have a massive LED wall and tracking of where the camera is. By creating a 3d set, you can render that to the LED wall so that the perspective is correct to the camera. While a giant LED wall was a little out of budget for [Philip], good old green screen fabric wasn’t. The idea was to set up a large green screen backdrop, put some props in, get some assets online, and film the different shots needed. The camera keeps track of where in the virtual room it is, so things like calculating perspective are easy. They also had large arUco tags to help unreal know where objects are. You can put a wall right where the actors think there’s a wall or a table exactly where you put a table covered in green cloth.

Initially, the camera was tracked using a Vive tracker and LiveLink though the tracking wasn’t smooth enough while moving to be used outside of static shots. However, this wasn’t a huge setback as they could move the camera, start a new shot, and not have to change the set in Unreal or fiddle with compositing. Later on, they switched to a RealSense camera instead of the Vive and found it much smoother, though it did tend to drift.

The end result called ‘Age of Outrage’, was pretty darn good. Sure, it’s not perfect, but it doesn’t jump out and scream “rendered set!” the way CGI tv shows in the 90’s did. Not too shabby considering the hardware/software used to create it!

The Dangerously Delightful Homemade Rockets Of Thailand

Every once in a while, we here at Hackaday stumble across something that doesn’t quite fit in with all the other amazing hacks we feature, but still seems like something that our dear readers need to see as soon as possible. This video of homemade rockets in Thailand is one of those things.

It comes to us from our friend [Leo Fernekes], who documents a form of amateur rocketry that makes the Estes rockets of our youth look pretty tame. It’s far easier to watch than it is to describe, but for a quick summary, the rockets are bamboo rings with a steel pipe across the diameter. The pipe is packed with homemade gunpowder and provided with nozzles that create both thrust and rotation. When ignited by torches touched to seriously sketchy primers, the rocket starts to spin up, eventually rising off the launch pad and screwing itself into the sky on a twisting column of gray smoke.

At three or four meters across, these are not small vehicles. Rather than letting a steel pipe plummet back to Earth from what looks like several hundred meters altitude, the rocketeers have devised a clever recovery system that deploys a parachute when the rocket motor finally melts through some plastic straps. The use of banana tree bark as a heat shield to protect the parachute is simple but effective; which is really the way you can describe the whole enterprise. [Leo] has another way to describe it: “Dangerously negligent madness,” with all due respect and affection, of course. It looks like a big deal, too — the air is obviously filled with the spirit of competition, not to mention the rotten-egg stench of gunpowder.

Should you try this at home? Probably not — we can think of dozens of reasons why this is a bad idea. Still, it’s amazing to watch, and seeing how much altitude these cobbled-up rockets manage to gain is truly amazing. Hats off to [Leo] for finding this for us.

Continue reading “The Dangerously Delightful Homemade Rockets Of Thailand”

A Home Payphone

We can’t condone what [Bertrand] did as a kid to make him a fan of payphones, but we get his desire to have one of his own in his home. Even if you don’t want one yourself, he’s got some good shots of the insides of a real phone that came from a casino in Vegas.

As you might expect, these phones were built like tanks. They obviously took a lot of abuse. We had to wonder how much each one cost to produce back in the day. Cleaning up an old phone and getting it to work doesn’t seem like a big effort, but there’s one thing we didn’t think about. Turns out there is a backplate that holds the 50-pound phone up and you need special studs that screw into the phone to hold it up while you put screws through both pieces.

He did connect the phone successfully to a regular phone jack, but his goal was to let his 5-year-old use the phone so he decided to actually wire it to a phone line simulator that just provides a connection between two phones.

New York City recently ripped out its last payphones. They were replaced with multipurpose kiosks, but there are still privately-owned payphones in the city. Of course, you can always use an old payphone as a platform for a different project.

Sorry, Your Internet Connection Is Slow

How fast is your Internet connection? The days of 56K modems are — thankfully — long gone for most of us. But before you get too smug with your gigabit fiber connection, have a look at what researchers from the Network Research Institute in Japan have accomplished. Using a standard diameter fiber, they’ve moved data at a rate of 1 petabit per second.

The standard fiber has four spatial channels in one cladding. Using wavelength division multiplexing, the researchers deployed a total of 801 channels with a bandwidth over 20 THz. The fiber distance was over 50 km, so this wasn’t just from one side of a lab to another. Well if you look at the pictures perhaps it was, but with big spools of fiber between the two lab benches. The project uses three distinct bands for data transmission with 335 channels in the S-band, 200 channels in the C-band, and 266 channels in the L-band.

To put this into perspective, a petabit — in theory — could carry a million gigabit Ethernet connections if you ignore overhead and other losses. But even if that’s off by a factor of 10 it is still impressive. We can’t imagine this will be in people’s homes anytime soon but it is easy to see the use for major backhaul networks that carry lots of traffic.

We are still amazed that we’ve gone from ALOHA to 2.5-gigabit connections. Although the Raspberry Pi can’t handle even a fraction of the bandwidth, you can fit it with a 10-gigabit network card.

Wooden Keycaps Minus The CNC

What’s the most important part of the keycap? The average user-who-cares might tell you it’s the look and feel, but a keyboard builder would probably say the mounting style. That’s where the rubber meets the road, after all. For anyone trying to make their own keycaps, ‘the mount itself’ is definitely the correct answer. Try printing your own keycaps, and you’ll learn a lot about tolerances when it comes to getting the mount right.

Conversely, you could use a subtractive process like a wood mill to make keycaps. Sounds easy enough, right? But what about all of us who don’t have access to one? [cbosdonnat], who has no CNC, has blazed a cellulose trail, combining hand-tooled wooden keycaps with 3D-printed mounts to create fully-customized keycaps. It’s a great project with concise how-to, especially when it comes to building the jigs needed to keep the keycaps consistently sized and shaped.

It makes a whole lot of sense to start by hollowing out the bottom instead of shaping the business side first or even cutting out the key shape, since the mount is mechanically vital. Why waste time on the look and feel if the foundation isn’t there yet?

Hardwood is a must for DIY keycaps, because the walls need to be thin enough to both fit over the switch and within the matrix, and be sturdy enough not to break with use. We love the look of the varnish-transferred laser-printed logo, and only wish there was a video so we could hear the clacking.

There are all kinds of ways to put legends on DIY keycaps, like waterslide decals for instance.