Home Assistant Display Uses E-Ink

[Markus] grabbed an ESP32 and created a good-looking e-ink dashboard that can act as a status display for Home Automation. However, the hardware is generic enough that it could work as a weather station or even a task scheduler.

The project makes good use of modules, so there isn’t much to build. A Waveshare 2.9-inch e-ink panel and an ESP32, along with a power supply, are all you need. The real work is in the software. Of course, you also need a box to put it in, but with 3D printing, that’s hardly a problem.

Well, it isn’t a problem unless — like [Markus] — you don’t have a 3D printer. Instead, he built a wooden case that also holds notepaper.

The software uses ESPHome to interface with Home Assistant. There is a fair amount of configuration, but nothing too difficult. Of course, you can customize the display to your heart’s content. Overall, this is a great example of how a few modular components and some open-source software can combine to make a very simple yet useful project.

There are many ways to use an ESP32 in your home automation setup. Maybe you can salvage the e-ink displays. Just try not to get carried away.

Pi Pico Helps Restring Badminton Rackets

Stringing a badminton racquet is a somewhat complicated job. It needs to be done well if the racquet is to perform well and the player is to succeed. To that end, [kuokuo] built a machine of their own to do that very task. Even better, they’ve made it open source so other hobbyists can benefit from their work.

The build is named PicoBETH, which stands for Pico Badminton Electronic Tension Head. It’s based around the Raspberry Pi Pico, as you might imagine. The Pico is charged with controlling the stringing procedure via a stepper motor and lead screw, while using a load cell to measure string tension during the process. A small two-line character LCD serves as the user interface, along with some buttons, LEDs and a buzzer for feedback. The electronic stringing gear is mounted on to a traditional manual drop-weight stringing machine to execute the process faster and more accurately, at least in theory.

Files are on Github for those that wish to explore the build further. It’s not the first stringing machine we’ve featured here, either! Video after the break.
Continue reading “Pi Pico Helps Restring Badminton Rackets”

3D Printed Braille Trainer Reduces Barrier To Entry

Accessibility devices are a wonder of modern technology, allowing people with various needs to interact more easily with the world. From prosthetics to devices to augment or aid someone’s vision or hearing, devices like these can open up many more opportunities than would otherwise exist. A major problem with a wide array of these tools is that they can cost a fortune. [3D Printy] hoped to bring the cost down for Braille trainers which can often cost around $1000.

Braille trainers consist of a set of characters, each with six pins or buttons that can be depressed to form the various symbols used in the Braille system. [3D Printy]’s version originally included six buttons, each with a set of springs, that would be able to pop up and down. After some work and real-world use, though, he found that his device was too cumbersome to be effective and redesigned the entire mechanism around flexible TPU filament, allowing him to ditch the springs in favor of indentations and buttons that snap into place without a dedicated spring mechanism.

The new design is modular, allowing many units to be connected to form longer trainers than just a single character. He’s also released his design under the Creative Commons public domain license, allowing anyone to make and distribute these tools as they see fit. The design also achieves his goal of dramatically reducing the price of these tools to essentially just the cost of filament, provided you have access to a 3D printer of some sort. If you need to translate some Braille writing and don’t want to take the time to learn this system, take a look at this robotic Braille reader instead.

Thanks to [George] for the tip!

Continue reading “3D Printed Braille Trainer Reduces Barrier To Entry”

Trying To Build A Communications Device With A 1-Pound Laser And A 7805

You can get a red laser diode pretty cheap these days—as cheap as £1 in fact. [Beamer] had purchased one himself, but quickly grew bored with just pointing it at the walls. He decided to figure out if he could use it for some kind of communication, and whipped up a circuit to test it out.

To do the job, he designed a modulator circuit that could drive the laser without damaging it. The build is based around the common 7805 regulator and the venerable 555 timer IC. The 555 is set to pulse at a given rate with the usual array of capacitors and resistors. Its output directly drives the input of a 7805 regulator. It’s set up as a constant current source in order to deliver the correct amount of current to run the laser. The receiver is based around a photodiode, which should prove fairly straightforward.

[Beamer]’s still working on the full setup, but plans to use the laser’s pulses to drive a varying analog meter or something similar. Not every communications method has to send digital data, and it’s good to remember that! Video after the break.

Continue reading “Trying To Build A Communications Device With A 1-Pound Laser And A 7805”

Etch-A-Sketch Camera Is Open Source

The Etch-a-Sketch was a great toy if you were somehow born with the talent to use it. For the rest of us, it was a frustrating red brick filled with weird grey sand. [Every Flavor of Robot] has taken the irritating knob-encrusted oblong and turned it into something we can all enjoy, however, by building an Etch-a-Sketch camera!

The build is simple. It uses an ESP32 microcontroller to run the show, equipped with a camera. The camera is used to take a photo of the subject, and the image is then sent to a desktop computer. The desktop runs the image through an AI pipeline that generates a simplified version of the image, and the necessary G-Code to draw it on the Etch-A-Sketch. The toy’s knobs are operated by a pair of brushless motors which have been geared down to provide more torque.

It’s a neat project, and more details are available on GitHub. We’ve seen some other great mechanized Etch-a-Sketch builds before, too.

Continue reading “Etch-A-Sketch Camera Is Open Source”

Supercon 2023: Exploring The Elegance Of The Voja4

When you design an electronic badge, the goal is to make a device that’s interesting and has enough depth to keep your attendees engaged for the duration of the con but not so complicated that they can’t become proficient with it before they have to head home. It’s a difficult balance to nail down, and truth be told, not every Supercon badge has stuck the landing in this regard.

But if you’ve really done things right, you’ll create a piece of hardware that manages to outlive the event it was designed for. A badge that attendees continue to explore for months, and potentially even years, afterward. If the talk “Inside the Voja4” by Nathan Jones is any indication, we think it’s safe to say that goal was achieved with the Supercon 2022 badge.

During this forty-minute presentation, Nathan discusses what makes the 4-bit badge so fascinating from a technical standpoint and how it could theoretically be expanded to accomplish far more complex tasks than one might assume at first glance.

Continue reading “Supercon 2023: Exploring The Elegance Of The Voja4”

How To Lace Cables Like It’s 1962

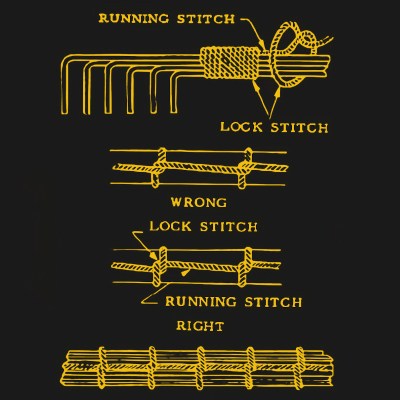
Cable harnesses made wire management a much more reliable and consistent affair in electronic equipment, and while things like printed circuit boards have done away with many wires, cable harnessing still has its place today. Here is a short how-to on how to lace cables from a 1962 document, thoughtfully made available on the web by [Gary Allsebrook] and [Jeff Dairiki].

It’s a short resource that is to the point in all the ways we love to see. The diagrams are very clear and the descriptions are concise, and everything is done for a reason. The knots are self-locking, ensuring that things stay put without being overly tight or constrictive.

According to the document, the ideal material for lacing cables is a ribbon-like nylon cord (which reduces the possibility of biting into wire insulation compared to a cord with a round profile) but the knots and techniques apply to whatever material one may wish to use.

Cable lacing can be done ad-hoc, but back in the day cable assemblies were made separately and electrically tested on jigs prior to installation. In a way, such assemblies served a similar purpose to traces on a circuit board today.

Neatly wrapping cables really has its place, and while doing so by hand can be satisfying, we’ve also seen custom-made tools for neatly wrapping cables with PTFE tape.