DIY laser microphone on cutting mat

Spy Tech: Build Your Own Laser Eavesdropper

Laser microphones have been around since the Cold War. Back in those days, they were a favorite tool of the KGB – allowing spies to listen in on what was being said in a room from a safe distance. This project by [SomethingAbtScience] resurrects that concept with a DIY build that any hacker worth their soldering iron can whip up on a modest budget. And let’s face it, few things are cooler than turning a distant window into a microphone.

At its core this hack shines a laser on a window, detects the reflected light, and picks up subtle vibrations caused by conversations inside the room. [SomethingAbtScience] uses an ordinary red laser (visible, because YouTube rules) and repurposes an amplifier circuit ripped from an old mic, swapping the capsule for a photodiode. The build is elegant in its simplicity, but what really makes it shine is the attention to detail: adding a polarizing filter to cut ambient noise and 3D printing a stabilized sensor mount. The output is still a bit noisy, but with some fine tuning – and perhaps a second sensor for differential analysis – there’s potential for crystal-clear audio reconstruction. Just don’t expect it to pass MI6 quality control.

While you probably won’t be spying on diplomats anytime soon, this project is a fascinating glimpse into a bygone era of physical surveillance. It’s also a reminder of how much can be accomplished with a laser pointer, some ingenuity, and the curiosity to see how far a signal can travel.

Continue reading “Spy Tech: Build Your Own Laser Eavesdropper”

Speeding Up Your Projects With Direct Memory Access

Here’s the thing about coding. When you’re working on embedded projects, it’s quite easy to run into hardware limitations, and quite suddenly, too. You find yourself desperately trying to find a way to speed things up, only… there are no clock cycles to spare. It’s at this point that you might reach for the magic of direct memory access (DMA). [Larry] is here to advocate for its use.

DMA isn’t just for the embedded world; it was once a big deal on computers, too. It’s just rarer these days due to security concerns and all that. Whichever platform you’re on, though, it’s a valuable tool to have in your arsenal. As [Larry] explains, DMA is a great way to move data from memory location to memory location, or from memory to peripherals and back, without involving the CPU. Basically, a special subsystem handles trucking data from A to B while the CPU gets on with whatever other calculations it had to do. It’s often a little more complicated in practice, but that’s what [Larry] takes pleasure in explaining.

Indeed, back before I was a Hackaday writer, I was no stranger to DMA techniques myself—and I got my project published here! I put it to good use in speeding up an LCD library for the Arduino Due. It was the perfect application for DMA—my main code could handle updating the graphics buffer as needed, while the DMA subsystem handled trucking the buffer out to the LCD quicksmart.

If you’re struggling with updating a screen or LED strings, or you need to do something fancy with sound, DMA might just be the ticket. Meanwhile, if you’ve got your own speedy DMA tricks up your sleeve, don’t hesitate to let us know!

Ultra-Low Power Soil Moisture Sensor

Electricity can be a pretty handy tool when it stays within the bounds of its wiring. It’s largely responsible for our modern world and its applications are endless. When it’s not running in wires or electronics though, things can get much more complicated even for things that seem simple on the surface. For example, measuring moisture in soil seems straightforward, but corrosion presents immediate problems. To combat the problems with measuring things in the natural world with electricity, [David] built this capacitive soil moisture sensor which also has the benefit of using an extremely small amount of energy to operate.

The sensor is based on an STM32 microcontroller, in this case one specifically optimized for low-power applications. The other low-power key to this build is the small seven-segment e-ink display. The segments are oriented as horizontal lines, making this a great indicator for measuring a varying gradient of any type. The microcontroller only wakes up every 15 minutes, takes a measurement, and then updates the display before going back to sleep.

To solve the problem resistive moisture sensors have where they’re directly in contact with damp conditions and rapidly corrode, [David] is using a capacitive sensor instead which measures a changing capacitance as moisture changes. This allows the contacts to be much more isolated from the environment. The sensor has been up and running for a few months now with the coin cell driving the system still going strong and the house plants still alive and properly watered. Of course if you’re looking to take your houseplant game to the next level you could always build a hydroponics system which automates not only the watering of plants but everything else as well.

A Foot Pedal To Supplement Your Keyboard

It’s 2025, and you’re still probably pressing modifier keys on your keyboard like a… regular person. But it doesn’t have to be this way! You could use foot pedals instead, as [Jan Herman] demonstrates.

Now, if you’re a diehard embedded engineer, you might be contemplating your favorite USB HID interface chip and how best to whip up a custom PCB for the job. But it doesn’t have to be that complicated! Instead, [Jan] goes for an old school hack—he simply ripped the guts out of an cheap USB keyboard. From there, he wired up a few of the matrix pads to 3.5 mm jack connectors, and put the whole lot in a little metal project box. Then, he hooked up a few foot pedal switches with 3.5 mm plugs to complete the project.

[Jan] has it set up so he can plug foot pedals in to whichever keys he needs at a given moment. For example, he can plug a foot pedal in to act as SPACE, ESC, CTRL, ENTER, SHIFT, ALT, or left or right arrow. It’s a neat way to make the project quickly reconfigurable for different productivity tasks. Plus, you can see what each pedal does at a glance, just based on how it’s plugged in.

It’s not an advanced hack, but it’s a satisfying one. We’ve seen some other great builds in this space before, too. If you’re cooking up your own keyboard productivity hacks, don’t hesitate to let us know!

The Capacitor Plague Of The Early 2000s

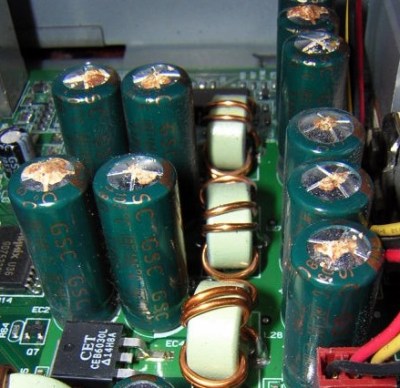
Somewhere between the period of 1999 and 2007 a plague swept through the world, devastating lives and businesses. Identified by a scourge of electrolytic capacitors violently exploding or splurging their liquid electrolyte guts all over the PCB, it led to a lot of finger pointing and accusations of stolen electrolyte formulas. In a recent video by [Asianometry] this story is summarized.

Blown electrolytic capacitors. (Credit: Jens Both, Wikimedia)

The bad electrolyte in the faulty capacitors lacked a suitable depolarizer, which resulted in more gas being produced, ultimately leading to build-up of pressure and the capacitor ultimately failing in a way that could be rather benign if the scored top worked as vent, or violently if not.

Other critical elements in the electrolyte are passivators, to protect the aluminium against the electrolyte’s effects. Although often blamed on a single employee stealing an (incomplete) Rubycon electrolyte formula, the video questions this narrative, as the problem was too widespread.

More likely it coincided with the introduction of low-ESR electrolytic capacitors, along with computers becoming increasingly more power-hungry, and thus stressing the capacitors in a much warmer environment than in the early 1990s. Combine this with the presence of counterfeit capacitors in the market and the truth of what happened to cause the Capacitor Plague probably involves a bit from each column, a narrative that seems to be the general consensus.

Continue reading “The Capacitor Plague Of The Early 2000s”

Illustrated Kristina with an IBM Model M keyboard floating between her hands.

Keebin’ With Kristina: The One With The Cheesy Keyboard

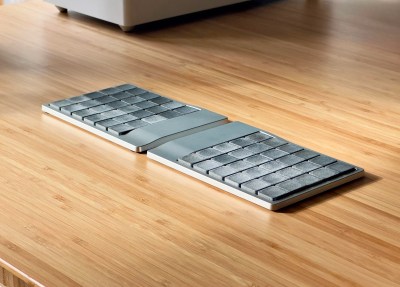
Let’s just kick things off in style with the fabulously brutalist Bayleaf wireless split from [StunningBreadfruit30], shall we? Be sure to check out the wonderful build log/information site as well for the full details.

Bayleaf, a stunning low-profile split keyboard.
Image by [StunningBreadfruit30] via reddit
Here’s the gist: this sexy split grid of beautiful multi-jet fusion (MJF) keycaps sits on top of Kailh PG1316S switches. The CNC-machined aluminium enclosure hides nice!nano boards with a sweet little dip in each one that really pull the keyboard together.

For the first serious custom build, [StunningBreadfruit30] wanted a polished look and finish, and to that I say wow, yes; good job, and nod enthusiastically as I’m sure you are. Believe it or not, [StunningBreadfruit30] came into this with no CAD skills at all. But it was an amazing learning experience overall, and an even better version is in the works.

I didn’t read the things. Is it open-source? It’s not, at least not at this time. But before you get too-too excited, remember that it cost $400 to build, and that doesn’t even count shipping or the tools that this project necessitated purchasing. However, [StunningBreadfruit30] says that it may be for sale in the future, although the design will have an improved sound profile and ergonomics. There’s actually a laundry list of ideas for the next iteration. Continue reading “Keebin’ With Kristina: The One With The Cheesy Keyboard”

Simulating Embedded Development To Reduce Iteration Time

There’s something that kills coding speed—iteration time. If you can smash a function key and run your code, then watch it break, tweak, and smash it again—you’re working fast. But if you have to first compile your code, then plug your hardware in, burn it to the board, and so on… you’re wasting a lot of time. It’s that problem that inspired [Larry] to create an embedded system simulator to speed development time for simple projects.

The simulator is intended for emulating Arduino builds on iPhone and Mac hardware. For example, [Larry] shows off a demo on an old iPhone, which is simulating an ESP32 playing a GIF on a small LCD display. The build isn’t intended for timing-delicate stuff, nor anything involving advanced low-level peripherals or sleep routines and the like. For that, you’re better off with real hardware. But if you’re working on something like a user interface for a small embedded display, or just making minor tweaks to some code… you can understand why the the simulator might be a much faster way to work.

For now, [Larry] has kept the project closed source, as he’s found that it wouldn’t reasonably be possible for him to customize it for everyone’s unique hardware and use cases. Still, it’s a great example of how creating your own tools can ease your life as a developer. We’ve seen [Larry]’s great work around here before, like this speedy JPEG decoder library.
Continue reading “Simulating Embedded Development To Reduce Iteration Time”