A 3d printed ghost next to the base of an LED tea light that has 4 LEDs poking out and the IR receiver port and micro-USB connector showing.

A Cold Light To Warm Your Heart

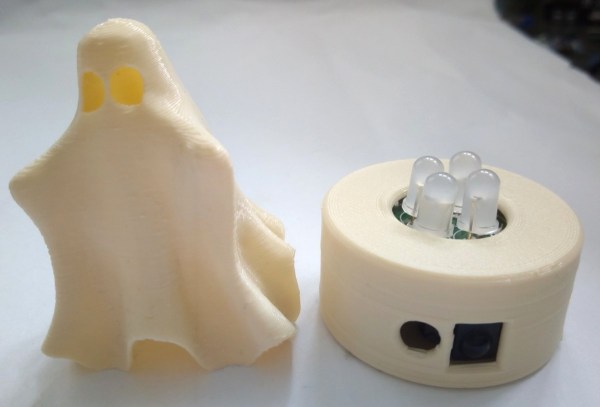
Halloween is coming fast and what better way to add to your Halloween ornamentation than [Wagiminator]’s cute NeoCandle tea light simulator.

[Wagiminator] has modified a 3D printed ghost along with extending [Mark Sherman]’s light simulation code to create a cute light that’s perfect for the holiday season. The NeoCandle uses an ATtiny85 chip to power four WS2812 NeoPixel jelly bean LEDs. The device has an infrared (IR) receiver to be able to control it from a remote that speaks the NEC protocol. There is a light sensor that allows the unit to dim when it detects ambient light and the whole unit is powered off of a micro-USB connection.

The ATtiny85 have limited program flash and [Wagiminator] packs in a lot of functionality in such a small package, squeezing in a bit-banging NeoPixel driver in only 18 bytes of flash that can push out a transfer rate 762 kpbs to update the LEDs. The pseudo-random number uses a Galois linear feedback shift register and comes in at 86 bytes of flash, with the IR receiver implementation code being the largest using 234 bytes of flash. The ATtiny85 itself has 8 KB of flash memory so maybe it’s possible to push [Waginminator]’s code to even more restrictive Atmel devices in the ATtiny family.

With microcontrollers and LEDs becoming so cheap and ubiquitous, making realistic flames with them is becoming accessible, as we’ve seen with previous projects on electronic candles.

Continue reading “A Cold Light To Warm Your Heart”

3D printed tea cup and saucer with the edges made out of 3d printed human teeth. Cup is sitting on a wooden table.

Relax And Have A Nice Cup Of Teeth

Halloween is just around the corner and what better way to add a little spooky decor than to 3D print [DaveMakesStuff]’s Teeth Cup.

It looks like [DaveMakesStuff] has done the equivalent of “kit bashing” by taking 3D models of a full teeth set and merging them with a tea cup. Details are pretty light but a Twitter thread (Nitter)has some clues about the process. The cup looks like it can be done in one print, support free. The smooth finish comes from bead blasting it which, as an added bonus in this case, provides the “dirty” look as the bead blaster is only normally used on nylon SLS prints.

Halloween is always a good source of inspiration for hacker projects and we’ve had many good entries from Halloween Hackfests of the past.

Continue reading “Relax And Have A Nice Cup Of Teeth”

Front of PCB for "SMT Garden" with glowing LEDs

Surface Mount Soldering Practice For Budding Electrical Engineers

Electronics components are steadily moving away from through hole parts to using surface mount technology (SMT) exclusively. While the small size of the SMT components can be intimidating, with a little practice, soldering can come pretty naturally. To help folks get over their fear of soldering small parts, [Alpenglow Industries] have created a charming board to practice SMT soldering skills on.

Back of "SMT Garden" PCB with only the 555 timer chips and inverter chip populated

[Alpenglow Industries] board, called the “SMT Garden”, combines a variety of SMT sizes ranging from 0402 to 1206 with beautiful PCB artwork to highlight the variety of LEDs on board. [Alpenglow Industries] provides detailed instructions on the various aspects of SMT soldering including what the terminology is and providing various techniques to help in soldering. The boards have practice “stalks” of surface mount component pads, so that folks can practice on columns of similarly sized SMT components to perfect their technique. The training stalks themselves aren’t functional but are there to provide practice for when folks feel comfortable soldering the LEDs, 555 timer and inverter chips to make the board functional.

[Alpenglow Industries] have provided all the KiCAD project files, gerbers and schematics available online. SMT soldering is more accessible than ever and when you can even use your phone as a microscope, it’s a good excuse to try it out, if you haven’t already.

Infrared controller and receiver board

Your Own Home IR Cloner

Many devices use infrared (IR) as a signalling medium like, for example, RGB LED strip controllers
modules and some TV controllers. Often times these signals aren’t meant for secure applications which means the functionality can be reproduced by simply replaying back the received signal verbatim. Sometimes, enterprising hackers want to reverse engineer the IR signals, perhaps to automate some tasks or just to get a better understanding of the electronics we use in our everyday life. To help in this effort, [dilshan] creates an open source hardware IR cloner device, capable of snooping IR signals and retransmitting them.

The IR cloner is a sweet little IR tool that can be used to investigate all sorts of IR signals.
In addition to the source code and design files, [dilshan] has also taken care to create detailed documentation as an addendum to the video on assembly and usage. Continue reading “Your Own Home IR Cloner”

laser cut acrylic coaster with rgb leds inside

Your Mug Will Like This Glowy Coaster

[Charlyn] wanted to highlight their friends beautiful mug collection, so the Glowy Coaster was born.

The coaster is made up of six layers of laser cut acrylic. The top and bottom layer are cut out of clear acrylic, providing a flat surface for the coaster. A top pattern layer made of pearl acrylic has a thin piece of vellum put underneath it to provide diffusion for the LED strip sandwiched inside. The middle layers are made of peach acrylic and have their centers hollowed out to provide room for the electronics inside. The top pearl acrylic layer gives the coaster, as [Charlyn] writes, a “subtle touch of elegance”. The coaster itself is screwed together by an M3 screw at each point of the hexagon that feed through to heat-set inserts.

inside of glowy coaster with electronics exposed

The electronics consist of a short NeoPixel strip, cut to include 12 LEDs pointed in towards the center of the coaster. The LEDs are driven by a Trinket M0 microcontroller with a LiPo “backpack” to provide power, attachment points for the exposed power switch and recharging capability to the 110 mAh 3.7 V battery. The code is a slightly modified NeoPixel “rainbow” wheel loop (source available as a gist). The design files are available through Thingiverse.

Creations like these highlight how much care and work goes into a project with minimal beauty, where decisions, like the opacity and thickness of the acrylic or countersinking the M3 screws, can have huge consequences for the overall aesthetic. [Charlyn] has an attention to detail that brings an extra touch of professionalism and polish to the project.

Coasters are a favorite for laser cutting and we’ve covered many different types, including
coaster bots, coaster engravers and even a color changing, drink sensing coasters.

Continue reading “Your Mug Will Like This Glowy Coaster”

three sensory bridge audio spectrum analyzers, one in use with a lit LED array plugged in, the other facing the camera and leaning against the third, all on a table

The Sensory Bridge Is Your Path To A Desktop Rave

[Lixie Labs] are no strangers to creating many projects with LEDs or other displays. Now they’ve created a low latency music visualizer, called the Sensory Bridge, that creates gorgeous light shows from music.

The Sensory Bridge has the ability to update up to 128 RGB LEDs at 60 fps. The unit has an on-board MEMS microphone that picks up ambient music to produce the light show. The chip is an ESP32-S2 that does Fast Fourier Transform trickery to allow for real-time updates to the RGB array. The LED terminal supports the common WS2812B LED pinouts (5 V, GND, DATA). The Sensory Bridge also has an “accessory port” that can be used for hardware extensions, such as a base for their LED “Mini Mast”, a long RGB array PCB strip.

The unit is powered by a 5 V 2 A USB-C connector. Different knobs on the device adjust the brightness, microphone sensitivity and reactivity of the LED strip. One of the nicer features is its “noise calibration” that can record ambient sound and subtract off the background noise frequency components to give a cleaner music signal. The Sensory Bridge is still new and it looks like some of the features are yet to come, like WiFi communication, accessory port upgrades and 3.5 mm audio input to bypass the on-board microphone.

The stated goals of the Sensory Bridge are to provide an open, powerful and flexible platform. This can be seen with their commitment to releasing the project as open source hardware, providing firmware, PCB design files and even the case STLs under a libre/free license. Audio spectrum analyzers are a favorite of ours and we’ve seen many different iterations ranging from ones using Raspberry Pis to others use ESP32s.

Video after the break!

Continue reading “The Sensory Bridge Is Your Path To A Desktop Rave”

Simple Stopwatch with two buttons, an eight digit 7-segment display and ICSP programming cable going into the board

Add An OSHW Certified Stopwatch To Your Toolkit

[MakingDevices] has created a simple stopwatch that makes for a nice introduction to surface mount electronic design and assembly. The project is open source hardware (OSHW) certified, with Gerbers, KiCAD files, and software all available.

Conceptually the stopwatch is straight forward, with a row of two four digit seven-segment displays being driven by a PIC18LF14k50 microcontroller through multiple NPN transistors. The PIC doesn’t quite have enough data lines to drive the two displays at once so an inverter is used to toggle between the two seven-segment blocks.

The circuit is continuously powered from a CR2032 coin cell battery. For normal usage with display, [MakingDevices] estimates 30+ hours of operation and 140+ hours without display, but still counting time. When idle, the “Extreme Low-Power (XLP)” capabilities of the PIC put the operating window estimates well beyond the self discharge of the coin cell battery. There’s an in circuit serial programming (ICSP) footprint that accepts a pogo pin TC2030-MCP-NL adapter for flashing the PIC.

Don’t let the simplicity fool you, this is a well documented project with detailed posts about the design, simulation and battery consumption. Various videos and glamour shots give a whole picture of the process, from design, assembly, testing to final validation.

It’d be wonderful to see the project extended or hacked on further, perhaps with a cute enclosure or case.

Continue reading “Add An OSHW Certified Stopwatch To Your Toolkit”