Star Wars Training Droid Uses The Force

Star Wars Training Droid

We all know the scene, Obi-Wan Kenobi gives Luke a helmet with the blast shield down. He tells Luke “Your eyes can deceive you. Don’t trust them. Stretch out with your feelings!” Easy for Obi-Wan to say – he doesn’t have a remote training droid flying around and shooting at him. [Roeland] and his team are working to create a real-life version of the training droid for Hackday’s Sci-Fi contest.

The training droid in Star Wars may not have had the Force on its side, but it was pretty darn agile in the air. To replicate this, the team started with a standard Walkera Ladybird micro quadcopter. It would have been simple to have a human controlling the drone-turned-droid, but [Roeland and co] wanted a fully computer controlled system. The Ladybird can carry a small payload, but it just doesn’t have the power to lift a computer and sensor suite. The team took a note from the GRASP Lab and used an external computer with a camera to control their droid.

Rather than the expensive motion capture system used by the big labs, the team used a pair of Wii Remote controllers for stereo vision. A small IR LED mounted atop the droid made it visible to the Wii Remotes’ cameras. A laptop was employed to calculate the current position of the droid. With the current and desired positions known, the laptop calculated and sent commands to an Arduino, which then translated them for the droid’s controller.

Nice work guys! Now you just have to add the blaster emitters to it!

Continue reading “Star Wars Training Droid Uses The Force”

Mirror Mirror On The Wall…

Who wouldn’t want a mirror that compliments them first thing in the morning? [Michael]’s  Magic Mirror does this and more.  [Michael] got the idea for his mirror during an epic Macy’s shopping trip with his girlfriend. While looking for a boyfriend chair, [Michael] noticed a mirror with a lighted sign behind it. Intrigued by the effect, [Michael] realized he could build it – and build it better!

Back at home [Michael] set to work. The Magic Mirror uses a piece of one-way mirror, similar to infinity mirrors. Instead of LED’s and another mirror, [Michael] wanted to embed an entire monitor behind the glass. In order to keep the mirror thin, [Michael] needed a monitor with cables exiting toward the side or bottom rather than directly out the back. He found what he was looking for in an Iiyama monitor. Yanking the case off a brand new LCD can be a bit nerve-wracking, but [Michael] pulled it off in pursuit of a thin final product.

Magic Mirror’s frame is built with standard 2×4 lumber. [Michael] had the foresight to include some cooling holes for the heat generated by the monitor. The heavy 6.5Kg final product required a double mounting point.

With a good-looking case, it was time to get some equally good-looking data to display. [Michael] used a Raspberry Pi to drive his display. He switched the Pi’s display mode to portrait and installed Chromium  in kiosk mode. The entire mirror is essentially a web page. [Michael] used some simple HTML, CSS and Javascript to pull time and weather data down from various feeds. The page is rendered in a clean Helvetica Nueve Neue font with matching icons. A handsome build indeed!

Droning On: The Anatomy Of A Drone


drone3

These last few weeks I’ve been ordering parts for the Hackaday Testbed, a basic quadcopter to be used here at Hackaday. The top question I see when surfing multicopter forums is “What should I buy”. Which frame, motors,  props, speed controller, and batteries are best?  There aren’t easy answers to these questions with respect to larger quads (300mm or more) . There are a myriad of options, and dozens of vendors to choose from.

Advice was simple in the pre-internet days of R/C planes and helicopters: just head down to your local hobby shop, and see what lines they carry. Hook up with a local club and you’ll have some buddies to teach you to fly. This advice still holds true to a certain extent. Some hobby shops carry the DJI and Blade lines of multicopters. However, their flight control systems are closed source. If you really want to dig in and adjust parameters, you have to either buy a combo package with an open source flight control system, or buy every part separately. Unfortunately, very few local hobby shops can afford to stock individual parts at that level.

In the online world there are several “big” vendors. The classic names in the USA have always been Tower Hobbies and Horizon Hobby. Some new US-based companies are All e RC and ReadyMadeRC. Several Chinese companies, including HobbyKing and RcTimer, maintain warehouses in several parts of the world. I’m only listing a few of the big names here. If I’ve left out your favorite site, drop some info in the comments section.

The killer with many of these companies is supply. A popular component will often go out of stock with no hint as to when it will be available again. When it comes to single parts like batteries, it’s easy to just order a different size. But what about motors or speed controls? These components need to be matched on a multicopter. Changing one for a different model means changing all of them, so it pays to buy a spare or two when ordering! Click past the break for a breakdown of some multicopter parts.

Continue reading “Droning On: The Anatomy Of A Drone”

ISEE-3 Dream Team Needs Your Help

ISEE-3 Moon flyby

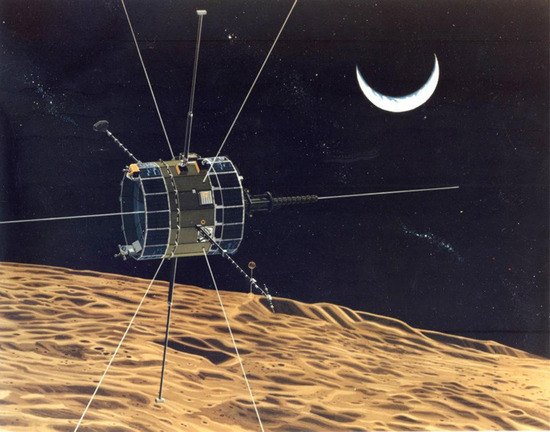
The mission to save ISEE-3 has is underway. The ISEE-3 Reboot Project has posted a crowdfunding campaign on Rockethub. When we first covered the ISEE-3 story no one had heard from it since 2008. Since then AMSAT-DL, an amateur radio group in Germany has received signals from the probe.

The ISEE-3 Reboot Project is being managed by [Dennis Wingo] and [Keith Cowing], the same two men who spearheaded the effort to recover NASA’s Lunar Orbiter images from old magnetic tapes. They did most of their work using restored 1960’s equipment in a vacant McDonald’s.

The goal of the ISEE Reboot Project is to return ISEE-3 to its original Earth/Sun Lagrange point L1 orbit. Once safely back in orbit, it will be used for STEM education, amateur radio solar predictions, and for science about the sun. In [Dennis Wingo’s] own words

If we can do this, we will have an open source, publicly accessible satellite data stream of the first open source satellite above Low Earth Orbit.

[Wingo] and [Cowing] aren’t alone in this effort; they are working with a venerable dream team. In addition to getting the nod from NASA, the team also has the help of [Dr. Robert Farquhar], the orbital dynamics guru who originally designed ISEE-3’s comet intercept orbit . [Farquhar] has an extremely personal reason to participate in this project. In 1982 he “borrowed” the satellite to go comet hunting. Once that mission was complete, he promised to give ISEE-3 back. [Dr. Farquhar] and his team designed the maneuvers required to bring ISEE-3 back to L1 orbit back in the 1980’s. This includes a breathtaking moon flyby at an altitude of less than 50 km. Seriously, we want to see this guy’s KSP missions.

Communicating with the ISEE-3 is going to take some serious power and antenna gain. The project has this in the form of a 21 meter dish at Moorehead State University in Kentucky, USA, and the Arecibo Observatory. Arecibo should be well-known to our readers by now. Moorehead and Arecibo have both received signals from ISEE-3. The reboot project team is also working directly with the AMSAT-DL team in Germany.

If this effort seems a bit rushed, that’s because time is very short. To implement [Dr. Farquhar’s] plan, ISEE-3 must fire its thrusters by late June 2014. In just two months the team needs to create software to implement ISEE-3’s communications protocols, obtain and install transmitters at Moorehead and Aricibo, and send some basic commands to the craft. Only then can they begin to ascertain ISEE-3’s overall health in preparation for a thruster burn.

If  the ISEE-3 Reboot Project succeeds, we’ll have an accessible satellite well outside of low Earth orbit. If it fails, Issac Newton will remain at the helm. ISEE-3 will fly right past Earth, not to be seen again until August 2029.

Continue reading “ISEE-3 Dream Team Needs Your Help”

a black aluminum heatsink with fins on a green matt

Hacking Manufacturing: Ordering A Custom Heatsink From China

Building a one-off hack is fun. But what happens when people like your hack so much they want to buy it? As many of us have discovered, going from prototype to product can be a frustrating, tedious, and often expensive process. [Nick] at Arachnid labs has documented the process of manufacturing a custom heatsink in China.

While designing the Re:Load Pro, [Nick] discovered that there were no enclosures with integrated heatsinks which suited his application. Rather than design an entire case from scratch, [Nick] used an aluminum extrusion. This is a common technique in the electronics world, and literally thousands of extrusion profiles are available. The problem was the heatsink. Only a custom part would fit the bill, so [Nick] created a CAD drawing detailing his design. Much like the case, the heatsink was an aluminum extrusion. The custom nature of the heatsink meant that [Nick] would need to pay mold/tooling costs as well as satisfy minimum orders.

Continue reading “Hacking Manufacturing: Ordering A Custom Heatsink From China”

Galvanic Isolated FTDI Board Saves Your USB Ports

Isolated FTDI circuitg

We work with some dangerous circuits in the pursuit of cool hacks. High voltage, high current, all demand some respect. We can protect our bodies easily enough, but what about that fancy new laptop or Macbook? [David] is here to help with his isolated versatile FTDI circuit.

Our computers are often wired directly into the circuits we’re hacking on. In days past that might have been a parallel or serial port. Today it’s almost always USB, specifically serial over USB. USB has some safety features built-in, such as current limiting. However, it isn’t too hard to blow up a USB port, or even a motherboard with high voltage. Galvanic isolation is a method of removing any electrical connection between two circuits. Connections can still be made through optical, magnetic, or capacitive methods, just to name a few. One of the simplest methods of galvanic isolation is the humble optocoupler.

Isolating a high-speed USB connection can get somewhat complex. [David] wisely chose to isolate things on the serial side of the FTDI USB to serial converter. He started with SparkFun’s open source FTDI Basic Breakout. Galvanic isolation is through either an Analog Devices ADuM 1402 or ADuM 5402. The 1402 needs a bit of power on the isolated side, while the 5402 includes an isolated DC/DC converter to provide up to 60mA.

[David] didn’t just stop at galvanic isolation. He also added ESD protection, over current protection, and multiple options which can be selected when the board is built. Nice work [David]! Now we don’t have to worry about our laptop frying when we’re blowing up wires.

A Tutorial On Using Linux For Real-Time Tasks

[Andreas] has created this tutorial on real-time (RT) tasks in Linux. At first blush that sounds like a rather dry topic, but [Andreas] makes things interesting by giving us some real-world demos using a Raspberry Pi and a stepper motor. Driving a stepper motor requires relatively accurate timing. Attempting to use a desktop operating system for a task like this is generally ill-advised. Accurate timing is best left to a separate microcontroller. This is why we often see the Raspi paired with an Arduino here on Hackaday. The rationale behind this is not often explained.

[Andreas] connects a common low-cost 28BYJ-48 geared stepper motor with a ULN2003 driver board to a Raspberry Pi’s GPIO pins. These motors originally saw use moving the louvers of air conditioners. In general, they get the job done, but aren’t exactly high quality. [Andreas] uses a simple program to pulse the pins in the correct order to spin the motor. Using an oscilloscope, a split screen display, and a camera on the stepper motor, [Andreas] walks us through several common timing hazards, and how to avoid them.

The most telling hazard is shown last. While running his stepper program, [Andreas] runs a second program which allocates lots of memory. Eventually, Linux swaps out the stepper program’s memory, causing the stepper motor to stop spinning for a couple of seconds. All is not lost though, as the swapping can be prevented with an mlockall() call.

The take away from this is that Linux is not a hard real-time operating system. With a few tricks and extensions, it can do some soft real-time tasks. The best solution is to either use an operating system designed for real-time operation, or offload real-time operations to a separate controller.

Continue reading “A Tutorial On Using Linux For Real-Time Tasks”