Raspberry Pi Controlled Chicken Door

We’re not sure if the Chickens know it yet, but they could be one of the reasons for all this IoT craze now a days. Look for chicken coop, and out come dozens of posts from the Hackaday chest.

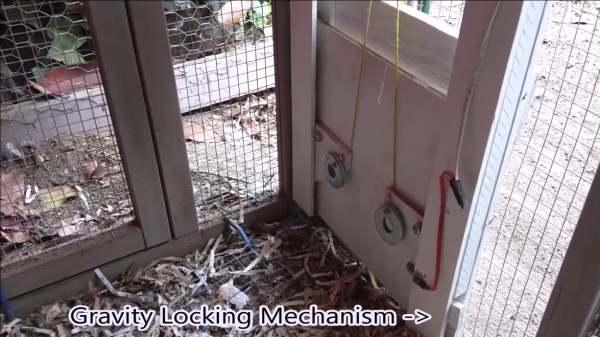
Here’s another one from self confessed lazy engineer [Eric]. He didn’t want to wake up early to let his chickens out in the morning, or walk out to the coop to lock them up for the night to protect them from predators like Foxes, Raccoons and Opossum. So he built a Raspberry-Pi controlled chicken coop door that automates locking and unlocking. The details are clear from his video which you can watch after the break. The door mechanism looks inspired from an earlier anti-Raccoon gravity assist door.

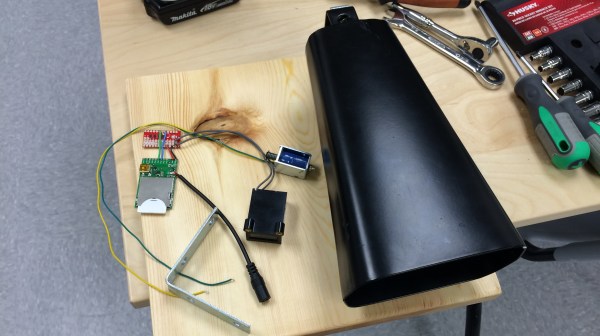
The hardware (jpg image) is simple – a couple of hall sensors that detect the open/close status of the coop door that is driven by a DC motor via a bridge controller. The whole setup is controlled using a Raspberry-Pi and this is where the fun starts – because he can now add in all kinds of “feature creep”. Motion sensor, camera, light array, and anti-predator gizmos are all on his drawing board at the moment. Add in your feature requests in the comments below and let’s see if [Eric] can build the most advanced, complicated, gizmo filled chicken coop in the Universe. Combine that with this design, and it could even turn out to be the most beautiful too.

Continue reading “Raspberry Pi Controlled Chicken Door”

Restoring A Vintage PDP-11/04 Computer

[MattisLind] spent one and a half years to complete restoration of a Digital Equipment Corporation (DEC) PDP-11/04 including peripherals like a TU60 tape drive and a LA30P Decwriter printing terminal. The computer is now able to run CAPS-11 which is a very simple operating system and also CAPS-11/BASIC. Just like the project itself, his blog post is quite long filled with interesting details. For a tl;dr version, check the video after the break.

This system originally belonged to Ericsson and [MattisLind] received it from Ericsson computer club, EDKX. He was lucky to have access to online resources which made the task easier. But it still wasn’t easy considering the number of hardware faults he had to tackle and the software challenges too. The first task was obviously looking at the Power supply. He changed the big electrolytic capacitors, and the power supply seemed to work well with his dummy load, but failed when hooked up to the backplane of the computer. Some more digging around, and a replaced thyristor later, he had it fixed. The thyristor was part of a crowbar circuit to protect the system from over-voltages should one of the main switching transistors fail.

With the power supply fixed, the CPU still wouldn’t boot. Some sleuthing around, and he pin pointed the bus receiver chip that had failed. His order of the device via a Chinese ebay seller was on the slow boat, so he just de-soldered a device from another board which improved things a bit, but it was still stuck in a loop. A replacement communications board and the system now passed diagnostics check, but failed memory testing. This turned out to be caused be a faulty DIP switch. He next tackled all the software challenges in getting the CPU board up to speed.

Continue reading “Restoring A Vintage PDP-11/04 Computer”

Internet Of Cowbell

If this is a sign of the times, the Internet of Things promises a lot of entertainment for hackers who can come up with wacky ideas and interactive projects. [Brandon] built a cowbell that rings when you tweet #morecowbell. Why? Because!

On the hardware side it is quite simple, and can be built in a number of different ways depending on the parts you have lying around. [Brandon] used an Electric Imp and its corresponding breakout board. A Sparkfun mini FET shield helps drive the solenoid that hits the cowbell. And because he had one lying around, he added a counter across the solenoid to count the number of times the Twitterati have rung the Cowbell.

The code for the Electric Imp consists of two parts – the “agent code” that runs on a server in the Electric Imp Cloud and the “device code” that runs on the imp itself – and is available at this Git link. Once you tweet with the hashtag, the Cowbell replies back, randomly selecting one from a list of stored responses. Would be nice to see a video of the Cowbell in action. And if it can be made to play the Salsa beat.

Repurposing A Palm Portable Keyboard

Typing comfortably on a Smart Phone is best done using an external keyboard, especially if you spend a lot of time on IRC or use other chat apps. Obviously, the keyboard needs to be portable too. [cy384] felt the current crop of portable keyboards left a lot to be desired in terms of build quality and feel. That’s when the Palm Portable Keyboard (PPK) caught his eye. It’s small enough to fold up and fit in a pocket, yet unfolds to a size big enough to feel comfortable while typing. Unfortunately, the version he preferred to use did not have either a Bluetooth or a USB interface, so he built up this Palm keyboard adapter.

The portable keyboards have a serial interface and custom connectors depending on the Palm model they were designed to connect to. [cy384]’s goal was to adapt the PPK as a generic USB HID keyboard using an Arduino Pro Mini clone, with a 3D printed adapter for both of the keyboard types that he had. The keyboards  use inverted TTL logic at 9600 baud with no parity and one stop bit. Some handshaking needs to be taken care of and there’s a low power mode that needs to be managed via the Arduino code. He was lucky to get his hands on a reference document that provided the hardware and software details to help him crack all of this. His Github repository has the code and 3D printable files for the adapters.

High Speed SSD1306 Library

[Lewin] wrote in to tell us about a high speed library for Arduino Due that he helped develop which allows interfacing OLED displays that use the SSD1306 display controller, using DMA routines for faster display refresh time.

Typically, displays such as the Monochrome 1.3″ 128×64 OLED graphic display , are interfaced with an Arduino board via the SPI or I2C bus. The Adafruit_SSD1306 library written by [Limor Fried] makes it simple to use these displays with a variety of Arduinos, using either software or hardware SPI. With standard settings using hardware SPI, calls to display() take about 2ms on the Due.

[Lewin] wanted to make it faster, and the SAM3X8E on the Due seemed like it could deliver. He first did a search to find out if this was already done, but came up blank. He did find [Marek Buriak]’s library for ILI9341-based TFT screens. [Marek] used code from [William Greiman], who developed SD card libraries for the Arduino. [William] had taken advantage of the SAM3X8E’s DMA capabilities to enable faster SD card transfers, and [Marek] then adapted this code to allow faster writes to ILI9341-based screens. All [Lewin] had to do was to find the code that sent a buffer out over SPI using DMA in Marek’s code, and adapt that to the Adafruit library for the SSD1306.

There is a caveat though: using this library will likely cause trouble if you are also using SPI to interface to other hardware, since the regular SPI.h library will no longer work in tandem with [Lewin]’s library. He offers some tips on how to overcome these issues, and would welcome any feedback or testing to help improve the code. The speed improvement is substantial. Up to 4 times quicker using standard SPI clock, or 8 times if you increase SPI clock speed. The code is available on his Github repo.

Tube Map Radio And Denki Puzzles

Sometimes, awesomeness passes us by and we don’t notice it until a while later. This is from 2012, but it’s so friggin’ insane we just have to cover it even if it’s late. Yuri Suzuki is an installation artist who designed the Tube Map Radio and Denki Puzzles.

The Tube Map Radio is inspired by a diagram created by the original designer of the London Tube map, Harry Beck, which shows the lines and stations of the London Underground rail network as an annotated electrical circuit. Iconic landmarks on this map are represented by components relating to their functions, including a speaker where Speaker’s Corner sits, battery representing Battersea Power Station and Piccadilly Circus marked as Piccadilly Circuit. The work was commissioned by the Design Museum London, and the PCB layout was done by Masahiko Shindo (Shindo Denki Sekkei). The idea was to bring the electronics out of the “black box” and not just display it, but to have it laid out in a fashion that people could try to understand how it really works.

The other project called Denki Puzzles is equally remarkable. It’s a kit meant to teach electronics, using a set of snap-fit components. But instead of having all “bricks” or units of the same shape, the Denki Puzzles are a collection of printed circuit board pieces whose form indicate a particular function. Fit the pieces together as a sort of physical circuit diagram and you’ll be able to build working electronics. For example, the LED unit looks like a 8 pointed star, and the resistance unit looks like a resistance symbol. Check out some pictures and a video after the break

Photo’s Credit : Hitomi Kai Yoda.

Continue reading “Tube Map Radio And Denki Puzzles”

Temperature, Altitude, Pressure Display

During a recent trip to Bhutan, [electronut] wished for a device that would show the temperature and altitude at the various places he visited in the Kingdom. Back home after his trip, he built this simple Temperature, Altitude and Pressure Display Device using a few off the shelf parts.

Following a brief search, he zeroed in on the BMP 180 sensor which can measure temperature and pressure, and which is available in a break-out board format from many sources. He calculates altitude based on pressure. The main parts are an Arduino Pro Mini clone, a BMP180 sensor and a Nokia 5110 LCD module. A standard 9V battery supplies juice to the device. A push button interface allows him to read the current parameters when pressed, thus conserving battery life.

Standard libraries allow him to interface the LCD and sensor easily to the Arduino. He wrapped it all up by enclosing the hardware in a custom laser cut acrylic box. The result is bigger than he would like it to be, so maybe the next iteration would use a custom PCB and a LiPo battery to shrink it in size. While at it, we think it would be nice to add a RTC and some sort of logging capability to the device so it can store data for future analysis. The schematic, code and enclosure drawing are available via his Github repository.