20 MPH IKEA Poäng Chair With Aerospace-Inspired Control Panel

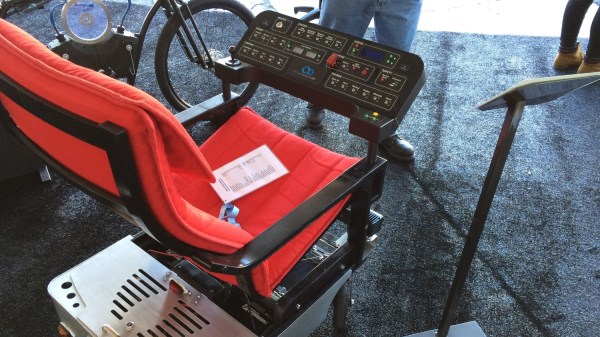
Spending time at work sitting on the same drab chair can get boring after a while, even if you’re lucky to use a comfortable recliner. If you want to win the Office Olympics, you need something with a bit of pep. [StuffAndyMakes] wanted to build a completely ridiculous motorized office chair. A couple of years in the making, and he’s ready to unleash the 20 MPH IKEA Poäng chair with aerospace-inspired control panel!

The OfficeChairiot MkII, as he has christened it aptly,  is a motorized IKEA Poäng comfy chair. It uses off-the-shelf scooter parts to roll around : Batteries, motors, chains, sprockets, tires, axles, and  bearings. The OfficeChairiot MkII is basically three main parts – the Chassis, the Control Panel and the comfy chair. One of the main parts of the chassis is the motor controller  – The Dimension Engineering Sabertooth 2×60 motor controller – which is also used in beefy battlebots. It’s capable of carrying 1,000 lbs. of cargo and can feed the drive system up to 60 amps per motor channel .

The brain on the chassis is an Arduino Mega which can be controlled via a hand held remote. The Mega also receives data from various sensors for motor temperature, power wire temperature, ambient air temperature, wheel RPM’s, Accelerometer’s, seat occupancy and GPS data. The firmware is designed to ensure safety. The hand held remote needs to ping the on-board Arduino twice a second. If it doesn’t hear from the Remote for whatever reason, the unit stops and turns off the lights.

The Control Panel is one crazy collection of switches, buttons, displays, a missile switch, a master key switch – in all over 30 switches and buttons. All of the devices on the panel are controlled via a second Arduino Mega, helped by a custom multiplexer board to help connect the large number of devices.

Here are a few more features the OfficeChairiot MkII boasts of :

  • 1.5 Horsepower from two 500W scooter motors
  • 20W stereo and MP3 sound effects
  • Weapons sounds, 15 different fart sounds, car alarm, horns, etc.
  • All LED lighting: Headlights, turn signals, 88 undercarriage RGB LEDs
  • Plenty of homemade PCB’s
  • Custom built aluminum body panels (with help from Local Motors, the people behind the 3D printed car)

Aside from the handcrafted wood chassis and circuits boards and firmware, it’s all off-the-shelf stuff. [StuffAndyMakes] plans on open-sourcing the schematics, C++ code and CAD drawings – so post some comments below to motivate him to do so soon. We’d sure like to see a few more of these being built, so that Office Chair racing becomes a competitive sport. Check out the video after the break.

Continue reading “20 MPH IKEA Poäng Chair With Aerospace-Inspired Control Panel”

Training Fish To Feed Themselves

We’ve featured quite a few aquarium and fish feeder hacks on our blog. [RoboPandaPDX] thought of taking it up a notch and make an interactive fish feeder. He built a Fish feeder that train’s them to feed themselves.

A copper bar hangs from the middle of a metal cylinder – much like a bell. The end of the bar has a fish lure. When a fish pushes the lure, the copper bar touches the metal cylinder and  closes the circuit. This signal goes to an Arduino. To catch the attention of the fishes and to “teach” them, an RGB LED is used. The fish need to figure out that the feeder will dispense food only when the LED is ON and the Lure is pushed. If the fish figure that out, and push the lure when the LED is on, a servo is activated which pushes the feeder to deliver 1 unit of fish food. While at it, he added a couple of bells and whistles. A buzzer to indicate when the Lure switch is closed and a 2 line LCD shows how many times the switch has been activated and how long the program has been running.

A Sparkfun  open logger stores the hit count and the minutes and seconds of the hit for data analysis later on. The good news is that it seems to be working. The current code activates the feeder for 30 to 60 minutes every day, which is indicated by the LED. At the end of 9 days,  [RoboPandaPDX] found that the goldfish would hit the Lure when the LED turned on, and then turn around to face where the feeder would dispense food in to the tank. His next plan is to put up some obstacles along the path to see if the fish learn some new tricks. His schematic looks a little iffy (the Lure switch is connected to the RST pin of the Arduino), and it seems he cannot remember why he ever did that. He’s happy that it works though, but we’re sure that’s not the right way to wire it up.

[RoboPandaPDX] is looking for suggestions on improving his interactive feeder, so if you have any, do add them in the comments below.

If you need some more fish feeder ideas, check out this and this that we blogged about earlier.

Resource Monitoring Solution

Electricity, Gas and Water – three resources that are vital in our daily lives. Monitoring them using modern technology helps with conservation, but the real impact comes when we use the available data to reduce wasteful usage over time. [Sébastien] was rather embarrassed when a problem was detected in his boiler only during its annual inspection. Investigations showed that the problem occurred 4 months earlier, resulting in a net loss of more than 450 cubic meters, equivalent to 3750 liters per day (about 25 baths every day!). Being a self professed geek, living in a modern “connected” home, it rankled him to the core. What resulted was S-Energy – an energy resource monitoring solution (translated) that checks on electricity, gas and water consumption using a Raspberry Pi, an Arduino, some other bits of hardware and some smart software.

[Sébastien] wanted a system that would warn of abnormal consumption and encourage his household folks to consume less. His first hurdle was the meters themselves. All three utilities used pretty old technology, and the meters did not have pulse data output that is commonplace in modern metering. He could have replaced the old meters, but that was going to cost him a lot of money. reflective-power-meter-sensor
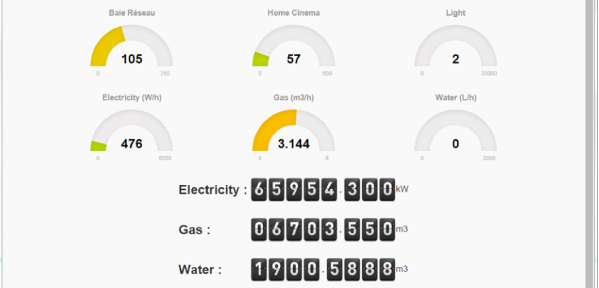
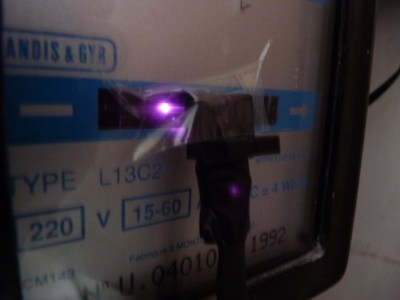
So he figured out a way to extract data from the existing meters. For the Electricity meter, he thought of using current clamps, but punted that idea considering them to be suited more for instantaneous readings and prone for significant drift when measuring cumulative consumption. Eventually, he hit upon a pretty neat hack. He took a slot type opto coupler, cut it in half, and used it as a retro-reflective sensor that detected the black band on the spinning disk of the old electro-mechanical meter. Each turn of the disk corresponds to 4 Watt-hours. A little computation, and he’s able to deduce Watt-hours and Amps used. The sensor is hooked up to an Arduino Pro-mini which then sends the data via a nRF24L01+ module to the main circuit located inside his house. The electronics are housed in a small enclosure, and the opto-sensor looks just taped to the meter. He has a nice tip on aligning the infra-red opto-sensor – use a camera to check it (a phone camera can work well).

Continue reading “Resource Monitoring Solution”

Another Radio Module For IoT Fun – EMW3162

The availability of cheap radio modules is making them ubiquitous in an increasing number of projects that we have been seeing recently. The usual go-to solution is using any one of the several modules based on the ESP8266 device. [Willem] wrote in to share with us his experiences with another radio module – the EMW3162 from MXChip, which at $10 isn’t as cheap as the ESP8266 modules, but is a more capable, power packed, device.

The EMW3162 (PDF datasheet) is a low-power embedded WiFi module with integrated wireless LAN, and a STM32F205 Cortex-M3 microcontroller that runs a “self-hosted” WiFi networking library and software application stack. The microcontroller has 1M flash, 128k RAM and runs at 120MHz. And since MXChip is a Broadcom partner, they are allowed to use the WICED_SDK.

The on-board ARM M3 means all kinds of useful interfaces are available: UART, SPI, I2C, ADC, DAC, PWM, TIMERS, GPIO, and a JTAG flash interface. The good news could be on the power consumption figures – the module is touted to be low-power, and the data sheet shows 7mA when connected to an access point but with no data transfer. When transmitting at 20kbps, the current draw is about 24mA, which goes up to 320mA at 11Mbps.

[Willem] has his EMW3162_WICED repository up on Github, but also take a look at the MXChips MICO (Mico-controller based Internet Connectivity Operation System) repository. At the moment, he has it working using Linux, with a gnu gcc compiler and a JLINK JTAG programmer. He also has the WICED SDK working and has a WiFi AP with an on-board 120MHz arm chip. It would be interesting to hear about other users’ experiences with this radio module. Do let us know in the comments below!


OpenSelfie Photobooth

Hackaday Prize Worldwide: Makers Asylum

Several weeks before we launched the Hackaday Prize 2015 officially, I was asked to set up a local event in Mumbai to help spread the word about the event to local Makers. Since I also help run a local maker space, Makers’ Asylum, we decided to have a Bring-a-Hack evening on March 21st at the Asylum.

It was a packed day at the Asylum. We had an Aeromodeling workshop in the morning. One bunch was building a quad bike from old bicycle frames, and another was doing something similar using PVC pipes. A third bunch was building a work table from a recycled wooden pallet. All this before we even hit lunch hour. I set up my OpenSelfie photobooth, and everyone quickly wolfed down a lunch of Biryani. We started off late in the afternoon with a quick round of introductions.


First up was Siji Sunny, who quickly setup his latest hack – an Intel Atom NUC running Ubuntu + a WiFi router and he had media streaming over the local network from his Phone. Something like AirPlay, but using open source software – ffmpeg, ffstream and ffserver.

Continue reading “Hackaday Prize Worldwide: Makers Asylum”

GT2 Belt Drive Conversion Of Printrbot Simple

The early versions of the Printrbot Simple at about $300 were cheap enough for even the most cash-strapped hackers to put on their desks. Obviously, for that cost, a lot of design compromises were needed to keep it cheap. Sometimes, changes carry forward to the next iteration at no cost increase. One such improvement in the current version of the Printrbot is the belt drive. Unfortunately, if you have one of the late 2013 – early 2014 wood models, it is most likely being driven by a fishing line that loops over a rubber hose attached to the stepper motor. [jason] describes the process of upgrading the Printrbot Simple to a GT2 belt drive , using the designs posted by Thingiverse contributor [iamjonlawrence].

The trouble with the fishing line drive was that it would tend to get loose over time and needed to be pulled taut. Also, it affected precision when the line tended to wander over the drive shaft. The good thing with having rapid prototyping tools is you can make bootstrap improvements using them. Once the parts for the upgrade were printed, [jason] only needed some bearings, GT2 belts and pulleys to complete the upgrade. For those wanting to upgrade their old Printrbot Simple machines, [jason] guides you through the whole process via some detailed photographs and listing out the gotcha’s that you need to be careful about.

Hackaday Prize Worldwide: Maker’s Asylum Meetup In Mumbai

I am excited to announce Hackaday’s first ever event in India. We have a huge readership in the country and because I am based in Mumbai there is an opportunity to organize some events. On this Saturday, March 21st, at Maker’s Asylum hackerspace we will gather for “Bring-A-Hack Maker’s Asylum” to talk about our passion for making and hacking. We’ll discuss the 2015 Hackaday Prize which offers $500,000 in prizes for hackers who can build solutions to problems faced by a wide-range of people. What does that really mean? That’s one of the topics of the evening. Of course there will be plenty of time to show off your own hacks, ask for advice on difficult projects, and to socialize with everyone that attends. Please visit the event page for all the details.

For all of you who aren’t in the area, I’d like to share with you a little background about hackerspaces in India.

Hacking in India

Hack : “To use something in a way it was not originally intended”. This could sound very familiar when you say that “Hack is the English equivalent of Hindi-Urdu word Jugaad“. So Hacking has a very positive and useful connotation when used in such a context. Everybody does it some time or the other – sometimes unknowingly, but quite often on purpose. It follows that people who Hack be called Hackers – and again, that description is used in a very positive sense.

Sometime around the turn of the 21st century, individual Hackers who up until then used to work in isolation, started congregating together to form clubs and community spaces which came be called – no points for guessing – Hacker Spaces. The movement spread over Europe rapidly and then on to the United States, and slowly to other parts of the world. Hacker Spaces became the breeding grounds for individual innovation. People with bright ideas would seek guidance and peer reviews of their hacks, and if it was interesting enough for the wider community, they would launch themselves as enterprising startups. Hacker Spaces provided the environment, the tools, and a community for people to tinker away and build stuff. In a sense, it is like going back to our enterprising roots before the advent of wide spread industrialization stifled individual entrepreneurship.

Rise of our Hackerspace Culture

Around 2008, when my interest in hacking got revived, I could not find a single Hacker Space in India. It wasn’t until late 2013 that I found another hacker with similar interests who wanted to set up a Hacker Space. When [Vaibhav Chabbra] met me in Ahmedabad during Maker Fest and mentioned that he had set up such a space in Mumbai, I immediately jumped in to help him out. Thus was born Makers’ Asylum. Since then, within a span of just 1 1/2 years, Hacker Spaces have sprung up in Ahmedabad, Surat, Pune, Bangalore, Hyderabad, Chennai, New Delhi, Meerut, and I am sure we will hear about more of them soon in other Cities. The Hacker movement is very much here, and here to stay and grow.


The 2015 Hackaday Prize is sponsored by: