Using A ThinkPad Keyboard Over USB

kbIt doesn’t have buckling springs, Cherry blues, or even the wonderful if forgotten Alps switches, but the keyboard found in ThinkPads has the best keyboard action of any laptop around. They would make a great USB conversion keyboard, but the board to board connector is very hard to find, and no one has yet managed to get the keyboard and track point working as a USB HID device. Until [rampadc] came along, that is.

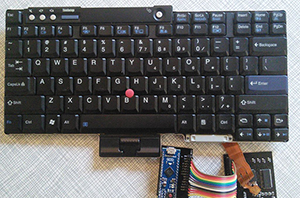
[Rampadc]’s keyboard adapter is built for the ThinkPad T60 keyboard, which is shared between the Lenovo T60, T61, Z60, Z61, R400, R500, T400, T500, and X41 laptops, among many others. The connector is an extremely odd proprietary deal, that can be found through the usual channels for about $5 in quantity 100. On top of this, the keyboard doesn’t have a controller – that’s offloaded to the laptop’s main board. The only electronics in this keyboard is just a matrix. Despite all this, [rampadc] managed to create a breakout board with a decade counter and an SPI GPIO expander.

The board [rampadc] made features one of the proprietary connectors, a few chips, and a receptacle for an Arduino Micro. With just a little bit of code, the old keyboard becomes one of the best portable keyboards in existence, and probably a bit cheaper than the official Lenovo USB-bound ThinkPad keyboard.

[rampadc] has a few of the expansion boards available over on Tindie should you want to build your own. It’s only cost-effective if you have one of these T60 keyboards sitting around in a junk pile; not a likely situation because these machines just don’t die.

Continue reading “Using A ThinkPad Keyboard Over USB”

The Zorkduino

zork

Zork, the famous Infocom text-based adventure game, is actually quite the technical achievement in software engineering. It’s an amazingly large world to explore, albeit in text form only, running on an interpreter that allows paging, loading, and saving the complete state. All this, built to run on computers with meager amounts of RAM in the late 70s. You might think it would be easy to play Zork on an Arduino, but as [rossum] found out, that’s easier said than done (alternate blog link)

While most computers that were capable of running Zork had at least 8k of RAM, if not more, the ATMega328 in the Arduino only has 2k of RAM. Those fancy home computers of yore also had built-in video, a keyboard, and most of the time, a disk drive. The Arduino has none of that.

[Rossum] faced this challenge head on, capitalizing on the onboard hardware of the Arduino. Video is generated by using SPI mode on a UART at top speed – 8 MHz. This just shifts out pixels from the video buffer on an SD card. The keyboard is handled like any other PS/2 keyboard project on the Arduino, and audio is generated by toggling a pin at 1000Hz for a keypress, and 3600Hz for SD card access.

The finished product includes a bunch of other Infocom games on the SD card, including Leather Goddesses of Phobos, and the ability to run Hitchhiker’s Guide to the Galaxy, the game regarded by many as being better than the book. Video below.

Continue reading “The Zorkduino”

A Masterpiece Of 3D Printed Case Modding. With An Ouya.

We’ve seen a few of [Downing]’s portabalized console builds before, but this one is his first build in over two years. That’s a lot of time, and since then he’s picked up a lot of great fabrication techniques, making this one of the best looking portables we’ve ever seen. It’s a repackaging of an Ouya, but we won’t hold that against him, it’s still an amazing piece of work.

In the build log, [Downing] started off this build by using a 3D printed enclosure, carefully milled, filled, and painted to become one of the best one-off console repackagings we’ve ever seen. The speaker and button cutouts were milled out, and an amazing backlit Ouya logo completes the front.

Stuffing the Ouya controller inside a case with a screen, battery, and the console itself presented a challenge: there is no wired Ouya controller. Everything is over Bluetooth. Luckily, the Bluetooth module inside each controller can be desoldered, and slapped on a small breakout board that’s stuffed in the case.

It’s a great build, and in [Downing]’s defense, the Ouya is kinda a cool idea. An idea much better suited to a handheld device, anyway. Videos below.

Continue reading “A Masterpiece Of 3D Printed Case Modding. With An Ouya.”

Finally, A Desktop CNC Machine With A Real Spindle

While cheap hobby CNC mills and routers are great machines that allow you to build things a 3D printer just can’t handle, they do have their limitations. They’re usually powered by a Dremel or other rotary tool, so speed control of the spindle via Gcode is nigh impossible. They’re also usually built with a piece of plywood as the bed – cheap, but not high on repeatability. The Nomad CNC mill fixes these problems, and manages to look good and be pretty cheap, to boot.

Instead of using a Dremel or other rotary tool to cut materials, the Nomad team is using a brushless DC motor connected to a real spindle. With a few certain motors, this allows for closed loop control of the spindle;  Sending S4000 Gcode to the mill will spin the spindle at 4000 RPM, and S6000 runs the spindle at 6000 RPM, whether it’s going through foam or aluminum. This is something you just can’t do with the Dremel or DeWalt rotary tools found in most desktop mills and routers.

Along with a proper spindle, the Nomad also features homing switches, a tool length probe, and a few included fixtures that make two-sided machining – the kind you need it you’re going to machine a two-layer PCB – possible, and pretty simple, too. The softwares controlling the mill are Carbide Motion and MeshCAM, a pretty popular and well put together CNC controller. Of course the mill itself speaks Gcode, so it will work with open source CNC software.

It’s all a very slick and well put together package. Below you can find a video of the Nomad milling out a Hackaday logo.

Continue reading “Finally, A Desktop CNC Machine With A Real Spindle”

ATtiny85 Data Acquisition

85

The folks at Ivmech recently had a need for some new hardware. They needed a small, cheap device able to sense some analog values, toggle a few digital pins, and log everything to a computer. What they came up with is the IViny, an extremely small data acquisition device built around the ATtiny85, capable of logging data to a computer.

The IViny features two digital channels and two 10 bit analog channels, just like you’d find in any ATtiny85 project. Power is supplied over USB, and a connection to a computer is provided by V-USB. There’s also a pretty cool Python app that goes along with the project able to plot the analog inputs and control the digital I/O on the device.

It’s not exactly a fast device – the firmware only supports 100 samples per second, but an upcoming firmware upgrade will improve that. Still, if you ever need to read some analog values or toggle a few pins on the cheap, it’s a nice little USB Swiss army knife to have.

A DIY Atomic Force Microscope

AFM

For looking at really small stuff, an optical microscope will only go so far. Looking at things at the nanometer level, though, usually requires some sort of electron microscope, with all the hassle of vacuum chambers and high voltages. There is another way to investigate the domain of the very small: an atomic force microscope. Unlike their electron spewing brothers, they don’t require high voltages or hard vacuums. They can also be built for about $1000, as [whoand] over on the Instructables shows us.

Instead of shooting light or electrons at an object and picking up the reflections, an atomic force microscope drags a very, very tiny stylus across an object. This stylus is attached to a probe that will reflect laser light off of it into a photosensor, eventually rendering an image on a display. [whoand] is using a laser diode and pickup unit from a DVD-ROM drive for the optical pickup unit, a frame made from soldered together PCBs, and a few piezos to vibrate the probe.

The probes themselves are incredible pieces of engineering with a tip size of a few nanometers. They’re consumable, and expensive, ranging from $20 to $500 per probe. Still, with these probes, [whoand] can look at the pits in a CD or DVD, measure the surface of an eraser, or check out the particulate matter floating around in the atmosphere in Beijing.

Thanks [Rob] for the tip.

Profiling An Arduino

profiling

In proper, high-dollar embedded development environments – and quite a few free and open source ones, as well – you get really cool features like debugging, emulation, and profiling. The Arduino IDE doesn’t feature any of these bells a whistles, so figuring out how much time is spent in one section of code is nigh impossible. [William] came up with a clever solution to this problem, and while it doesn’t tell you exactly how much time is spent on a specific line of code, it’s still a good enough tool to be a great help in optimization.

[William]’s solution is to create a ‘bin’ for arbitrary chunks of code – one for each subroutine or deeply nested loop. When the profiler run, you end up with a histogram of how much time is spent per block of code. This is done with an interrupt that runs at about 1 kHz, with macros sprinkled around the code. Each time the interrupt ticks, the macro runs and increases a counter by one. Let the sketch run for a minute or so, and you get an idea of how much time is spent in a specific area of code.

It’s a bit of a kludge, but when you’re dealing with extremely minimal tools, any sort of help in debugging is sorely needed and greatly appreciated.