Building A Spectrum Analyzer With Parallel Processing

fft

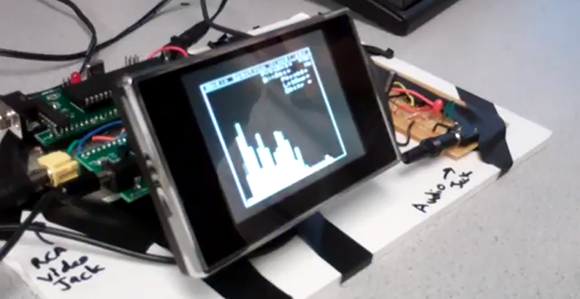
It’s the end of the semester for [Bruce Land]’s microcontroller design class at Cornell, and the projects coming off the workbench this semester look as awesome as any before. For their final project, [Alexander Wang] and [Bill Jo] designed an audio frequency spectrum analyzer using two microcontrollers in a parallel setup.

This spectrum analyzer takes an audio signal from an iPod, phone, or CD player through a 3.5 mm jack and displays the level for dozens of frequency bands much like an audio visualizer in iTunes or a nice car stereo display. To display these frequency bands, the spectrum analyzer first needs to perform a Fast Fourier Transform on the incoming audio signal. While FFT is extremely fast, the calculations are rather hardware intensive; calculating the frequencies and displaying them on a TV would be a bit much even for the ATMega1284 used in the project.

To graph the audio signal on their small display, [Alexander] and [Bill] broke the build up into two parts – one to do the math on the audio, and another to generate the NTSC video signal for the display.

As seen in the video after the break, the spectrum analyzer works wonderfully, and even though it only functions up to 4kHz, it’s more than enough to see what’s going on in most music.

Continue reading “Building A Spectrum Analyzer With Parallel Processing”

Voltage Logger Does It The Right Way

testing

The folks over at Adafruit have been busy designing an LED matrix wristwatch for a while now. The circuit works great, but since this watch is powered by a coin cell battery, they’d really like to get the power consumption as low as possible. This means they needed a test rig to measure the consumption of each firmware revision, but how exactly do you build a voltage logger that works with voltages and currents this small? It turned out to be a very interesting project, with plenty of info on how to build an accurate voltage logger for really small projects.

Continue reading “Voltage Logger Does It The Right Way”

Hackaday Links: December 5, 2012

PS1 hombrew competition

code

The PlayStation Development Network is hosting a six-month long competition to develop homebrew games for the original PlayStation.We don’t get many homebrew games for old systems in our tip line, so if you’d like to show something off, send it in.

This is how you promote a kickstarter

snes

[Andy] has been working on an SNES Ethernet adapter and he’s finally got it working. Basically, it’s an ATMega644 with a Wiznet adapter connected to the second controller port. The ATMega sends… something, probably not packets… to the SNES where it is decoded with the help of some 65816 assembly on a PowerPak development cartridge. Why is he doing this? To keep track of a kickstarter project, of course.

What exactly is [Jeri] building?

jeri

[Jeri] put up an awesome tutorial going over the ins and outs of static and dynamic flip-flops. There’s a touch of historical commentary explaining why dynamic registers were used so much in the 70s and 80s before the industry switched over to static designs (transistors were big back then, and dynamic systems needed less chip area). At the end of her video, [Jeri] shows off a bucket-brigade sequencer of sort that goes through 15 unique patterns. We’re just left wondering what it’s for.

Finally, a camera for the Raspberry Pi

camera

In case you weren’t aware, the camera board for the Raspberry Pi will be released sometime early next year. Not wanting to wait a whole month and a half, [Jouni] connected a LinkSprite JPEG serial camera to his Raspberry Pi. The whole thing actually works, but [Jouni] didn’t bother posting the code. Maybe we can encourage him to do so?

Blatant advertising? Yes, but fireballs

Nintendo gave [MikenGary] a Wii U and asked them to make a film inspired by 30 years of Nintendo lore and characters. They did an awesome job thanks in no small part to Hackaday boss man [Caleb](supplied the fire), writer [Ryan] (costume construction) and a bunch of people over at the Squidfoo hackerspace.

RC Car Transforms Into RC Robot

Transformer

After nearly 30 years since the first episode of Transformers aired, someone has finally done it. A company named Brave Robotics out of Japan has created a true transformer robot that is half remote control car and half remote control bipedal robot.

According to the Brave Robotics’ site, this creation is the result of more than 10 years. In 2002, the first version of the Transform Robot was completed – a relatively simple affair that transformed but couldn’t walk or drive. Over the last 10 years, the prototypes have seen incremental improvement that included a drive system for the wheels, a steering mechanism, and even the ability to move its’ arms and shoot plastic darts.

Surprisingly, you can actually buy one of Brave Robotics’ transforming robots for ¥1,980,000 JPY, or about $24,000 USD. A little pricy but we’re sure we’ll see a few more transforming robots in the future.

Check out a few more videos of the Brave Robotics transform robot after the break.

Continue reading “RC Car Transforms Into RC Robot”

An Introduction To Vector Displays

clock

Unlike the CRTs found in big old televisions, vector displays are a bit of a historical oddity. Instead of sweeping an electron beam across the screen from left to right and top to bottom, a vector display draws lines between two points on a screen. Once used in arcade games such as AsteroidsTempest, and old FAA displays, vector monitors have fallen out of favor due to either the complexity or difficulty in acquiring the needed CRT. The folks over at NYC Resistor put up a great tutorial for getting a vector display up and running, and even managed to put a clock on an oscilloscope.

The key component of getting a vector display to work is the digital to analog converter. This DAC takes voltages from eight pins on a Teensy 2.0 dev board and converts them to a voltage anywhere in between 0 and 5 Volts. After connecting the output of this DAC to an input on an oscilloscope, the microcontroller can draw a line between any two points on an axis.

In the video after the break, you can see two of these DACs connected to an oscilloscope displaying a clock. It’s a very cool piece of work, and something that finally gives a purpose to the ancient CRT oscilloscope you might have lying around.

Continue reading “An Introduction To Vector Displays”

Syncing Two Strands Of G35 Christmas Lights

Lights

For a few years now, the set of Christmas lights most wanted by hackers and makers the world over is the GE G35 color changing set. With 50 individual RGB LEDs controlled by a microcontroller, these light strings can display any pattern of lights with the help of something as simple as an Arduino. The stock light sequences are a little problematic, especially if you’re running more than one string.

[Todd] picked up two G35 strings, and even when they’re turned on at the same time the light sequences slowly go out of sync after a half hour or so. He came up with a great way to make sure these lights stay in sync that requires only a slight modification. To make two light strings stay in sync, it’s simply a matter of disconnecting the data line from one string’s controllers and bridging that connection with the other string.

It’s a very easy modification, but it won’t give you twice as many individually controllable LEDs – for that, you’ll have to use either multiple Arduinos or buy a longer RGB LED strip. Still, having two identical 7×7 LED panels is better than a single panel, so we’ll have to tip our hat to [Todd] for this one.

Cute Little Amplifier Has A Tube Pre

tube

While you won’t catch us in an argument with an audiophile regarding the sound quality of tube vs. solid state amps, there is a general consensus that tube amplifiers sound much better than their transistorized brethren. Actually building an all-tube amplifier, though, is a bit harder than one built around common ICs – there are transformers to deal with and of course very high voltages. One solution to get the sound of tubes easily but still retaining the simplicity of integrated circuits is a hybrid amp, or a tube preamplifier combined with a solid state power section. They’re easy enough to build as [Danilo] shows us with his hybrid tube amp design (Italian, translation).

[Danilo]’s design uses two ECC86 for the left and right channels powered by a 12 Volt supply. Each channel is sent through a tube and then amplified by a TDA2005 20 Watt power amplifier. After plugging in a CD player, the result is a clear, warm sound that can put a whole lot of power through a speaker.