The Smallest NES Controller Ever

A few months ago, [Ben] saw a video of the world’s largest NES controller. “I bet I could make the smallest,” he thought in a strange game of one-upmanship. Now [Ben] has the smallest fully functional NES compatible controller, a feat of engineering that can only end in very, very sore thumbs.

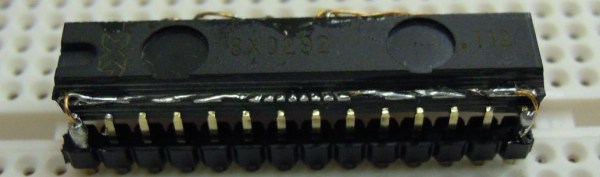
The old NES controller is a very simple device: eight buttons are connected directly to a 4021 shift register. Every time the NES is looking for a change in input, it reads out the data in the shift register and gets the status of all the buttons.

After finding the  smallest footprint 4021 shift register he thought he could solder, [Ben] found some very small SMD push buttons and a very tiny resistor network for the pull ups. The result is tiny, and thanks to the sacrifices of a few NES controller extension cables he found on Amazon, 100% compatible with his old NES.

You can grab all the schematics over on [Ben]’s git. Tip ‘o the hat to [Troy] for sending this one in.

Turning A 600 Mil Chip To 300 Mil

We’ve seen a few builds featuring NXP’s LPC1114 microcontroller before. This chip – the only breadboard friendly ARM microcontroller available – comes in a ‘still a little too large for prototyping’ 600 mil, 28 pin package. We won’t hazard a guess why NXP chose this rather large package, but the good news is it’s possible to shave this chip down to the more common 300 mil, 28-pin package used by AVRs and PICs.

In the video tutorial of this procedure, the chip is first taped down to a desktop CNC mill. 150 mil on each side of the die are removed, exposing the very cool-looking pattern of leads coming out of the chip. This isn’t enough area to solder, so the chip had to be further milled to expose some of the internal wiring.

After soldering everything to a set of pins, the new 300 mil package is covered in epoxy putty, milled down again into a nice cube shape and painted. Yes, the modified chip does work, and no, we can’t figure out why NXP chose a 600 mil package for this microcontroller over the far more common 300 mil chip.

Video after the break. Tip ‘o the hat to [Ian] for sending this one in.

Continue reading “Turning A 600 Mil Chip To 300 Mil”

Discrete FPGA Will Probably Win The 7400 Logic Competition

For this year’s 7400 logic competition, [Nick] decided to build an FPGA out of logic chips (Internet Archive cached version).

Perhaps a short explanation is in order to fully appreciate [Nick]’s work. The basic component of an FPGA is a slice, or cell, that performs boolean operations on its input and sends the result on its output. The core of these slices is a lookup table – basically a truth table that stores the result of every possible input combination.

One very easy way to implement a lookup table is to use a RAM or EEPROM chip. By tying the address lines of an EEPROM to the input and the data lines to the output, it’s possible to create a single slice of an FPGA very easily.

Unfortunately for [Nick], 74-series memories have long been out of production. There is another option open, though: shift registers. A shift register is basically an 8-bit memory chip with parallel inputs, so combining a shift register with an 8-input multiplexer is a very simple way to implement a 3-input, 1-output FPGA slice.

After figuring out how to tie these slices to bus lines, [Nick] needed a way to program them. Verilog or VHDL would border on insanity, so he wrote his own hardware description language. It’s certainly not as powerful or capable as the mainstream solutions to programming an FPGA, but it’s more than enough.

In the video after the break, you can see [Nick]’s overview of his very large 8-slice FPGA while he runs a combination lock and PWM program. All the code, schematics, and board layout are up on [Nick]’s git if you’d like to build your own.
Continue reading “Discrete FPGA Will Probably Win The 7400 Logic Competition”

Computer Tracking Of Billiard Balls

The folks at the London-based startup GoCardless have a pool table at their office. Being the techies they are, they decided to build a system that automatically scores games. The results, while not fully complete, are still pretty impressive for something whipped up during a 48 hour hackathon.

The automated score keeper uses a webcam duct taped to the ceiling right above the center of the pool table, The balls – red and yellow balls replace the rainbow of solids and stripes to make things easier – are found using OpenCV.

This build isn’t quite finished yet. The people at GoCardless are looking to improve the accuracy of their setup by using a camera with a higher frame rate and possibly moving on to physics simulation to predict where the balls should be. If these guys get the time, they could add something like augmented reality pool table to improve shot accuracy.

Vidia after the break.

Continue reading “Computer Tracking Of Billiard Balls”

PWM On The Stellaris Launchpad

[Joonas] has been following TI’s ‘getting started’ tutorials for their new Stellaris Launchpad. Everything had been going swimmingly until [Joonas] reached the fourth tutorial on interrupts. To the ire of LEDs the world over, implementing PWM on the new Stellaris Launchpad is a somewhat difficult task. After banging his head against the documentation for hours, [Joonas] finally cracked his PWM problem and decided to share his discoveries with the world.

The Stellaris has a PWM mode for its six hardware timers, but unfortunately there are no PWM units on the chip. Solving this problem required making two 16-bit timers out of a single 32-bit one. This allowed [Joonas] to specify a ‘load’ and ‘match’ value.

After coding this up, [Joonas] discovered the PWM timer only works on two of the Launchpad’s pins. Hours of Googling later, he had real PWM on his Stellaris Launchpad.

Given the amount of time [Joonas] spent on this problem, we’re glad to help all the other frustrated Stellaris tinkerers out there by sharing this.

DIY Spot Welder Makes Metalwork Easy

At Hackaday, we’ve seen enclosures built out of just about every material. From wood, glass, epoxy resin, plastic, and even paper, all these different types of enclosures provide some interesting properties. Sometimes, though, you need an enclosure made out of metal and welding together steel cases isn’t exactly easy or cheap. [manekinen] came up with a really great solution to the problem of welding together sheet metal. It’s a very easy to build spot welder perfect for fabbing steel cases.

The core of the build is a transformer pulled from a Technics stereo amplifier. [manekinen] removed the stock secondary winding and rewound the transformer four turns of 35mm ² wire (about 2 AWG). This made the transformer put out 2.6 Volts a 1 kA – more than enough to weld 22 ga sheet.

For the control mechanism, [manekinen] put a limit switch on the electrode arm and wired that to a timer. A knob on the front of the welder allows him to vary the time the welder is on from 0 seconds to 4 seconds.

The results are fantastic – trying to rip apart a weld only results in the metal itself tearing; exactly what you want to see in a welder. It’s a great build made even more fantastic by the welder building its own enclosure.

Continue reading “DIY Spot Welder Makes Metalwork Easy”

Extracting Data With Keyboard Emulation

A common challenge for computer security specialists is getting data out of a very locked-down system. Of course all network traffic on these test machines is monitored, and burning a CD or writing to a USB Flash drive is out of the question. Where there’s a will there’s a way, so [András] figured out how to extract data from a computer by emulating a keyboard.

Emulating a USB HID device is nothing new; the newest Arduino can do it, as can any AVR with the help of V-USB. [András]’s build emulates a USB keyboard that can download data from a computer by listening to the NUM, CAPS and SCROLL lock LEDs.

Of course, [András] first needs an app to transmit data through these keyboard status LEDs. To do this, his build carries with it a Windows executable file on the AVR’s Flash memory. After plugging his device into the computer, it writes this program to disk and is then able to send data out through keyboard status LEDs.

It’s not very fast – just over one byte per second – but [András] did manage to extract data from a computer, circumventing just about every anti-leaking solution.