Raspberry Pi Server Cluster In 1U Rack-Mount Case

[Paul Brown] wants to take advantage of off-site server colocation services. But the providers within [Paul]’s region typically place a limit of 1A @ 120V on each server. Rather than search out commercial low-power solutions, [Paul] embraced the hacker spirit and built his own server from five Raspberry Pi 4b single board computers.

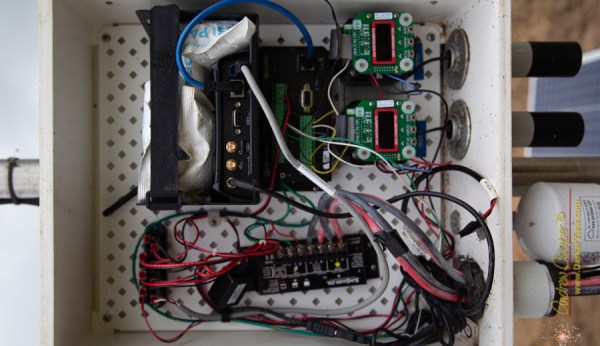
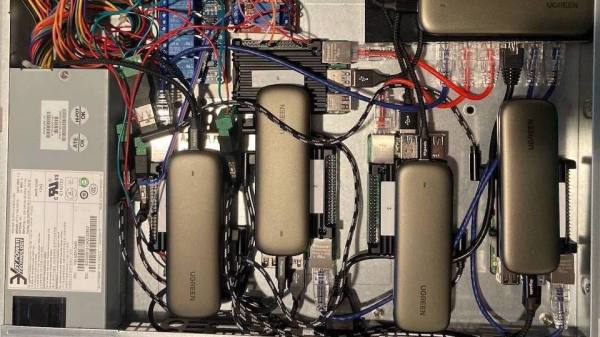
The task involves a little bit more than just mounting five Pi4s in a chassis and calling it done. There is an Ethernet switch connecting all the modules to the network, and each Pi has a comparatively bulky SSD drive + enclosure attached. By far the most annoying part of the assembly is the power supply and distribution cabling, which is further complicated by remote controlled power switching relays (one of the computers is dedicated to power management and can shut the other four modules on and off).

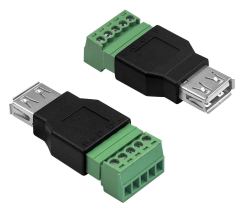
Even if you’re not planning on building your own server, check out the thoroughly documented assembly process and parts list — we particularly liked the USB connector to screw terminal breakout connector that he’s using for power distribution. For all the detailed information, assembly instructions and photos, we think a top-level block diagram / interconnection drawing would be very helpful for anyone trying to understand or replicate this project.

There are a lot of connections in this box, and the final result has a messy look-and-feel. But in fairness to [Paul]’s craftsmanship, there aren’t many other ways to hook everything together given the Raspberry Pi form-factor. Maybe a large and costly PCB or using CM4 modules instead of Raspberry Pi boards could help with cable management? In the end, [Paul] reckons he shelled out about $800 for this unit. He compares this expense with some commercial options in his writeup, which shows there are some cheaper and more powerful solutions. But while it may be cheaper to buy, we understand that strong urge to roll your own.

We’ve written about many Pi cluster projects in the past, including this one which contains a whopping 750 Raspberry Pis. Have you ever used a colocation service, and if so, did you use a DIY or an off-the-shelf server?

SOL75 Uses AI To Design Standard Mechanical Parts

[Francesco] developed a parametric design tool called SOL75 which aims to take the drudgery out of designing the basic mechanical parts used in projects. He knows how to design things like gears, pulleys, belts, brackets, enclosures, etc., but finds it repetitive and boring. He would rather spend his time on the interesting and challenging portions of his project instead.

The goal of SOL75 is to produce OpenSCAD and STL files of a part based on user requirements. These parameters go beyond the simple dimensional and include performance characteristics such as peak stress, rigidity, maximum temperature, etc. The program uses OpenSCAD to generate the geometries and a core module to evaluate candidate designs. In an attempt to overcome the curse of dimensionality, [Francesco] has trained an AI oracle to quickly accept or reject candidate solutions.

In the realm of parametric design aids, you have projects like NopSCADlib which dimensionally parameterize a large collection of common objects by numbers alone ( a 100 cm long, 6.35 mm diameter brass tube with 1.22 mm wall thickness ) or industry standard specifications ( a 10 mm long M3 socket head cap screw ). This approach doesn’t take into account whether the object will hold up in your application nor does it consider any 3D printing issues. At the other extreme, there are the generative design and optimization tools found in professional packages like Fusion 360 and SolidWorks which can make organic-looking items that are optimized precisely for the specified conditions.

SOL75 seems to fall in the middle, combine characteristics of both approaches. It gives you the freedom to select dimensional parameters and performance requirements, yet bounds the solution space by only offering objects that have been prepared ahead of time by domain experts — if you ask for an L-bracket, you’ll get an L-bracket and not something that looks like a spider web or frog leg.

Once you compile the design, SOL75 generates the OpenSCAD and/or STL files and a bill of materials. But wait — there’s more– it also makes a thorough design handbook documenting the part in great detail, including the various design considerations and notes on printing. Here is a demonstration link for an electronics enclosure which is pretty interesting. There is also an example of using SOL75 to make a glider, which you can read about on the Hackaday.io project page.

For now, [Francesco] has only made SOL75 available in a register-by-email online Beta version, as he’s still undecided on what form the final version will be. Do you have any success (or failure) stories regarding generative designs? Let us know in the comments below.

Samsung Shuttering Original SmartThings Hubs

Samsung is causing much angst among its SmartThings customers by shutting down support for its original SmartThings home automation hub as of the end of June. These are network-connected home automation routers providing Zigbee and Z-Wave connectivity to your sensors and actuators. It’s not entirely unreasonable for manufacturers to replace aging hardware with new models. But in this case the original hubs, otherwise fully functional and up to the task, have intentionally been bricked.

Users were offered a chance to upgrade to a newer version of the hub at a discount. But the hardware isn’t being made by Samsung anymore, after they redirected their SmartThings group to focus entirely on software. With this new dedication to software, you’d be forgiven for thinking the team implemented a seamless transition plan for its loyal user base — customers who supported and built up a thriving community since the young Colorado-based SmartThings company bootstrapped itself by a successful Kickstarter campaign in 2012. Instead, Samsung seems to leave many of those users in the lurch.

There is no upgrade path for switching to a new hub, meaning that the user has to manually reconnect each sensor in the house which often involves a cryptic sequence of button presses and flashing lights (the modern equivalent of setting the time on your VCR). Soon after you re-pair all your devices, you will discover that the level of software customization and tools that you’ve relied upon for home automation has, or is about to, disappear. They’ve replaced the original SmartThings app with a new in-house app, which by all accounts significantly dumbs down the features and isn’t being well-received by the community. Another very popular tool called Groovy IDE, which allowed users to add support for third-party devices and complex automation tasks, is about to be discontinued, as well.

Continue reading “Samsung Shuttering Original SmartThings Hubs”

Peeking Inside A Volcano Sensor

On a recent walk through the Hawaii Volcanoes National Park, [Andrew Cooper] stumbled upon an unlocked monitoring station. Being an engineer, he couldn’t resist taking a look. This station is one of a network of sulfur dioxide (SO2) monitoring stations installed around the park to keep an eye on volcanic emissions. Unsurprisingly, sulfur dioxide is unhealthy to breathe. Sensors like these keep people informed about local conditions before taking their strolls among the volcanic foothills, enjoying gorgeous vistas as [Andrew] describes it.

[Andrew] wasn’t particularly surprised at the contents of the station, since he builds similar equipment in his day job. Continuous power is provided by lead acid batteries kept charged by an array of three mis-matched solar panels. There are duplicate SO2 monitors, an air particulate meter, and a standard weather station affixed to the top. Data is logged on-site and reported up the chain by a cell-phone modem. [Andrew] wasn’t impressed with the workmanship, noting:

It appeared as if the circuits were wired by a ham-handed grad student with no sense of pride in their work.

Continue reading “Peeking Inside A Volcano Sensor”

Human-Following Utility Trailer

[Théo Gautier] thought that a human-following utility trailer would be helpful for people working on farms. He didn’t just think about it, however, he designed and built it as a final project at the Agrilab FabAcademy at the University UniLasalle Polytechnique in northern France. He took the idea from concept to fruition in six weeks.

His build log documents the project very well, and takes you through his design choices and their implementation. The brains of the cart are a SAMD21E board that he made himself, and its sensory perception of the world is provided by HC-SR04 ultrasonic sensors and a PixyCam 2. Locomotion is provided by four each 100W DC motor / gearbox assemblies. He’s put a lot of effort into the construction process and posted a lot of photos of the intermediate steps. One piece of advice that caught our eye was to measure the diagonals of your frame repeatedly when welding it together — things can and do shift around. If you don’t, you may have to rectify the mistake like [Théo] did, with a big hammer.

Continue reading “Human-Following Utility Trailer”

CAN Bus Wireless Hacking / Dev Board

[Voltlog] has been hacking away at the CAN bus console of his VW Golf for quite some time now. Presumably, for his projects, the available CAN bus interface boards are lacking in some ways, either technically and/or price. So [Voltlog] designed his own wireless CAN bus hacking and development module called the ESP32 CanLite (see the video below the break). The board was tailored to meet the needs of his project and he claims it is not a universal tool. Nevertheless we think many folks will find the features he selected for this module will be a good fit for their projects as well.

In his introduction of the design, he walks through the various design decisions he faced. As the project name suggests, he’s using the ESP32 as the main controller due to it’s wireless radios and built-in CAN controller. The board is powered from the car’s +12V power, so it uses a wide input range ( 4 to 40 V ) switching regulator. One feature he added was the ability to switch automotive accessories using the ST VN750PC, a nifty high-side driver in an SO-8 package with integrated safety provisions.

The project is published as open source and the files can be pulled from his GitHub repository. We noticed the debug connector labeled VOLTLINK on the schematic, and found his description of this custom interface interesting. Basically, he was not satisfied with the quality and performance of the various USB-to-serial adapters on the market and decided to make his own. Could this be a common theme among [Voltlog]’s projects?

A word of warning if you want to build the ESP32 CanLite yourself. While [Voltlog] had intentionally selected parts that were common and easy to purchase when the project began, several key chips have since become nearly impossible to obtain these days due to the global parts shortage issue (it’s even out of stock on his Tindie page).

If you want to dig deeper into CAN bus hacking, check out this talk that we wrote about back in 2016. Do you have any favorite CAN bus development boards and/or tools? Let us know in the comments below.

Continue reading “CAN Bus Wireless Hacking / Dev Board”

DIY Forth On Arduino

On a recent rainy afternoon, [Thanassis Tsiodras] decided to build his own Forth for the Arduino to relieve the boredom. One week of intense hacking later, he called it done and released his project as MiniForth on GitHub. [Thanassis] says he was inspired by our series of Forth articles from a few years back, and his goal was to build a Forth interpreter / compiler from scratch, put it into a Blue Pill microcontroller. That accomplished, he naturally decides to squeeze it into an Arduino Uno with only 2K of RAM.

Even if you are ambivalent about the Forth language, [Thanissis]’s project has some great ideas to check out. For example, he’s a big proponent of Makefile automation for repetitive tasks, and the project’s Makefile targets implements almost every task needed for development, building and testing his code.

Some development and testing tasks are easier to perform on the host computer. To that end, [Thanassis] tests his programs locally using the simavr simulator. The code is also portable, and he can compile it locally on the host and debug it using GDB along with Valgrind and AddressSanitizer to check for memory issues. He chose to write the program in C++ using only zero-cost abstractions, but found that compiling with the ArduinoSTL was too slow and used too much memory. No problem, [Thanassis] writes his own minimalist STL and implements several memory-saving hacks. As a final test, the Makefile can also execute a test suite of Forth commands, including a FizzBuzz algorithm, to check the resulting implementation.

Here’s a short video of MiniForth in action, blinking an LED on an UNO, and the video below the break shows each of the various Makefile tasks in operation. If you want to learn more, check out Elliot Williams’s Forth series which inspired [Thanassis] and this 2017 article discussing several different Forth implementations. Have you ever built your own compiler? Let us know in the comments below.

Continue reading “DIY Forth On Arduino”