Fran Finds Four Foot Alphanumeric Displays From 1910

Video blogger and display technology guru [Fran Blanche] has discovered a splendid retro-tech alphanumeric display from 1910. (Video, embedded below.)

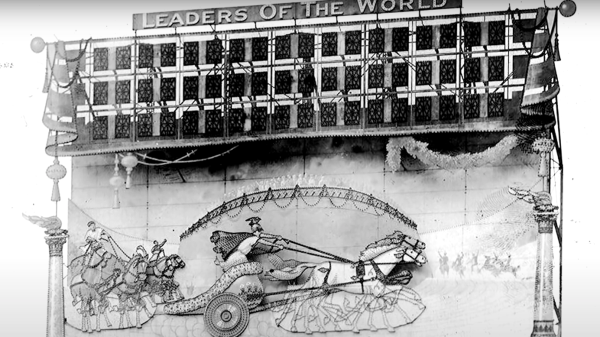
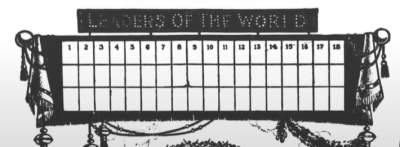
We have always enjoyed her forays into old and unusual displays, including her project researching and reverse engineering an Apollo DSKY unit. This time [Fran] has dug up an amazing billboard from the early 20th century. It was built by the Rice Electric Display Company of Dayton Ohio, and operated in Herald Square for about two years. Requiring $400,000 in 1910-US-dollars to build, this was clearly an Herculean effort for its day and no doubt is the first example of selling advertising time on a computer-controller billboard. It boasts characters that are about 1.3 m tall and 1 m wide which can display letters, numbers, and various punctuation and symbols. These are arrayed into a 3-line 18-character matrix that is about 27 x 4 meters, and that’s up only a third of the total billboard, itself an illuminated and dynamic work of art.

Diagram Depicting the 3×18 Character Display

There are quite a few tantalizing details in the video, but a few that jumped out at us are the 20,000 light bulbs, the 40 Hz display update rate, the 150 km of wire used and the three month long installation time. We would really like to learn more about these two 7.5 kW motorized switch controllers, how were they programmed, how were the character segments arranged, what were their shapes?

In the video, you can see triangles arranged in some pattern not unlike more modern sixteen segment displays, although as [Fran] points out, Mr Rice’s characters are more pleasing. We hope [Fran] can tease out more details for a future video. If you have any ideas or knowledge about this display, please put them in the comments section below. Spoiler alert after the video…

Continue reading “Fran Finds Four Foot Alphanumeric Displays From 1910”

Door Mutes Microphone To Prevent Remote Learning Humiliation

In a kind of reverse twist on the doorbell, [TheStaticTurtle] whipped up a system to mute his computer’s microphone whenever someone opens the door to his room. He lives in France, where the government announced a strict lockdown last Friday. Like many university students around the world these days, he is now forced to take online classes. Even though he has his own room, occasionally someone will barge in and announce something, often to [TheStaticTurtle]’s embarrassment.  When his classmates suddenly heard “Do you want some pie?” the other day, it was the last straw.

His first decision was to sense the door opening with a magnet and sensor, which he stuck to the door and frame with hot glue. He then ran a long cable to his desk, where it connected to an ATTiny 85 with a DigiSpark boot-loader. He wrote firmware to simulate special key combinations, which were then registered with his audio routing software Voicemeeter Potato. We presume he isn’t using an external mic, in which case muting might have been easier to accomplish with a hardware switch. All in all, this is a pretty clever and timely hack. Should you be in a similar predicament and want to try this out, he’s published the source code on GitHub.

Continue reading “Door Mutes Microphone To Prevent Remote Learning Humiliation”

Wearable Sensors On Your Skin

An international team at Penn State led by [Larry Cheng] made a breakthrough in printing sensors directly on skin without heat. The breakthrough here is the development of a room-temperature sintering technique. Typical sintering of copper happens at 300 C, and can be further lowered to 100 C by adding nanoparticles. But even 100 C is too hot, since skin starts to burn at around 40 C.

You can obtain their journal article if you want the details, but basically their technique combines the ingredients in peelable face masks and eggshells. With this printed circuit is applied to the skin, the sintering process only requires a hair dryer on the cool setting, and results can bend and fold without breaking the connections. A hot shower will remove the circuit without damaging the circuit or your skin. [Larry] says the circuits can be recycled.

They are using these sensors to monitor temperature, humidity, blood oxygen levels, and heart performance indicators. They’ve even linked these various on-body sensors with a WiFi network for ease of monitoring. After reading this report, we’re left wondering, if the sensor is directly on your skin, can it be really called wearable?

We’ve written about printable inks before, but for printed circuit board applications.  We can’t help but wonder if this technology would help solve some problems inherent in that technology, as well. Thanks to [Qes] for the tip.

Open Source Lego Controller

A mechanical and manufacturing engineer by day, [Tyler Collins] taught himself electronics and firmware development in his spare time and created an open source Lego controller called Evlōno One. It is based on the STM32 and Arduino ecosystems, and compatible with a impressive variety of existing Lego controllers, sensors and actuators. [Tyler] encountered Lego Mindstorms while helping in an after-school program, and got to wondering whether he could make a more flexible controller. We’d have to say he succeeded, and it’s amazing how much he has packed into this 4 x 4 single-height brick format.

The Evlōno One is based on an ESP32 dual-core MCU, and has WiFi, Bluetooth, and an IR transmitter for wireless connectivity. It also boasts USB-C power delivery, three motor controllers, speakers, LEDs and a button. Dig through the Kickstarted page for more details on these interfaces and specifications. Both the firmware and the hardware will be published as open source on GitHub.

Although [Tyler] has the prototypes all running, he notes this is his first big production effort. FCC certification testing and production mold tooling are the two biggest items driving the scheduled Feb 2021 shipments. If computer driven Lego modeling is one of your hobbies, definitely check out [Tyler]’s project. And if you missed our [Daniel Pikora]’s FOSSCON 2018 presentation about the intersection (collision) of Legos and Open Source, our article must-read for you folks in the Adult Fan of Lego (AFOL) community.

Continue reading “Open Source Lego Controller”

Building Walks With Robot Legs

The Shanghai Evolution Shift company has just pulled off one of the most impressive robotic projects we’ve ever seen – making a building walk using 198 robotic legs. We’ve all seen structural relocation documentaries where large buildings are moved to new locations. This involves jacking up the building and installing a supporting platform on wheels, then carefully towing the building to its new site.

But the T shape of the five story, 7600 ton Lagena elementary school was problematic, and the route to the new site involved taking a curved path and rotating the building. This ruled out the more traditional methods of relocation. Robot legs came to the rescue. It took 18 days for the building to walk 62 meters and rotate 21 degrees to its new home. This project is part of a trend to preserve historic architecture rather than bulldoze everything to make space for modern buildings.

After watching the video below, we think you’ll agree that this is a unique application of robotics and an amazing engineering feat. Disclaimer – don’t try this at home. Thanks to [Chuckz] for sending us this tip.

Continue reading “Building Walks With Robot Legs”

Quick And Simple Milliohmmeter

User [mircemk] presents his “MiliOhm Meter” project which you can build with an Arduino, a handful of common parts from your lab, and a cigar box.  It doesn’t get much simpler than this, folks.  While this is something you won’t be getting calibrated with NIST traceability, it looks like a fun and quick project that’s more than suited for hobbyist measurements.  It’s not only easy to build, the Arduino sketch is less than thirty lines of code.  This is a great learning project, plus you get something useful for your lab when its finished.

We like the creative use of colored tape instead of paint on the project’s box.  If this style suits you, [mircemk] has published several other similar lab instrument projects on his Hackaday.io page, including a frequency meter, an audio spectrum analyzer, and an auto-ranging capacitance meter to name a few.  You might recognize him from some other projects we’ve featured, such as the crazy kinematic arms that set a clock’s hands every minute.

Continue reading “Quick And Simple Milliohmmeter”

How Many Punches Does It Take?

Do you ever wonder just how many punches you have thrown? The answer is going to be different if you happen to use a punching bag as part of your exercise routine. So is the case with the [DuctTapeMechanic] and while restoring an old speed ball punching bag, he decided to combine his passions for sports and electronics by adding a punch counter.

Perhaps most interesting in this build is the method used to monitor the bag. A capacitance proximity sensor most often used for industrial automation is mounted in the wooden base. He just calls it “an NPN capacitive sensor” without mentioning part number but these are rather easy to find from the usual places. It has no problem sensing each punch — assuming you swing strong enough so that the bag comes near the sensor. Two battery packs, an Arduino, and an optocoupler round out the bill of materials. We were a little disappointed not to see any duct tape in the construction of this project, but since the electronics are outside and exposed to the elements, maybe duct tape will be used to install a roof in a future episode.

The [DuctTapeMechanic] likes to repurpose items which would otherwise be thrown away, which is something to be applauded. The frame of this punching bag was welded from a discarded metal bed frame (a regular occupant of crawl spaces and self storage places), and you might remember he repurposed the electric motor from a discarded clothes dryer last month, changing it into a disk sander.

Continue reading “How Many Punches Does It Take?”