Now You’re Washing With Gas

[Michiel] likes to wash his clothes in warm water. Like a lot of machines, his draws from the cold water line and  heats it electrically. Gas is much cheaper than electricity in the Netherlands, so he wanted to be able to heat the water with gas instead. Hot-fill machines already exist, but few models are available and they’re all too expensive.  [Michiel] rolled up his sleeves and hacked his brand new washer into a hot-fill machine.

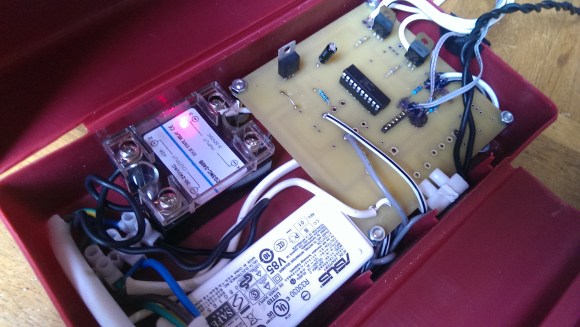
He started out thinking that he’d just connect the hot water line instead, but that proved to be too hot. He found out it needs to be about 35°C (95°F), so he decided to mix input from the hot and cold lines. Since it’s a shiny new machine, [Michiel] wanted an externally mounted system to keep from voiding  the warranty. He got two solenoid valves from the electronic bay and used a PIC16F to make them dance. He wired up a light switch on a two-panel face and used the blank plate for power and status LEDs.

[Michiel]’s design works like a charm. The machine used to draw 2000W to heat the water, and peak usage now is as low as 200W. He noticed that the washer drew a lot of power in standby mode so he added a solid state relay and a bit more code. Now the electricity to the machine is cut after two hours and [Michiel] saves about €97 per year.

Crafternoon: Forget Potatoes, We’re Making Stamps With Lasers

No, that’s not Heisenberg without his hat. It’s [Jens], and he laser-cut a stamp of his face out of EVA foam. He made the laser cutter himself, which we covered a couple of months ago.
Let’s take a brief interlude to discuss your beautiful eyeballs. Keep them safe, okay? If you’re going to play with lasers, be smart and protect yourself according to the wattage and wavelength. Alright, back to business.

[Jens] started by making a stencil from a photo using this tutorial. He added a frame and supports around his face to keep everything where it should be. [Jens] then turned to Inkscape to generate the g-code using the laser plugin and then proceeded to cut his countenance into EVA foam.

After gluing the foam to a wood backing, he cut off the supports. Now it’s ready to stamp. You could use a brayer if you have one or maybe your wife’s rolling pin to apply whatever ink or paint you want to use. [Jens] loaded up his stamp with a sponge.

Don’t Just Go Sticking That Anywhere: Protect The Precious With A USB Wrapper

Oooh, look, a public charging station. Should you trust it? You might get juice jacked. Oh wait, you’ve got a USB Wrapper designed by [Scasagrande] to deny access to your datas.
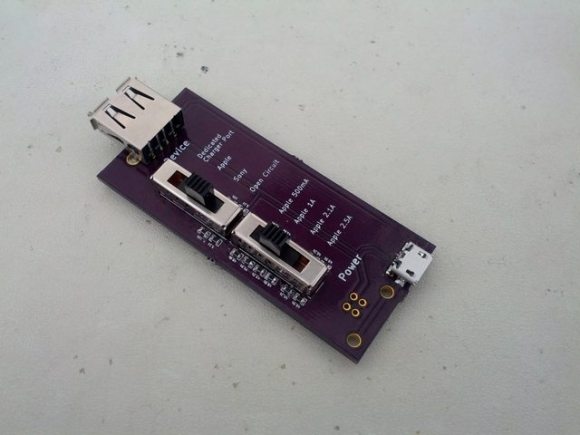
This project was inspired by the USB Condom, but the problem with those is that they completely cut out the data lines and limit the charge rate to USB 2.0 (500mA). The data lines are used to communicate information about the charger’s power sourcing capabilities to the device. Many manufacturers short D+ and D- together, but Apple applies specific voltages to those lines.

[Scasagrande]’s USB Wrapper gives you options. You can set it to Dedicated Charging Port, Sony, Open Circuit, or Apple. The super-cool part of this hack is for you Apple fanboys. The bottom slider lets you emulate any Apple charger and use any USB cube (including one you may have made) as long as you have that funny cable in your messenger bag.  The hardware is open source and available at [Scasagrande]’s repo.

Make the jump to see [Scasagrande]’s nicely detailed video about the project.

Continue reading “Don’t Just Go Sticking That Anywhere: Protect The Precious With A USB Wrapper”

Piezoelectric Crystal Speaker For Clock Radio Is Alarmingly Easy To Make

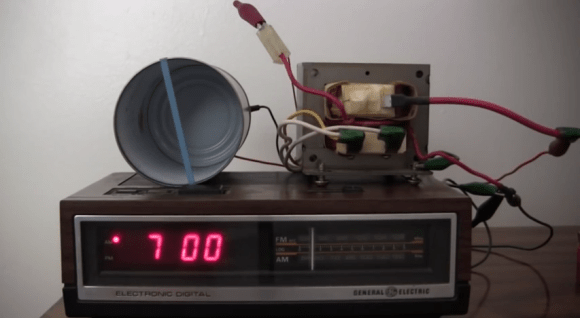
cockadoodledooLet’s face it: most of us have trouble getting out of bed. Many times it’s because the alarm isn’t loud enough to rouse us from our viking dreams. [RimstarOrg]’s homeowner’s association won’t let him keep a rooster in the backyard, so he fashioned a piezoelectric crystal speaker to pump up the volume.
[RimstarOrg]’s speaker uses a Rochelle salt crystal strapped to a bean can diaphragm. In his demonstration, he begins by connecting an old clock radio directly to the crystal. This isn’t very loud at all, so he adds a doorbell transformer in reverse. This is louder, but it still won’t get [RimstarOrg] out of bed.

Enter the microwave oven transformer. Now it’s sufficiently loud, though it’s no fire bell alarm. He also demonstrates the speaker using a piezo igniter from one of those long barbecue lighters and a crystal radio earpiece. As always, the video is after the jump. [RimstarOrg] has a lot of relevant linkage in the summary so you can learn how to grow your own Rochelle crystals.

Continue reading “Piezoelectric Crystal Speaker For Clock Radio Is Alarmingly Easy To Make”

Mug Music Is Good To The Last Drop

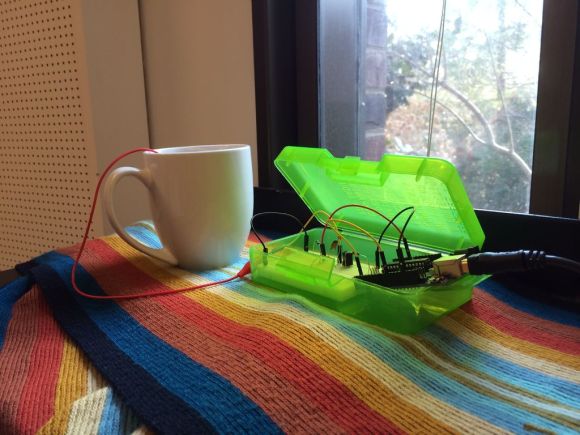
[Bonnie] is majoring in CS at Princeton and minoring in Awesome. She is taking an electronic music class and had to produce a digital instrument for her midterm project. She and her friend [Harvest] came up with Mug Music, which turns a ceramic mug of water into an instrument.
The circuit is very easy to replicate with an Arduino, a coil, and a few resistors and capacitors. [Bonnie] wanted to experiment with Disney Research Lab’s Touché method of touch detection, and Mug Music is based on this Touché for Arduino Instructable. The inputs are turned into MIDI notes with ChucK, a real-time sound synthesis language developed at Princeton.

As you may have guessed and will see in the demonstration video after the jump, you aren’t limited to touching the water. The entire mug will produce sounds as well. [Bonnie] says you can trigger a thunderclap if you touch the water and a grounded surface simultaneously.

This would be a great project to explore with kids, especially as a music therapy vehicle for kids on the autism spectrum. It isn’t as physical as these portable musical stairs, but it may draw less attention from lawyers.

Continue reading “Mug Music Is Good To The Last Drop”

Homemade Ball Mill Tumbles Along Like A Champ

[Mike] enjoys doing all kinds of things with glass. He likes to melt it and fuse it into new things, so it’s perfectly understandable that he wanted to make his own glass. Doing so requires finely ground chemicals, so [Mike] put together this awesome homemade ball mill.

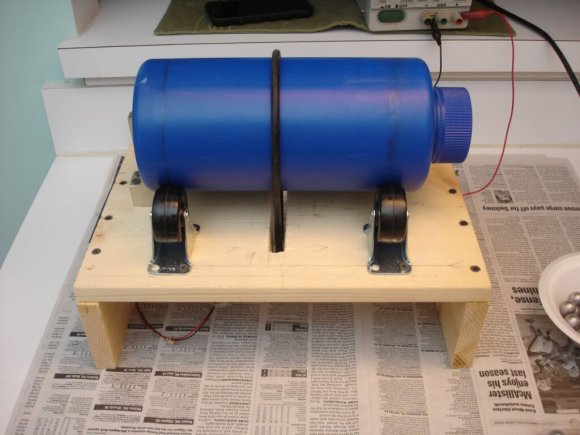
The design is wonderfully simple. The mill is powered by a robust 12VDC motor from a printer that he’s running from a variable power supply in order to fine tune the speed. [Mike] built a scrap wood platform and attached four casters for the drum to spin against. The drum is rotated by a round belt he had lying around from various other projects. [Mike] already had a couple of those blue containers, which formerly held abrasive grit for use in vibratory tumblers.

[Mike] had some trouble with the drum walking off the casters so he attached scrap piece of aluminum to form an end stop. All he had to buy for this project were the 5/8″ steel balls and the casters. The mill can also be used as a rock tumbler, though the bottle isn’t quite water tight as-is. He does not recommend this type of setup for milling gunpowder or other explosives, and neither do we.

Make the jump to see the mill in action and get the grand tour. If you need more tumbling power, use a dryer motor!

Continue reading “Homemade Ball Mill Tumbles Along Like A Champ”

Easily Silkscreen All The Things

Silkscreening isn’t as hard as it might seem. For instance, it’s easier than block printing because you don’t have to reverse the image. [Jimmy DiResta] shows how easy it is to put a silkscreening setup together and print on wood, metal, and, of course, t-shirts.

Once you decide on a design, print it out on an acetate sheet which can be run through a regular household printer. You can buy ready-made meshed frames or even entire kits, but [Jimmy] shows you how to build a simple frame and staple screen mesh to it. After sealing up the edges, mix up some photo emulsion, cover the mesh, and let it dry in a dark room.

When it’s dry, place your acetate on the screen and expose the emulsion using whatever light is available. [Jimmy] built a milk crate tower up to his fluorescent work light and exposed it for about four minutes. Now you’re almost ready to make your mark. Peel off the acetate and remove excess emulsion with a squirt bottle and compressed air. Dry the whole thing with a hair dryer and you’re done. Load up a squeegee with silkscreen ink and draw it from top to bottom with nice, even pressure, and you’ve got yourself a silkscreened thing.

Continue reading “Easily Silkscreen All The Things”